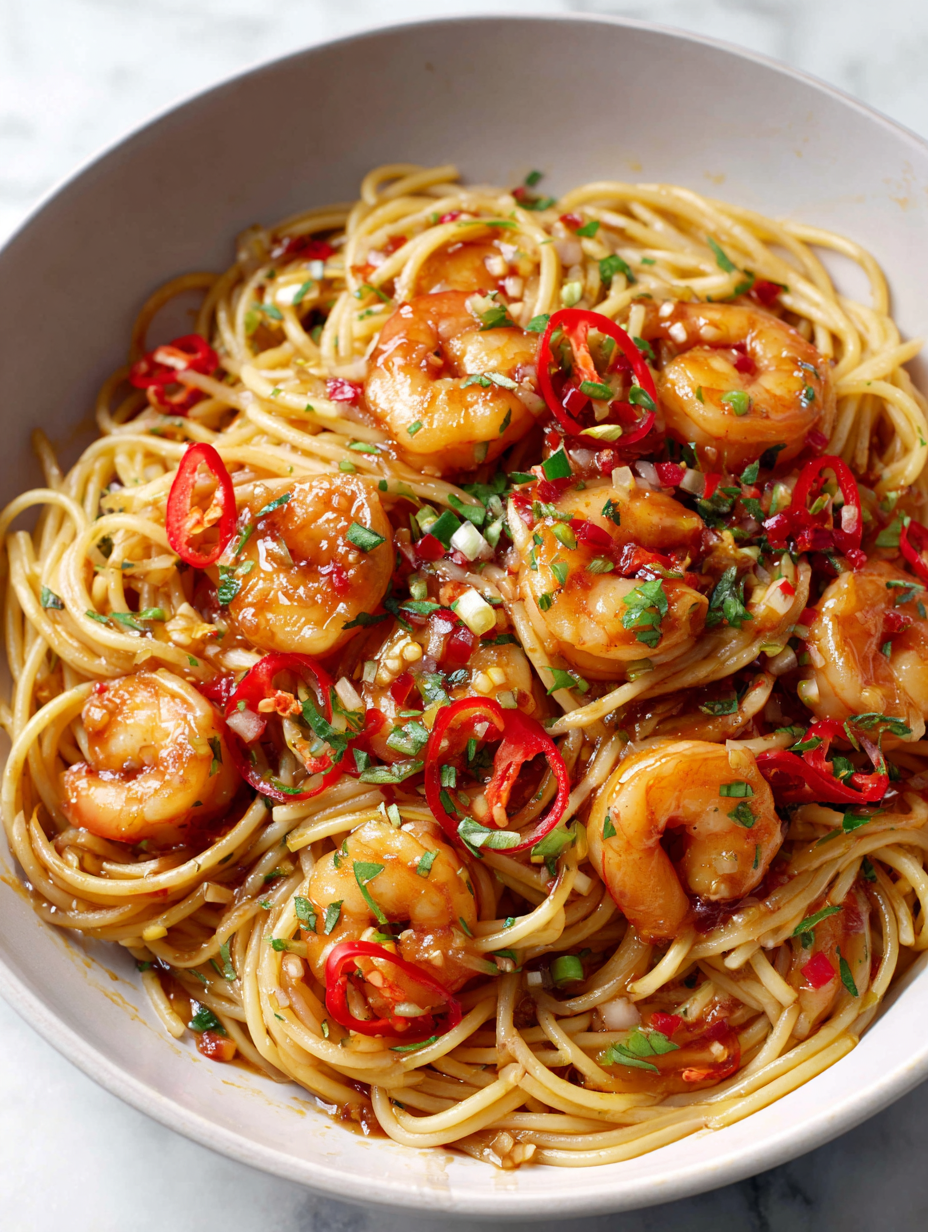
Author: EllaDavis

  • Stuffed Mushrooms Recipe

    Stuffed mushrooms might seem straightforward, but there’s an art to balancing the umami, salt, and brightness that makes them memorable.

    When I first started making these, I realized that the secret isn’t just in the filling but how you treat the mushroom caps beforehand.

    Getting the texture right—crispy edges with a juicy, flavorful inside—takes a little patience and a keen eye for detail.

    The Unseen Art of Balancing Flavors in Stuffed Mushrooms — Focus on the subtle harmony of earthiness, creaminess, and a hint of acidity.

    Why Stuffed Mushrooms Matter to Me

    • I love how versatile they are—can be vegetarian or loaded with bacon.
    • There’s a certain satisfaction in cleaning out the stems and turning them into flavor bombs.
    • The aroma when they bake—garlic, cheese, earthy mushrooms—always pulls everyone into the kitchen.
    • I feel a tiny sense of pride when someone asks for the recipe.

    My Journey with Stuffed Mushrooms

    • A friend brought these to a potluck, and I was hooked by how they balanced earthiness with creamy richness.
    • Since then, I’ve experimented with different cheeses, herbs, and even spicy kicks—always returning to the classic combo.
    • They remind me that simple ingredients, treated well, create real magic.

    A Brief History of Stuffed Mushrooms

    • Stuffed mushrooms have roots in European tapas, where small bites were designed to be shared.
    • The classic filling with Parmesan and herbs dates back to mid-20th-century French cuisine.
    • Mushrooms are naturally umami-rich, making them perfect for savory, satisfying bites.
    • The term ‘stuffed’ in culinary use often relates to small, handheld dishes meant for sharing.

    Ingredient Breakdown & Tips

    • Mushroom caps: Large, sturdy, with a firm texture that holds the filling well. Watch for any slimy or cracked caps.
    • Cream cheese: Brings creamy richness and helps bind the filling. Warm slightly for easier mixing, or swap with Greek yogurt for a tangy twist.
    • Parmesan: Adds sharp, salty depth. Freshly grated is best, but pre-grated works in a pinch.
    • Breadcrumbs: For texture and crunch. Toast lightly for extra flavor, or use crushed nuts as a gluten-free option.
    • Herbs: Parsley and thyme brighten the dish. Fresh herbs provide a vibrant flavor; dried are subtler but still good.

    Spotlight on Mushrooms and Cheese

    Mushrooms:

    • Fresh large mushrooms: Their earthy aroma intensifies when roasted, providing the perfect vessel.
    • They shrink slightly during baking, so choose bigger caps for easier stuffing.

    Cream cheese:

    • Melts into the filling, making it luscious and smooth. Watch for it to brown if overbaked.
    • It’s also a moisture anchor, so don’t skimp on it.

    Ingredient Substitutions

    • Dairy-Free: Use soaked cashews blended with nutritional yeast for a cheesy, nutty flavor.
    • Gluten-Free: Substitute breadcrumbs with crushed gluten-free crackers or almond meal.
    • Vegan: Swap cheese for a plant-based alternative and use flaxseed or chia seeds as binders.
    • Low-Sodium: Use less salt and add a splash of acid—lemon juice or vinegar—to keep flavor lively.
    • Extra Herb: Fresh basil or oregano can replace parsley for a different herbal note.

    Equipment & Tools

    • baking sheet: To hold and bake the stuffed mushrooms
    • small spoon or scoop: For filling the mushroom caps
    • sharp knife: To chop stems finely
    • parchment paper: To prevent sticking and easy cleanup

    Step-by-Step for Perfect Stuffed Mushrooms

    1. Preheat your oven to 180°C (350°F).
    2. Clean the mushrooms gently with a damp cloth; remove stems carefully.
    3. Chop the stems finely, then sauté in olive oil with garlic and herbs until fragrant.
    4. Mix the cooked stems with cream cheese, Parmesan, breadcrumbs, and a pinch of salt and pepper.
    5. Stuff each mushroom cap generously with the filling, pressing it in gently.
    6. Arrange on a baking sheet lined with parchment paper, caps facing up.
    7. Bake for 20 minutes, until the tops are golden and bubbling.
    8. Remove from oven and let rest for 5 minutes before serving.

    Let the mushrooms rest for 5 minutes to allow flavors to meld. Serve warm, garnished with fresh herbs or a squeeze of lemon.

    How to Know It’s Done

    • Filling is creamy but not runny.
    • Tops are golden brown and crisp.
    • Mushrooms are tender but not soggy.

    Stuffed Mushrooms

    These stuffed mushrooms feature large, firm caps filled with a creamy mixture of cream cheese, Parmesan, and finely chopped mushroom stems. Baked until golden and bubbling, they develop crispy edges with a juicy, flavorful inside, offering a perfect balance of earthiness and richness. The dish showcases a simple yet artful combination of textures and flavors, ideal as an appetizer or main course.
    Prep Time 15 minutes
    Cook Time 20 minutes
    Total Time 35 minutes
    Servings: 4
    Course: Main Course
    Cuisine: European
    Calories: 150

    Ingredients
      

    • 8 large large mushroom caps preferably sturdy and firm
    • 4 cloves garlic minced
    • 2 tablespoons olive oil for sautéing
    • 1/2 cup finely chopped mushroom stems
    • 4 oz cream cheese softened for easy mixing
    • 1/4 cup Parmesan cheese freshly grated
    • 1/4 cup breadcrumbs lightly toasted
    • 2 tablespoons fresh parsley chopped
    • to taste salt and pepper for seasoning

    Equipment

    • Baking sheet
    • small spoon or scoop
    • Sharp knife
    • Parchment paper

    Method
     

    1. Preheat your oven to 180°C (350°F) and line a baking sheet with parchment paper.
    2. Gently clean the mushroom caps using a damp cloth, then carefully remove the stems and set them aside.
    3. Finely chop the mushroom stems and set aside.
    4. Heat olive oil in a skillet over medium heat and sauté the chopped stems with minced garlic until fragrant and slightly browned, about 3-4 minutes.
    5. Transfer the sautéed stems and garlic to a mixing bowl, then add softened cream cheese, grated Parmesan, chopped parsley, and season with salt and pepper. Mix until well combined and creamy.
    6. Use a small spoon or scoop to generously fill each mushroom cap with the prepared mixture, pressing it in gently to ensure full coverage.
    7. Arrange the stuffed mushrooms on the prepared baking sheet, caps facing up, and sprinkle the tops with toasted breadcrumbs for added crunch.
    8. Bake in the preheated oven for 20 minutes, until the tops are golden brown and bubbling around the edges.
    9. Remove from oven and let the mushrooms rest for 5 minutes, allowing the flavors to meld and the filling to set slightly.
    10. Garnish with additional chopped parsley or a squeeze of lemon, then serve warm and enjoy the crispy edges and juicy interior.

    Cooking Tips & Tricks

    • Use fresh garlic and herbs for a bright, fragrant filling.
    • Toast breadcrumbs lightly for extra crunch and flavor.
    • Brush mushroom caps with olive oil before baking for a shiny, crisp top.
    • Keep an eye on the oven; tops can brown quickly, so tent with foil if needed.
    • For a smoky twist, add a dash of smoked paprika to the filling.

    Common Mistakes and How to Fix Them

    • FORGOT TO PAT DRY THE MUSHROOMS? Use a paper towel to remove excess moisture, preventing sogginess.
    • DUMPED TOO MUCH CHEESE? Add more breadcrumbs or a splash of milk to balance richness.
    • OVER-TORCHED? Cover with foil and lower the oven temp to 160°C (320°F), then finish baking.
    • UNDERSALTED THE FILLING? Sprinkle a little more salt or add a splash of soy sauce for depth.

    Quick Kitchen Fixes

    • When filling is too runny, stir in more breadcrumbs or grated Parmesan.
    • When mushrooms are soggy, bake at a slightly higher temp for a few extra minutes.
    • Splash a little lemon juice on the filling if it tastes flat.
    • Patch over burnt tops with a sprinkle of fresh herbs and a drizzle of olive oil.
    • Shield the mushrooms with foil if the tops brown too quickly.

    Make-Ahead and Storage Tips

    • Prepare the filling a day ahead; keep covered in the fridge for up to 24 hours.
    • Stuff the mushrooms just before baking to keep the filling fresh and prevent sogginess.
    • Store leftovers in an airtight container in the fridge for up to 2 days.
    • Reheat in the oven at 180°C (350°F) for 10 minutes until bubbly and warm, check aroma and texture.

    10 Practical Q&As About Stuffed Mushrooms

    1. Which mushrooms are best for stuffing?

    Use large, meaty mushroom caps like portobellos or large cremini, so there’s enough space for stuffing.

    2. What do I do with the mushroom stems?

    Chop the stems finely and cook them with garlic and herbs to add flavor to the filling.

    3. What’s in the stuffing?

    Mix cream cheese, Parmesan, breadcrumbs, and herbs for a creamy, crispy filling that holds well.

    4. How long do I bake the stuffed mushrooms?

    Bake at 180°C (350°F) for about 20 minutes, until the tops are golden and bubbling.

    5. How long should I let them rest?

    Let them rest for 5 minutes after baking; this helps the filling settle and makes them easier to serve.

    6. What tools are good for stuffing?

    Use a spoon or small scoop for filling; a silicone spatula helps spread the stuffing evenly.

    7. How should I serve stuffed mushrooms?

    Serve hot, with a squeeze of lemon or a drizzle of good olive oil for extra flavor.

    8. Can I make stuffed mushrooms ahead of time?

    You can prepare the filling ahead and stuff the mushrooms just before baking for convenience.

    9. What are common mistakes and fixes?

    Watch the oven; if tops brown too quickly, tent with foil. If filling is runny, add more breadcrumbs.

    10. How do I keep herbs fresh?

    Use fresh herbs for vibrant flavor; dried herbs tend to be dull and overpowering if not used sparingly.

    This dish is a quiet hero at any gathering—simple but satisfying, with just enough finesse to impress.

    They remind me that good flavors come from respecting each ingredient’s personality and letting them shine together.

  • Vegan Pasta Bake Recipe

    There’s a certain magic in turning simple pantry staples into a warm, cheesy-looking dish that feels like a hug. It’s a recipe born from those busy nights when I want something filling but don’t want to fuss over it.

    The best part? It’s forgiving. You can swap ingredients, add what’s in the fridge, and still end up with something hearty and satisfying, without a lot of clean-up.

    Cooking a comforting vegan pasta bake with a focus on sustainable, everyday ingredients that transform into something special.

    Why this vegan pasta bake matters to me

    • I love how this dish warms up my apartment with its savory aroma.
    • It’s a relief to throw everything together and know it’ll turn out delicious.
    • I feel proud when I see friends enjoy a hearty, vegan meal without missing cheese.
    • This recipe has saved me on many a busy weeknight, quick and satisfying.
    • There’s a nostalgic comfort in the gooey, baked top that reminds me of childhood casseroles.

    Behind the comfort: my pasta bake story

    • I was inspired by a long day and a nearly empty fridge. The smell of garlic and tomato simmering took me back to simpler times.
    • It’s a dish that celebrates improvisation—what you have, what’s fresh, what needs using up.
    • Every time I make it, I feel a little more connected to my kitchen, turning everyday ingredients into something special.

    Trivia and origins of vegan pasta bake

    • This dish is a vegan twist on the classic baked ziti, adapted for plant-based diets.
    • Using nutritional yeast as a cheesy topping became popular among vegans in the 1980s as a cheese substitute.
    • The concept of baking pasta with sauce and cheese dates back to Italian cucina povera, where leftovers were transformed.
    • Vegan cheese options have exploded in variety recently, making dishes like this more indulgent and accessible.

    Ingredient insights and tweaks

    • Pasta: I prefer sturdy shapes like penne or fusilli, which hold sauce well. Swap for gluten-free versions if needed.
    • Tomato sauce: Use a good quality jarred sauce or make your own with ripe tomatoes for a fresh, bright flavor.
    • Vegan cheese: Melty styles work best—think cashew-based or soy-based. Try nutritional yeast for a cheesy umami boost.
    • Vegetables: Bell peppers, zucchini, mushrooms—whatever needs using up. They add flavor, color, and texture.
    • Herbs: Fresh basil or oregano brighten the bake and add a layer of aroma. Dried works in a pinch.

    Spotlight on key ingredients

    Vegan cheese:

    • It melts, stretches, and gives that gooey top. Look for varieties that mimic cheese’s stretch.
    • It can be a bit salty, so adjust your seasoning accordingly.

    Tomato sauce:

    • It’s the base of flavor. A rich, savory sauce balances the dish’s heart.
    • Look for one with a deep, tomato-y aroma and bright color.

    Substitutions to customize your bake

    • Dairy-Free: Choose vegan cheese or nutritional yeast for cheesy flavor without dairy.
    • Gluten-Free: Use gluten-free pasta options to make it accessible for all diets.
    • Fresh Herbs: Swap dried herbs for fresh for a brighter, more aromatic dish.
    • Oil: Use olive oil or a neutral oil depending on flavor preference.
    • Vegetables: Frozen or fresh—just adjust cook time accordingly.

    Equipment & Tools

    • Large pot: Boil pasta
    • Large sauté pan: Cook vegetables and sauce
    • Baking dish (9×13 inches): Bake the assembled dish
    • Wooden spoon or spatula: Mix ingredients
    • Oven mitts: Handle hot dishes

    Step-by-step guide to perfect vegan pasta bake

    1. Preheat your oven to 180°C (350°F). Grab a large pot, fill it with salted water, and bring to a boil.
    2. Cook the pasta until just al dente, about 8-10 minutes. Drain and set aside.
    3. In a large pan, sauté chopped onions and garlic in a splash of oil until fragrant and translucent, about 5 minutes.
    4. Stir in your choice of chopped vegetables, like bell peppers, zucchini, or mushrooms, and cook until tender, about 7-8 minutes.
    5. Mix cooked pasta with the sautéed veggies, then fold in your prepared tomato sauce, vegan cheese, and herbs.
    6. Transfer everything to a baking dish, spread evenly, and sprinkle extra vegan cheese on top.
    7. Bake uncovered for 20-25 minutes, until bubbly and golden on top. Check around 20 minutes to prevent burning.
    8. If the top browns too quickly, cover loosely with foil and continue baking.
    9. Let it rest for 5-10 minutes after baking. This helps the sauce set and makes serving easier.

    Allow the baked pasta to rest for at least 5 minutes before serving. Finish with a sprinkle of fresh herbs if desired.

    How to Know It’s Done

    • The top should be bubbly and slightly golden.
    • The pasta should be tender but not mushy—taste test.
    • The sauce should be thick but not dry—add water if needed.

    Vegan Pasta Bake

    This vegan pasta bake combines cooked pasta with sautéed vegetables and a savory tomato sauce, topped with melty vegan cheese and baked until bubbling and golden. The dish boasts a hearty, comforting texture with a crispy top and tender interior, perfect for busy weeknights or cozy comfort food craving.
    Prep Time 10 minutes
    Cook Time 30 minutes
    Total Time 40 minutes
    Servings: 4
    Course: Main Course
    Cuisine: Italian-inspired
    Calories: 450

    Ingredients
      

    • 8 ounces penne or fusilli pasta sturdy shape that holds sauce well
    • 1 cup tomato sauce preferably a good quality jarred sauce
    • 1 cup vegan cheese melty style like cashew-based or soy-based
    • 1 medium onion chopped
    • 3 cloves garlic minced
    • 1 cup mixed vegetables bell peppers, zucchini, mushrooms, chopped
    • 2 tablespoons olive oil for sautéing
    • 1 teaspoon dried oregano
    • to taste salt and pepper

    Equipment

    • Large pot
    • Large sauté pan
    • Baking dish (9×13 inches)
    • Wooden spoon or spatula
    • Oven mitts

    Method
     

    1. Bring a large pot of salted water to a boil, then add the pasta and cook until just al dente, about 8-10 minutes. Drain and set aside.
    2. Meanwhile, heat olive oil in a large sauté pan over medium heat. Add chopped onions and minced garlic, cooking until fragrant and translucent, about 5 minutes.
    3. Add chopped mixed vegetables to the pan and sauté until tender and slightly caramelized, about 7-8 minutes. Stir occasionally to prevent sticking.
    4. In a large bowl, combine the cooked pasta with the sautéed vegetables, then fold in the tomato sauce and dried oregano. Mix well to evenly coat everything.
    5. Add half of the vegan cheese to the mixture and stir until melted and incorporated.
    6. Transfer the mixture into a greased 9×13 inch baking dish, spreading it evenly with a spatula.
    7. Sprinkle the remaining vegan cheese evenly over the top, creating a gooey, cheesy layer.
    8. Bake uncovered in a preheated oven at 180°C (350°F) for 20-25 minutes, until bubbly and golden on top. Check at 20 minutes to prevent over-browning.
    9. If the top browns too quickly, cover loosely with foil and continue baking. Once done, remove from the oven and let rest for 5-10 minutes.
    10. Serve warm, garnished with fresh herbs if desired. Enjoy the bubbly, cheesy, and hearty vegan pasta bake!

    Tips & tricks for perfect baking

    • FLAVOR: Use smoked paprika or chili flakes to add depth and heat.
    • TEXTURE: Toss pasta in a little olive oil after draining to prevent sticking.
    • TECHNIQUE: Cover with foil halfway through baking to keep moisture in.
    • FLAVOR BOOST: Add a splash of balsamic vinegar or a squeeze of lemon for brightness.
    • TIP: Use a silicone spatula to fold ingredients gently—preserves texture.

    Mistakes and how to fix them

    • FORGOT to salt the pasta water? Add a pinch of salt to the sauce to enhance flavor.
    • DUMPED in cold sauce? Warm it gently on the stove before baking to avoid clumping.
    • OVER-TORCHED the top? Cover with foil and bake longer, or lower the oven temperature.
    • FAILED to pre-cook veggies enough? Sauté longer or chop smaller for quicker cooking.

    Quick fixes for common issues

    • When sauce is too thick, splash in hot water or plant milk and stir.
    • If cheese isn’t melting, increase oven temp slightly or bake uncovered longer.
    • Splash some lemon juice if the dish needs brightness.
    • Patch a burnt top with a sprinkle of fresh herbs and a few more vegan cheese crumbs.
    • Shield over-browning with foil if top caramelizes too fast.

    Make-ahead and storage tips

    • Cook and drain the pasta ahead, store in an airtight container for up to 24 hours.
    • Prepare the sauce and sauté vegetables in advance; store separately for up to 2 days.
    • Assemble the bake and refrigerate, covered, for up to 24 hours before baking.
    • Reheat leftovers in the oven at 180°C (350°F) until bubbly, about 20 minutes, checking for heat and texture.

    10 Practical Q&As About Vegan Pasta Bake

    1. What’s the best baking dish for this?

    Use a sturdy ovenproof dish, like a glass or ceramic baking dish around 9×13 inches, to hold the pasta and sauce comfortably.

    2. How long should I cook the pasta beforehand?

    Pre-cook the pasta until just al dente, about 8-10 minutes, so it doesn’t turn mushy during baking.

    3. Can I skip the vegan cheese?

    Use a good quality vegan cheese that melts well, like cashew-based or soy-based, to get that gooey top.

    4. Why rest it after baking?

    Let the baked dish rest for 5-10 minutes after coming out of the oven to settle and avoid oozy mess.

    5. How to boost flavor without dairy?

    Add a splash of lemon juice or a sprinkle of nutritional yeast for extra flavor and brightness.

    6. My sauce is too thick after baking, what do I do?

    If the sauce thickens too much while baking, loosen it with a bit of hot water or plant milk.

    7. How much water and salt for boiling pasta?

    Use a large pot to boil pasta, ensuring enough water and salt, so the pasta cooks evenly.

    8. How do I know when it’s done?

    Check the bake around 20-25 minutes; the top should be bubbly and slightly golden.

    9. My top is burning, what now?

    Cover with foil if the top browns too quickly, then uncover for the last 5 minutes to crisp.

    10. How long does leftovers last?

    Store leftovers in an airtight container in the fridge for up to 3 days, reheating in the oven for best texture.

    This dish isn’t just about comfort; it’s about making do with what you have and still serving up something hearty. It’s perfect for weeknights or when you want to feed a crowd without stressing.

    Once baked, it’s even better the next day. Just reheat in the oven until it’s bubbly and the top is slightly crisp again.

  • Creamy Vegan Tomato Pasta Recipe

    On a busy weeknight, I found myself craving comfort but also something a little different. I grabbed a handful of ripe tomatoes, some cashews, and a few herbs, thinking—what if I could make a sauce that’s rich and velvety but still plant-based? That’s how this creamy vegan tomato pasta was born, a happy accident in my kitchen.

    It’s not fancy, just honest ingredients turned into something satisfying. I love how the sauce clings to the pasta, the way the basil’s fresh aroma cuts through the richness, and how each bite feels like a little celebration of simple cooking. It’s fast, forgiving, and pretty hard to mess up, which is exactly what I need after a long day.

    From the perspective of a home cook who’s tired of plain tomato sauces, this recipe focuses on how to elevate simple ingredients with a touch of creaminess and depth, making everyday pasta feel special without much fuss.

    Why This Recipe Matters to Me

    • I love how forgiving this recipe is—no stressing about exact timings.
    • It reminds me of summer evenings, with the scent of basil filling the kitchen.
    • I felt proud the first time I got the sauce silky without any dairy—like a little victory.
    • This dish has become my go-to for cozy nights when I want something hearty but healthy.
    • Every time I make it, I appreciate how simple ingredients can turn into something special.

    Inspiration Behind the Creamy Vegan Tomato Pasta

    • I was experimenting with plant-based sauces one evening when I realized how much richness you can get from cashews—no dairy needed.
    • The idea was to keep it simple, fresh, and quick, so I could enjoy a homemade meal without the fuss.
    • • It started as a way to enjoy a classic comfort food in a healthier way.
    • • I wanted something that felt indulgent but still light.

    Origins and Quirks of Creamy Vegan Tomato Pasta

    • The use of cashews for creamy sauces dates back to traditional vegan and raw food cuisines.
    • Tomato pasta is a staple in Italy, but making it vegan and creamy is a modern twist.
    • Nutritional yeast was once considered a health food for vegans and is now a popular cheese substitute.
    • This recipe adapts a classic comfort food into a plant-based version that’s just as satisfying.

    Ingredient Insights and Tips

    • Ripe tomatoes: I choose juicy, fragrant tomatoes—they’re the star. If not in season, use good-quality canned tomatoes.
    • Cashews: I soak them to get a creamy texture—no gritty bits. Swap with sunflower seeds for nut allergies, but expect a slightly different flavor.
    • Garlic: Fresh garlic adds punch and aroma. Roasted garlic gives a sweeter, milder twist.
    • Basil: Bright and fragrant, it’s the finishing touch. If unavailable, try parsley or oregano for a different herbal note.
    • Nutritional yeast: Adds cheesy depth. Vegan Parmesan or a sprinkle of miso can be substitutes, but they bring different flavors.

    Spotlight on Tomatoes and Cashews

    Cashews: They become silky smooth when blended, providing creaminess without dairy. Soaking is key to avoid gritty texture.:

    • Juicy, ripe tomatoes: Their natural sweetness and acidity make or break the sauce. Look for deep color and fragrant aroma.
    • During cooking, they soften and release a vibrant juice that forms the sauce’s base.

    Tomatoes: They should be plump and fragrant, with a slight give when pressed. They soften beautifully, integrating into the sauce.:

    • Fresh basil: Its aromatic oils burst when added at the end, brightening the dish. Dried basil doesn’t deliver the same fresh punch.
    • Watch for the leaves turning slightly darker—then it’s time to plate. The aroma should be fresh and herbal.

    Ingredient Swap Tips

    • Dairy-Free: Swap cashews with silken tofu for creaminess. Slightly less rich, but still smooth.
    • Gluten-Free: Use rice or quinoa pasta—cooks similarly, just watch the timing.
    • Low-Acid: Add a pinch of sugar or a splash of balsamic vinegar if tomatoes are too tart.
    • Herb Variations: Oregano or thyme can replace basil for different flavor profiles.
    • Oil-Free: Sauté onions in vegetable broth or water, then add a splash of water to simmer.
    • Extra Protein: Toss in cooked chickpeas or lentils for a heartier dish.

    Equipment & Tools

    • Large pot: To boil pasta
    • Skillet or sauté pan: To cook the sauce
    • High-speed blender: To blend cashews into a smooth cream
    • Wooden spoon or spatula: Stirring and combining ingredients

    Step-by-Step Guide to Creamy Vegan Tomato Pasta

    1. Fill a large pot with water, salt generously—like the sea, really. Bring to a boil, then cook the pasta until just al dente, about 8–10 minutes.
    2. While pasta cooks, heat a tablespoon of olive oil in a skillet over medium heat. Add chopped onions and garlic, sauté until fragrant, about 3 minutes.
    3. Dice your ripe tomatoes and add them to the skillet. Let them soften and release their juices, about 5–7 minutes, stirring occasionally.
    4. In the meantime, drain your soaked cashews and transfer them to a blender with a cup of water, a pinch of salt, and a squeeze of lemon juice. Blend until super smooth—silky, like a thin custard.
    5. Pour the cashew cream into the tomato mixture. Stir well and simmer on low for 10 minutes. Taste and season with salt, pepper, and a pinch of red pepper flakes if you like heat.
    6. Drain the pasta, saving a little pasta water. Toss the pasta into the sauce, adding a splash of reserved water if needed to loosen it up. Stir until evenly coated.
    7. Turn off the heat, stir in chopped fresh basil, and let it sit for a minute to meld flavors.
    8. Plate the pasta, sprinkle with more basil or nutritional yeast, and serve immediately.

    Let the pasta sit for a minute after plating to settle flavors. Garnish with fresh basil and a drizzle of olive oil before serving.

    How to Know It’s Done

    • The sauce should be rich and velvety, with a vibrant tomato color.
    • Pasta should be just tender, not mushy—test a bite.
    • Basil should be bright and aromatic, not wilted or dull.

    Creamy Vegan Tomato Pasta

    This vegan pasta features a rich, velvety tomato sauce made from ripe tomatoes, soaked cashews, garlic, and fresh herbs, creating a comforting yet plant-based dish. The sauce clings beautifully to al dente pasta, offering a smooth, vibrant, and aromatic final presentation that feels indulgent without any dairy. It’s quick, simple, and perfect for a cozy weeknight dinner.
    Prep Time 10 minutes
    Cook Time 20 minutes
    Total Time 30 minutes
    Servings: 4
    Course: Main Course
    Cuisine: Italian
    Calories: 450

    Ingredients
      

    • 12 oz pasta (such as spaghetti or linguine) uncooked
    • 2 cups ripe tomatoes chopped
    • 1/2 cup soaked cashews drained
    • 3 cloves garlic minced
    • 2 tbsp olive oil
    • 1/4 cup fresh basil chopped
    • 2 tbsp nutritional yeast
    • to taste salt and pepper
    • 1 tbsp lemon juice optional, for brightness

    Equipment

    • Large pot
    • Skillet or sauté pan
    • High-speed blender
    • Wooden spoon or spatula

    Method
     

    1. Bring a large pot of salted water to a boil. Add the pasta and cook until just al dente, about 8-10 minutes. Drain and set aside.
    2. While the pasta cooks, heat olive oil in a skillet over medium heat. Add minced garlic and sauté until fragrant, about 1-2 minutes, until it turns golden and smells wonderful.
    3. Add the chopped ripe tomatoes to the skillet. Cook for 5-7 minutes, stirring occasionally, until the tomatoes soften and release vibrant juices that start to thicken into a sauce base.
    4. Drain your soaked cashews and transfer them to a high-speed blender. Add a cup of water, a pinch of salt, and lemon juice if using. Blend until completely smooth and silky, about 1-2 minutes.
    5. Pour the cashew cream into the skillet with the tomato mixture. Stir well and simmer on low heat for about 10 minutes, allowing the flavors to meld and the sauce to thicken slightly. Season with salt, pepper, and nutritional yeast.
    6. Add the cooked pasta directly into the skillet with the sauce. Toss gently to coat each strand evenly, adding a splash of reserved pasta water if needed to loosen the sauce to your desired consistency.
    7. Turn off the heat and stir in freshly chopped basil for a burst of herbal aroma. Let sit for a minute to allow the basil to release its fragrant oils.
    8. Serve the pasta hot, garnished with additional basil or nutritional yeast if desired. Enjoy the velvety, vibrant dish immediately for the best flavor and texture.

    Tips & Tricks for Perfect Creamy Vegan Tomato Pasta

    • FLAVOR: Use ripe tomatoes for a naturally sweet and tangy base.
    • TECHNIQUE: Sauté onions and garlic on medium heat until fragrant—don’t rush, or they burn.
    • SENSORY: Smell the garlic become golden and fragrant, not burnt.
    • TIP: Use the pasta water to adjust sauce consistency and add a bit of starchy silkiness.
    • TRICK: Add basil at the end for maximum aroma and freshness.

    Common Mistakes and How to Fix Them

    • FORGOT TO SALT THE WATER? Add salt generously to avoid bland pasta.
    • DUMPED TOO MUCH WATER IN THE SAUCE? Use some pasta water to loosen and bring everything together.
    • OVER-TORCHED THE GARLIC? Start over with fresh garlic, as burnt garlic ruins the flavor.
    • SAUCES SEPARATED? Whisk in a little warm water or re-blend cashews for a smooth finish.

    Quick Fixes for Common Cooking Hiccups

    • When the sauce is too thick, splash in a little hot pasta water to loosen it.
    • If the sauce tastes flat, add a squeeze of lemon or a pinch of salt.
    • Splash some olive oil for gloss and richness if it looks dull.
    • Patch over a burnt garlic flavor with a bit of fresh basil or parsley.
    • When in doubt, stir in a spoonful of nutritional yeast for added umami.

    Make-Ahead and Storage Tips

    • You can prepare the sauce a day ahead, store in the fridge for up to 2 days.
    • Reheat gently on the stove over low heat, stirring often, until hot and bubbly.
    • The flavor deepens slightly after a day, making it even more satisfying.
    • Leftovers can be stored in an airtight container in the fridge and reheated with a splash of water or plant milk.

    10 Practical Q&As About Creamy Vegan Tomato Pasta

    1. What tomatoes work best for this pasta?

    Use ripe, juicy tomatoes for a natural sweetness and vibrant color. Cherry or heirloom work beautifully.

    2. How do I make the sauce extra creamy?

    Soak cashews in hot water for 20 minutes before blending for a creamy texture.

    3. What equipment helps achieve a silky sauce?

    Use a high-speed blender to get a smooth, silk-like sauce without grit.

    4. How do I know when the pasta is just right?

    Cook pasta al dente, about 8-10 minutes in salted boiling water.

    5. How long should I simmer the sauce?

    Simmer the tomato sauce on low heat to deepen flavors without burning.

    6. When is the best time to add basil?

    Add fresh basil at the end for bright, aromatic bursts.

    7. How do I balance the flavors?

    Taste and adjust salt and acidity before serving.

    8. Can I skip nutritional yeast?

    Use nutritional yeast for cheesy flavor without dairy.

    9. How do I reheat without ruining the sauce?

    Reheat gently over low heat, stirring often to avoid separation.

    10. What should I serve with this pasta?

    Serve with crusty bread or a side salad for a complete meal.

    This dish feels like a warm hug—rich, bright, and a little nostalgic. It’s perfect for those nights when you want something wholesome but don’t want to spend hours in the kitchen.

    Plus, it’s flexible. Toss in some spinach or sautéed mushrooms if you’re feeling adventurous. Sometimes, the simplest meals turn out to be the most memorable, especially when they come together with just a few good ingredients and a little love.

  • Peanut Butter Muffins Recipe

    Peanut butter muffins might seem straightforward, but I’ve found that their success hinges on a few tiny details. I love that sweetness paired with that rich, nutty aroma—it’s the smell that makes the kitchen cozy, especially when it’s chilly outside.

    This recipe is about more than just flavor. It’s about the quiet satisfaction of mixing batter, the anticipation of that first bite, and the slightly sticky fingers that come with it. Making them from scratch is a small act of kindness, a little moment of control in a busy day.

    The secret to moist, tender peanut butter muffins is all in the gentle mixing and proper baking technique.

    Why these muffins matter to me

    • I love how the smell of baking peanut butter fills my kitchen.
    • There’s something satisfying about mixing batter that’s almost too thick to stir.
    • I’ve had moments where I forgot the baking powder, and the muffins turned out dense—lesson learned.
    • Sharing these muffins with friends always sparks a smile—simple, honest, comforting.
    • I feel proud every time I bake a batch from scratch, knowing exactly what’s inside.

    The story behind these humble muffins

    • This recipe was born out of a need for a quick, satisfying snack that my kids would love. I experimented with different ratios of peanut butter to flour, aiming for a muffin that’s moist yet sturdy enough to hold up in a lunchbox.
    • Sometimes, I add a handful of oats or a sprinkle of cinnamon for extra flavor. It’s a flexible base that invites tweaks and personal touches.
    • The moment I realized I could make a batch that’s both wholesome and indulgent was a small victory in my busy kitchen.

    A little history and fun facts about peanut butter muffins

    • Peanut butter muffins are a classic American brunch treat, often baked for picnics or school lunches.
    • The muffin style originated in early 20th-century America, evolving from quick bread traditions.
    • Peanut butter’s role in baking grew during the 1950s as a protein-rich snack for busy families.
    • Adding chocolate chips or bananas is common, but the pure peanut butter version remains a favorite for many.
    • The recipe is flexible—try swapping whole wheat flour or adding a dash of cinnamon for variation.

    Ingredient insights and tweaks

    • All-purpose flour: I use it for light, tender muffins—swap with whole wheat for more fiber, but expect denser texture.
    • Baking powder: It’s the leavening magic—make sure it’s fresh for fluffy results.
    • Peanut butter: The rich, oozing core—natural or processed, both work but natural adds more oil, adjust liquids.
    • Sugar: Sweetens and tenderizes—brown sugar adds moisture, white keeps it light.
    • Eggs: Bind everything together—use large eggs; smaller ones may throw off the balance.

    Spotlight on Peanut Butter and Flour

    Peanut Butter:

    • Its oily nature helps keep muffins moist, but too much can make batter heavy.
    • It melts into the batter, giving each bite a rich, nutty flavor.
    • Natural peanut butter may slightly change the texture, making it a bit oilier.

    All-purpose Flour:

    • The backbone of these muffins, providing structure and softness.
    • Too much flour makes them dense; too little, they fall apart.
    • Sifting helps create a lighter crumb.

    Smart ingredient swaps for dietary needs and flavor tweaks

    • Dairy-Free: Use almond or soy milk instead of regular milk, for a nutty, subtle flavor.
    • Sugar-Free: Substitute with maple syrup or honey, but reduce liquids slightly.
    • Gluten-Free: Swap with a gluten-free baking blend—expect a slightly denser crumb.
    • Vegan: Replace eggs with applesauce or mashed bananas, for a moist, tender crumb.
    • Extra Nutty: Add chopped peanuts or almond pieces for more crunch.

    Equipment & Tools

    • Muffin tin: Shape and bake the muffins
    • Mixing bowls: Combine ingredients
    • Whisk or spatula: Mix and fold ingredients
    • Measuring cups and spoons: Accurate measurement of ingredients
    • Cooling rack: Cool muffins evenly

    Step-by-step guide to perfect peanut butter muffins

    1. Preheat oven to 180°C (350°F). Line a muffin tin with paper liners or grease well.
    2. In a large bowl, whisk together 1 cup all-purpose flour, 1/2 cup sugar, 1 tsp baking powder, 1/2 tsp baking soda, and a pinch of salt.
    3. In a separate bowl, mix 1/2 cup peanut butter, 1/2 cup milk, 2 eggs, and 1/4 cup melted butter until smooth.
    4. Pour the wet ingredients into the dry and gently fold until just combined. Do not overmix.
    5. Fold in optional extras like chocolate chips or chopped peanuts.
    6. Spoon batter into the prepared muffin tin, filling each about 2/3 full.
    7. Bake for 15-18 minutes. The muffins should be golden around the edges and a toothpick inserted in the center comes out clean.
    8. Let the muffins cool in the tin for 5 minutes, then transfer to a wire rack to cool completely.
    9. Check for doneness: golden crust, slight bounce when pressed, and a clean toothpick.
    10. If muffins crack on top, they are perfectly baked. If they stay pale and wet, give them a few more minutes.

    Allow muffins to cool for 5 minutes in the tin, then transfer to a wire rack. Enjoy warm or at room temperature, preferably within a day or two.

    How to Know It’s Done

    • Golden edges and a slight smell of roasted peanut butter.
    • A gentle bounce when pressing the center.
    • Toothpick comes out clean without sticky batter.

    Peanut Butter Muffins

    These moist and tender peanut butter muffins are made by gently mixing a simple batter of flour, sugar, baking powder, eggs, milk, and peanut butter. Baked until golden and fluffy, they boast a rich, nutty aroma and a slightly sticky, satisfying texture that makes them perfect for breakfast or a snack. Their cozy appearance and warm flavor make them a comforting treat any time of day.
    Prep Time 10 minutes
    Cook Time 18 minutes
    Total Time 28 minutes
    Servings: 12
    Course: Main Course
    Cuisine: American
    Calories: 250

    Ingredients
      

    • 1 cup all-purpose flour
    • 1/2 cup sugar
    • 1 tsp baking powder
    • 1/2 tsp baking soda
    • 1 cup peanut butter smooth or chunky
    • 1/2 cup milk dairy or plant-based
    • 2 eggs large
    • 1/4 cup melted butter

    Equipment

    • Muffin tin
    • Mixing bowls
    • Whisk or spatula
    • Measuring cups and spoons
    • Cooling rack

    Method
     

    1. Preheat your oven to 180°C (350°F) and line a muffin tin with paper liners or grease it well to prevent sticking.
    2. In a large mixing bowl, whisk together the all-purpose flour, sugar, baking powder, and baking soda until evenly combined. The mixture should look slightly grainy but well mixed.
    3. In a separate bowl, combine the peanut butter, milk, eggs, and melted butter. Whisk until the mixture is smooth and slightly frothy, with no streaks of peanut butter remaining.
    4. Pour the wet mixture into the bowl with the dry ingredients. Gently fold everything together with a spatula or whisk, just until the flour is incorporated. Be careful not to overmix; the batter will be thick and slightly lumpy.
    5. Scoop the batter into the prepared muffin tin, filling each cup about two-thirds full. You can use a spoon or an ice cream scoop for even portions.
    6. Bake in the preheated oven for 15 to 18 minutes, or until the muffins are golden around the edges and a toothpick inserted into the center comes out clean with no wet batter.
    7. Remove the muffins from the oven and allow them to cool in the tin for about 5 minutes. Then, transfer them to a wire rack to cool completely or enjoy warm right away.
    8. Once cooled, the muffins will have a soft, moist crumb with a slightly sticky top and a rich peanut aroma filling the kitchen. Serve them fresh for the best flavor and texture.

    Pro tips for perfect muffins

    • BIND: Gently fold ingredients to keep muffins tender.
    • TEST: Use a toothpick to check doneness—comes out clean when ready.
    • TECHNIQUE: Don’t overmix; it causes toughness.
    • TIP: Use room temperature eggs for better emulsification.
    • SECRET: Adding a splash of vanilla enhances flavor.

    Common pitfalls and how to fix them

    • FORGOT to add baking powder? Quickly fold in a teaspoon of baking soda + vinegar to activate.
    • DUMPED the batter into the pan too fast? Use a spoon to fill each cup gently, avoiding spills.
    • OVER-TORCHED the edges? Reduce oven temperature by 10°C (20°F) and bake a few minutes longer.
    • MUFFINS came out flat? Ensure your baking powder is fresh and well-measured.

    Fast fixes for baking mishaps

    • When muffins crack excessively, lower oven temperature immediately.
    • Splash a teaspoon of milk if batter seems too thick.
    • Patch dry muffins with a quick drizzle of honey or jam.
    • Shield muffins with foil if top browns too fast.
    • Smell burnt? Turn down oven or move muffins to a lower rack.

    Smart prep and storage tips

    • Batter can be mixed and refrigerated for up to 24 hours, which makes morning prep easier.
    • Bake muffins and store in an airtight container at room temperature for 2 days, or refrigerate for up to 5.
    • Freezing baked muffins is best done in a single layer, then stored in a sealed bag for up to 3 months.
    • Reheat muffins in the microwave for 15-20 seconds, until warm and fragrant.

    10 Practical Q&As About Peanut Butter Muffins

    1. Can I use natural peanut butter?

    Use a chunky or creamy peanut butter depending on your texture preference. Chunky gives more crunch, creamy makes the muffin smoother.

    2. What if I only have crunchy peanut butter?

    Yes, but reduce the added sugar since natural peanut butter tends to be less sweet. It also might be a bit oilier, so mix well.

    3. Can I add chocolate chips?

    That works fine! The bits add a nice texture. Just be gentle when mixing so they don’t sink or break apart too much.

    4. How do I prevent the muffins from sticking?

    Absolutely, fold in a handful of chocolate chips before baking. They melt slightly and make each bite richer.

    5. What if my muffins stick?

    Line your muffin tin with paper liners or grease well. A quick spray of non-stick spray helps too.

    6. How long do these muffins keep fresh?

    Let them cool for 5 minutes before removing. Use a butter knife around the edges if needed.

    7. Can I freeze the batter?

    They stay good at room temperature for 2 days in a sealed container, or freeze for up to 3 months.

    8. How do I reheat for best flavor?

    Best to bake first, then freeze the muffins. Reheat in the microwave for 15-20 seconds for a soft, warm snack.

    9. Are these muffins suitable for gluten-free diets?

    Wrap in a damp paper towel and microwave at medium power. The aroma of peanut will fill your kitchen.

    10. What’s a good alternative sweetener?

    Yes, swap the all-purpose flour for a gluten-free blend. Textural slightly different but still tasty.

    Now, these muffins are not just a quick treat—they’re a small, comforting ritual. The smell of peanut butter baking, the soft crumb inside, that slight crunch of the crust—that’s what makes them memorable.

    They’re perfect for a quick breakfast, a snack, or even a little dessert. Keep a batch handy; they’re simple, honest, and just a little bit indulgent without being overwhelming. And honestly, I’d say that’s a win for any kitchen.

  • Pineapple Mint Popsicles Recipe

    These pineapple mint popsicles are a little bit nostalgic, a little bit about that unexpected burst of freshness. I stumbled on the idea last summer, when the heat made everything sticky and slow. The mint was a last-minute addition, but it turned out to be a game-changer—like a breath of cool air.

    Making them is straightforward, but I like to think of it as a small ritual—selecting the ripest pineapple, plucking fresh mint leaves, blending everything into a bright, icy wonder. It’s a recipe that feels like a mini vacation in a frozen pop, perfect for those long, lazy afternoons. Plus, they’re so easy to make, you’ll find yourself sneaking a second—and third—before the first batch even hits the freezer.

    Turning a simple summer treat into a sensory journey through aroma, texture, and vibrant flavor layers, with a focus on the refreshing contrast between sweet pineapple and cooling mint.

    Why I Keep Coming Back to This Simple Pleasure

    • I love how this recipe reminds me of childhood summers, sneaking into the garden for mint.
    • The aroma of pineapple and mint together is like a tropical breeze—so invigorating.
    • Making these pops is almost meditative—pure, simple ingredients, a quick blend, then waiting.

    A Little Inspiration Behind These Pops

    • This recipe was born out of a need for something quick, bright, and satisfying on hot days.
    • I was experimenting with ways to make fruit more exciting, and the mint just hit the right note.
    • It’s become a staple in my freezer—an easy way to cool down and lift my spirits.

    A Brief Look at the Roots of This Refreshing Treat

    • Pineapple originated in South America and was once a luxury item in Europe.
    • Mint has been used for thousands of years for its refreshing aroma and medicinal properties.
    • The concept of frozen fruit treats dates back to ancient China, where they used snow to chill fruit.
    • In recent years, herbal and fruit-infused popsicles have become symbols of summer wellness.

    Ingredient Insights for Better Popsicles

    • Fresh pineapple: Juicy and bright, it’s the backbone of flavor. Use ripe for best sweetness.
    • Mint leaves: Lively and cooling. Use fresh, packed tightly for maximum aroma.
    • Honey or sweetener: Balances acidity. Adjust to taste, or omit for a natural fruit flavor.
    • Lime juice: Adds zing and brightness. Use fresh lime for a zesty kick.
    • Water or coconut water: Dilutes and adjusts texture. Use filtered for purity.

    Spotlight on Pineapple and Mint

    Mint: Fresh leaves release a sharp, bright aroma when crushed.:

    • Pineapple: Its natural sugars caramelize slightly when frozen, giving a rich, oozy sweetness.
    • The texture should be juicy and tender, with a slight fibrous bite if overripe.

    Pineapple: When blending, it becomes a fragrant, vibrant puree—think lemon-bright and tropical.:

    • Mint: During blending, leaves turn into tiny green flecks, infusing every sip with coolness.
    • The flavor intensifies as it chills, so start with a small handful and adjust to taste.

    Smart Swaps for Custom Flavors

    • Dairy-Free: Use coconut milk or almond milk for a creamy, nutty alternative.
    • Sweetener: Maple syrup or agave nectar can replace honey for vegan options.
    • Mint: Basil or cilantro can add different herbal notes, but don’t expect the same cooling effect.
    • Fruit: Mango or papaya can swap in for pineapple, giving a softer, sweeter profile.
    • Lime: Lemon juice provides a slightly different citrus brightness.

    Equipment & Tools

    • blender: to puree the pineapple and mint into a smooth mixture
    • popsicle molds: to shape and freeze the popsicles
    • small saucepan: for warming or dissolving any sweeteners if needed
    • stirring spoon or spatula: to mix ingredients thoroughly

    Step-by-Step Guide to Perfect Pineapple Mint Popsicles

    1. Gather your equipment: blender, popsicle molds, and a small saucepan for heating if needed.
    2. If using fresh pineapple, peel and cut into chunks. For frozen, let thaw slightly for easier blending.
    3. Blend pineapple with a handful of fresh mint leaves until smooth, about 30 seconds.
    4. Taste and adjust: add a touch of honey or lime juice if you want more brightness.
    5. Pour the mixture into popsicle molds, leaving a small gap at the top.
    6. Insert sticks and freeze for at least 4 hours, preferably overnight.
    7. To serve, run warm water briefly over the molds to loosen, then gently pull out the popsicles.

    Freeze overnight, then serve immediately after running under warm water. Enjoy the crisp, icy texture with each bite.

    How to Know It’s Done

    • Check the color: should be vibrant yellow with bits of green from mint.
    • Smell: fresh pineapple and mint should be fragrant and lively.
    • Texture: the mixture should be smooth, not grainy, before pouring into molds.

    Pineapple Mint Popsicles

    These pineapple mint popsicles combine the natural sweetness of ripe pineapple with the refreshing coolness of fresh mint. Made by blending juicy pineapple with aromatic mint leaves and a touch of honey, then freezing in molds until firm, they offer a bright, icy treat with vibrant flavor layers. The final popsicles are juicy, tender, and visually appealing with bits of green mint throughout.
    Prep Time 10 minutes
    Total Time 10 minutes
    Servings: 6
    Course: Main Course
    Cuisine: Tropical
    Calories: 60

    Ingredients
      

    • 2 cups fresh pineapple chunks ripe for sweetness
    • 1/4 cup fresh mint leaves packed tightly
    • 2 tablespoons honey adjust to taste
    • 1 tablespoon lime juice freshly squeezed
    • 1/2 cup water or coconut water

    Equipment

    • Blender
    • popsicle molds
    • small saucepan
    • stirring spoon or spatula

    Method
     

    1. Place the pineapple chunks and mint leaves into the blender.
    2. Add honey, lime juice, and water to the blender.
    3. Blend everything on high for about 30 seconds until the mixture is smooth and fragrant, with tiny green flecks of mint visible.
    4. Taste the mixture and adjust sweetness or acidity if needed, adding more honey or lime juice.
    5. Pour the bright, fragrant blend into popsicle molds, filling each almost to the top.
    6. Insert sticks into the molds and place the trays in the freezer.
    7. Freeze for at least 4 hours, preferably overnight, until the popsicles are firm and icy.
    8. To serve, run warm water briefly over the outside of each mold to loosen the popsicles, then gently pull them out.

    Tips & Tricks for Perfect Popsicles

    • FLAVOR: Use ripe pineapple for maximum sweetness and juice.
    • BRIGHTEN UP: Add a squeeze of lime before blending for a zesty kick.
    • COOLING TECHNIQUE: Chill your molds in the freezer before filling for faster freezing.
    • SENSORY CHECK: The mixture should smell intensely fruity and minty.
    • SMOOTH TEXTURE: Blend thoroughly to avoid icy chunks.

    Common Mistakes and How to Fix Them

    • FORGOT TO THAW? Run mold briefly under warm water to loosen.
    • DUMPED TOO MUCH LIQUID? Pour into smaller molds or freeze in batches.
    • OVER-TORCHED? Avoid direct heat; melt gently over low heat if needed.
    • MIXTURE TOO SOGGY? Chill in fridge for 30 mins before pouring.

    Quick Fixes for Common Frozen Treat Problems

    • When mixture is too thick, add a splash of water or juice.
    • Splash with extra lime if flavor is dull.
    • Patch icy texture by blending again and refreezing.
    • Shield mold from direct sunlight to prevent melting.
    • Rescue a melted batch by re-blending and refreezing.

    Make-Ahead & Storage Tips for Frozen Freshness

    • Popsicles can be made up to 2 days in advance for best flavor.
    • Store in an airtight container in the freezer, covered with plastic wrap to prevent ice crystals.
    • Flavors deepen slightly after a day, becoming more concentrated.
    • To re-freeze, just pop back in the freezer and check for firmness.

    10 Practical Q&As About Pineapple Mint Popsicles

    1. Can I use canned pineapple?

    Use fresh pineapple for the best juiciness and vibrant flavor. Frozen works too, just thaw slightly before blending.

    2. Is fresh mint necessary?

    Absolutely, but drain well to avoid waterlogging the popsicles and diluting the flavor.

    3. What if I don’t have popsicle molds?

    Fresh mint gives a bright, lively flavor that dried mint can’t match. If you must, use a small amount of mint extract.

    4. How long do they freeze?

    You can use small paper cups with sticks or even silicone muffin cups, just cover with foil and insert a stick.

    5. Can I make these ahead?

    At least 4 hours, but overnight is best for fully firm popsicles.

    6. How do I prevent them from sticking to the mold?

    Yes, make them a day in advance, and keep in the freezer until ready to serve.

    7. Can I add other ingredients?

    Run warm water over the outside of the mold for a few seconds to loosen before removing.

    8. Are these dairy-free?

    Sure, try shredded coconut or a splash of lime juice for extra flavor layers.

    9. How do I keep them from melting too fast?

    Yes, they are naturally dairy-free as long as you use pure pineapple juice and fresh mint.

    10. Can I add alcohol?

    Serve them straight from the freezer, and keep in a cool place if outdoors.

    Once frozen, these pops are a perfect way to cool down and satisfy that sweet tooth without feeling heavy. The sharp pineapple and fresh mint keep things feeling lively, even on the hottest days.

    They’re flexible, too—swap in lime juice for extra zing, or toss in shredded coconut for a tropical twist. Whatever your style, they’re a simple, honest treat that brings a little bit of joy to the summer table.

  • Peanut Butter Chocolate Chip Chewy Bars Recipe

    Imagine biting into a chewy, dense bar where peanut butter’s creamy richness melds perfectly with bursts of chocolate. It’s a treat that’s simple enough for a weekday snack but hearty enough to satisfy that sweet craving with genuine, honest flavor.

    This recipe isn’t about perfection; it’s about the messy, delicious process of throwing ingredients together, tasting as you go, and ending with something that feels like a little celebration in your hand. It’s a reminder that sometimes, the best bites come from improvisation and a little bit of love.

    The unexpected joy of reimagining comfort food with a nostalgic twist — in this case, a chewy bar that feels like a warm hug but with a modern, indulgent flair.

    Why these bars matter to me

    • I love how these bars turn out sticky and chewy, almost like a caramelized treat.
    • Baking these fills my kitchen with the warm smell of toasted oats and melting chocolate.
    • Sharing these with friends always sparks a nostalgic smile, like a bite of childhood.
    • Sometimes I sneak in a handful of chopped nuts for extra crunch and richness.

    My personal story with these chewy bars

    • This recipe is a comfort food classic, but with a personal twist I learned from experimenting in my own kitchen.
    • It started as a quick fix when I needed a sweet snack in a pinch, and now it’s a go-to for gatherings.
    • I love the messy process of mixing, tasting, and adjusting—every batch feels like a small victory.

    A little history and fun facts about chewy bars

    • Inspired by childhood snack bars but upgraded with real ingredients.
    • Originally a way to use up leftover peanut butter and chocolate chips.
    • Chewy bars gained popularity in the 1980s as a portable snack for kids and hikers.
    • The combination of peanut butter and chocolate is a timeless flavor duo, dating back decades.
    • These bars can be customized with nuts, dried fruits, or different chocolates for variety.

    Ingredient insights and tweaks

    • Peanut Butter: adds creaminess and flavor. Use natural or processed, but adjust sweetness accordingly.
    • Chocolate Chips: provide melty pockets of sweetness. Dark, milk, or even white chocolate works.
    • Oats: give structure and chew. Use rolled oats for a hearty texture, or quick oats for softer bars.
    • Honey: binds everything together with a touch of sweetness. Maple syrup can be a substitute, but expect a different flavor.
    • Butter: enhances richness and helps the bars hold together. Melted coconut oil can be a dairy-free alternative.

    Key ingredients and their quirks

    Chocolate Chips:

    • Peanut Butter: natural oils can cause separation; stir well before mixing.
    • It melts smoothly and spreads easily, giving the bar its signature flavor.
    • The aroma is nutty and inviting, filling the kitchen with warmth.

    Oats:

    • Chocolate Chips: they soften and melt during baking, creating gooey pockets.
    • Choose high-quality chips for better flavor and melt.
    • They add a rich, bittersweet note that balances the sweetness.

    Smart swaps to customize your bars

    • Dairy-Free: swap butter for coconut oil for a tropical note.
    • Sweetener: use maple syrup instead of honey for a different sweetness profile.
    • Chocolate: replace chips with chopped dark chocolate or cacao nibs.
    • Nut Butters: almond or cashew butter for different nutty flavors.
    • Add-ins: dried cranberries or chopped dried apricots for more texture.

    Equipment & Tools

    • Mixing bowls: Combine ingredients thoroughly.
    • Spatula: Spread mixture evenly in the pan.
    • 8-inch square baking pan: Shape the bars.
    • Parchment paper: Prevent sticking and for easy removal.
    • Wire rack: Cool the bars evenly.

    Step-by-step guide to chewy bars

    1. Preheat your oven to 175°C (350°F). Line an 8-inch square baking pan with parchment paper.
    2. In a mixing bowl, combine 1 cup peanut butter, 1/2 cup honey, and 1/2 cup melted butter. Mix until smooth.
    3. Add 1 1/2 cups rolled oats, 1 cup chocolate chips, and 1 teaspoon vanilla extract. Stir until well combined.
    4. Press the mixture evenly into the prepared pan using a spatula. Bake for 15–18 minutes, until edges are golden.
    5. Remove from oven and let cool in the pan for 10 minutes. Then, transfer to a wire rack to cool completely.
    6. Once cooled, cut into bars. For cleaner cuts, refrigerate for 30 minutes before slicing.

    Cool completely on a wire rack before cutting. Store in an airtight container.

    How to Know It’s Done

    • Edges are golden and slightly crispy.
    • Chocolate chips are melted and slightly bubbly.
    • Center feels firm but not hard when pressed.

    Peanut Butter Chocolate Chip Chewy Bars

    These chewy bars combine creamy peanut butter and melty chocolate chips for a dense, sticky treat. They are made by mixing oats, honey, and butter into a rich, flavorful dough, then baking until golden. The final product is a hearty, gooey bar with pockets of chocolate and a satisfying chewiness.
    Prep Time 10 minutes
    Cook Time 15 minutes
    Total Time 25 minutes
    Servings: 12
    Course: Main Course
    Cuisine: American
    Calories: 250

    Ingredients
      

    • 1 cup peanut butter natural or processed
    • 1/2 cup honey
    • 1/2 cup melted butter
    • 1 1/2 cups rolled oats
    • 1 cup chocolate chips dark or milk
    • 1 teaspoon vanilla extract

    Equipment

    • Mixing bowls
    • Spatula
    • 8-inch square baking pan
    • Parchment paper
    • Wire rack

    Method
     

    1. Preheat your oven to 175°C (350°F) and line your 8-inch square pan with parchment paper, leaving some overhang to lift out the bars easily.
    2. In a large mixing bowl, combine the peanut butter, honey, and melted butter. Use a spatula to stir everything together until the mixture is smooth and creamy, and you can see a glossy sheen forming.
    3. Add the rolled oats, chocolate chips, and vanilla extract to the bowl. Gently fold everything together until the oats are evenly coated and the chocolate chips are distributed throughout the mixture. It will be thick and sticky.
    4. Transfer the mixture into your prepared pan. Use the back of a spatula to press it down evenly across the surface, creating a compact layer. This helps the bars hold together after baking.
    5. Bake in the preheated oven for about 15–18 minutes, or until the edges turn a golden brown and smell warm and toasty. You might hear a gentle bubbling around the chocolate chips.
    6. Once baked, remove the pan from the oven and let it cool on a wire rack for about 10 minutes. The mixture will firm up slightly as it cools, making it easier to handle.
    7. Using the overhang of parchment, lift the bars out of the pan and transfer them to the wire rack. Allow them to cool completely, about 20–30 minutes, until they feel firm to the touch.
    8. Once cooled, cut the bars into squares with a serrated knife. For cleaner slices, dip the knife in hot water and wipe dry between cuts.
    9. Enjoy these hearty, chewy bars as a satisfying snack or a quick energy boost. Store any leftovers in an airtight container at room temperature for up to 3 days, or freeze for longer storage.

    Tips and tricks for perfect chewy bars

    • Use fresh peanut butter for a creamy texture.
    • Chill the mixture before pressing into the pan for easier handling.
    • Bake on the middle rack for even heat distribution.
    • Add a pinch of sea salt on top before baking for contrast.
    • Use a serrated knife for cleaner cuts.

    Troubleshooting your chewy bars

    • FORGOT to line the pan? Use foil or parchment for easy removal.
    • DUMPED too much chocolate? Mix in a handful of oats to balance moisture.
    • OVER-TORCHED the edges? Cover with foil and reduce baking time next round.
    • UNDERBAKED? Bake for an extra 2 minutes or until the edges are golden.

    Fast fixes for common issues

    • If bars fall apart, chill the mixture longer before pressing.
    • Splash a little hot water on your knife to cut cleaner slices.
    • Patch cracks with a bit of warm peanut butter.
    • Shield edges with aluminum foil if they brown too fast.
    • When in doubt, bake a minute less to avoid over-drying.

    Prepping and storing your chewy bars

    • You can prepare the mixture a day ahead, keep refrigerated, and bake fresh when needed.
    • Bars can be stored in an airtight container at room temperature for up to 3 days.
    • For longer storage, freeze in an airtight bag for up to a month. Thaw at room temp.
    • Reheat in a 180°C (350°F) oven for 5 minutes until warm and fragrant.

    10 Practical Q&As About Peanut Butter Chocolate Chip Chewy Bars

    1. Can I use other nut butters?

    Yes, you can substitute almond or cashew butter, but the flavor changes slightly, and the texture might be a bit less gooey.

    2. Can I make these vegan?

    Absolutely. Use the same amount, and expect a slightly different flavor. Peanut butter keeps it classic.

    3. Are these bars suitable for vegans?

    Yes, use dairy-free chocolate chips and ensure your butter substitute is plant-based. The texture stays chewy, just like the original.

    4. How long do these keep?

    You can bake them ahead and store them at room temperature for up to 3 days, or freeze for longer.

    5. How should I store leftovers?

    Store in an airtight container at room temp for 2–3 days, or freeze for up to a month.

    6. Can I freeze these bars?

    Yes, double the batch and freeze in slices. Thaw at room temp for 10 minutes before serving.

    7. How do I keep the chocolate chips from sinking?

    Use a light hand when mixing to avoid breaking the chocolate chips. Fold gently to keep chunks intact.

    8. How do I know when they’re done?

    For a softer texture, slightly underbake by a minute or two. The edges should be golden but center still a bit gooey.

    9. What’s the perfect doneness look like?

    Use a toothpick in the center; it should come out with moist crumbs, not wet batter.

    10. Can I toast the oats beforehand?

    For a richer flavor, toast the oats lightly before mixing. It adds a smoky, nutty note.

    These bars are more than just a snack; they’re a little piece of comfort that travels well and keeps well too. Perfect for busy mornings or lazy afternoons where you want something sweet but substantial.

    Keep a batch in your freezer for those moments when you need a quick pick-me-up or an impromptu gift. They’re humble, honest, and all about reminding us that good things don’t always need fuss.

  • Cashew Crunch Salad Recipe

    Sometimes, the best salads come from a handful of ingredients that you keep on hand. This Cashew Crunch Salad was born out of a frantic fridge raid—no fancy ingredients, just what I had in the kitchen. The surprise was the texture combo: crisp vegetables, buttery cashews, and a zingy dressing that wakes up every bite.

    It’s the kind of dish that feels like a little rebellion against the usual, where texture and flavor collide in a satisfying crunch. It’s quick to put together, fresh, and packed with a balance of sweet, savory, and tangy notes that make your taste buds sit up.

    A crunchy, nutty salad that’s perfect for a quick, satisfying lunch or a side on busy days.

    Why this salad matters to me

    • I love how this salad reminds me of summer picnics—fresh, crunchy, and bright.
    • Making this is almost meditative; chopping vegetables and roasting cashews feel grounding.
    • It’s a dish that always gets compliments, especially when I sneak in a handful of fresh herbs.
    • I’ve made it for everything from quick weeknight dinners to potlucks—never fails to please.

    Personal notes on making this dish your own

    • This salad started as a way to use up leftover veggies and a bag of cashews I couldn’t resist. I wanted something that was crunchy, fresh, and quick to throw together after a long day. Over time, I tweaked the ingredients and found the perfect balance of flavors and textures that keeps me coming back.
    • A little chaos in the kitchen often leads to the best discoveries. Sometimes, I add a splash of soy or a dash of sesame oil for a different vibe. It’s a flexible, forgiving recipe that’s all about celebrating simple ingredients.
    • Every batch feels a little different, which makes it kind of special—an edible reminder that good things often come from improvisation.

    The story behind the crunch

    • Cashew trees are native to Brazil but are now widely cultivated in Vietnam and India.
    • The name ‘cashew’ comes from the Portuguese ‘caju,’ meaning ‘nut that produces itself.’
    • Cashews are technically seeds, not nuts, and contain a toxic resin that must be roasted out.
    • This salad style echoes the casual, vibrant street foods of Southeast Asia, where crunch and freshness rule.

    Deep dive into key ingredients

    • Cashews: I love their buttery, creamy texture. Roast to deepen flavor, but raw works if you prefer milder taste.
    • Bell peppers: They add color and crunch. Use yellow or orange for sweetness, or red for a more robust flavor.
    • Cucumber: Refreshing and crisp, it balances richness. Peel if you prefer less bitterness.
    • Red onion: Sharp and pungent—soak slices briefly in cold water if you want milder flavor.
    • Lemon juice: Brightens everything. Use fresh for a zesty kick, or bottled in a pinch.

    Spotlight on Cashews and Fresh Herbs

    Cashews:

    • Their rich, buttery flavor and crunch define this salad. Toasting amplifies their aroma.
    • They behave like little flavor bombs—oily and oozing subtly when toasted.

    Herbs:

    • Fresh herbs like cilantro or mint lift the dish with their bright, fragrant notes. Chop finely for even distribution.
    • They can wilt quickly if added too early, so add just before serving.

    Substitutions for different diets and flavors

    • Dairy-Free: Swap honey for maple syrup for a vegan-friendly sweetener with a similar sweetness.
    • Nut-Free: Use toasted sunflower seeds instead of cashews for a crunchy, nutty flavor.
    • Vegan Dressing: Replace honey with agave or maple syrup for a plant-based, sweet glaze.
    • Gluten-Free: Ensure your soy sauce (if used) is gluten-free or skip it altogether.
    • Extra Zest: Add a teaspoon of grated lemon or lime zest for an extra citrus punch.

    Equipment & Tools

    • Large bowl: Mix all ingredients comfortably
    • Skillet: Toast the cashews evenly
    • Knife and chopping board: Prepare vegetables and herbs
    • Whisk: Blend dressing ingredients

    Step-by-step guide to a perfect Cashew Crunch Salad

    1. Gather your ingredients and equipment: a large bowl, a skillet, a sharp knife, and a chopping board.
    2. Toast the cashews: heat a dry skillet over medium heat (~160°C / 320°F). Add cashews and toast, stirring frequently, until golden and fragrant (~3-5 mins). Remove and set aside.
    3. Prepare the vegetables: finely chop the bell pepper, cucumber, and red onion. Keep everything small and uniform.
    4. Make the dressing: whisk together olive oil, lemon juice, honey, salt, and pepper in a small bowl. Adjust to taste.
    5. Assemble the salad: in a large bowl, combine chopped vegetables, toasted cashews, and herbs if using.
    6. Dress the salad: pour over the dressing and toss gently until everything is coated and shiny.
    7. Final touch: sprinkle a few extra cashews on top for added crunch.
    8. Rest briefly if needed—about 5 minutes—to let flavors meld.
    9. Serve immediately for the best crunch, or keep refrigerated for up to 2 days, adding extra cashews at serving.

    Toss gently, rest briefly if needed, then serve immediately for maximum crunch.

    How to Know It’s Done

    • Cashews are golden and fragrant.
    • Vegetables are crisp and brightly colored.
    • Dressing is well mixed and coats everything evenly.

    Cashew Crunch Salad

    This Cashew Crunch Salad features crisp vegetables, buttery toasted cashews, and a zingy lemon dressing, creating a delightful mix of textures and flavors. The dish is assembled quickly, offering a fresh, crunchy, and colorful salad with a balance of sweet, savory, and tangy notes. Its vibrant appearance and satisfying crunch make it perfect for a quick lunch or side dish.
    Prep Time 10 minutes
    Cook Time 5 minutes
    Total Time 15 minutes
    Servings: 4
    Course: Main Course
    Cuisine: Fusion
    Calories: 220

    Ingredients
      

    • 1 cup cashew nuts raw or toasted
    • 1 red bell pepper finely chopped
    • 1 medium cucumber finely chopped
    • 0.5 red red onion finely chopped
    • 1 tablespoon olive oil for dressing
    • 2 tablespoons lemon juice freshly squeezed
    • 1 teaspoon honey or maple syrup for vegan option
    • Pinch salt
    • Pinch pepper
    • Fresh cilantro or mint chopped, optional

    Equipment

    • Large bowl
    • Skillet
    • Knife and chopping board
    • Whisk

    Method
     

    1. Start by toasting the cashew nuts in a dry skillet over medium heat. Stir frequently and cook for about 3-5 minutes until they turn golden and fragrant. Remove from heat and set aside to cool.
    2. While the cashews cool, finely chop the red bell pepper, cucumber, and red onion. Keep the pieces small and uniform for a balanced bite.
    3. In a small bowl, whisk together olive oil, lemon juice, honey, salt, and pepper until the dressing is smooth and slightly emulsified. Set aside.
    4. In a large bowl, combine the chopped vegetables and toasted cashews. Add chopped herbs such as cilantro or mint if using, for a fresh burst of flavor.
    5. Pour the dressing over the vegetable mixture and gently toss everything together until the vegetables are evenly coated and shiny with the dressing.
    6. Sprinkle a few extra toasted cashews on top for added crunch and visual appeal. Let the salad rest for about 5 minutes to allow flavors to meld.
    7. Serve immediately to enjoy the crisp texture, or refrigerate for up to 2 hours if making ahead. Toss again before serving if needed.

    Notes

    For extra flavor, add fresh herbs just before serving. Toast cashews until fragrant but not burnt. Adjust seasoning to taste, adding more lemon or honey as desired.

    Tips and tricks for perfect results

    • Toast cashews in a dry skillet—avoid oil for a cleaner, nuttier flavor.
    • Finely chop vegetables for even bites and quicker mixing.
    • Use fresh herbs if available—cilantro or mint brighten the dish.
    • Whisk the dressing vigorously to emulsify—shiny and smooth is best.
    • Toss the salad gently but thoroughly—every piece gets coated.
    • Serve immediately for maximum crunch—if needed, refrigerate briefly before serving.

    Common pitfalls and how to fix them

    • FORGOT to toast the cashews? Toast them in a hot oven (~180°C / 350°F) for 8-10 mins, stirring occasionally.
    • DUMPED too much dressing? Add more chopped vegetables or a handful of greens to balance.
    • OVER-TORCHED the nuts? Lower the heat and remove immediately, then toss with a bit of oil to cool.
    • SEASONED the dressing too salty? Dilute with a splash more lemon juice or a teaspoon of honey.

    Quick fixes for common issues

    • When the dressing is too tangy, add a pinch of sugar or honey to mellow it.
    • Splash some hot water into the dressing if it thickens or becomes too oily.
    • Patch over soggy vegetables with fresh herbs and a squeeze of lemon.
    • Shield the salad with plastic wrap if it sits out—keeps it crisp longer.
    • Rescue burnt nuts by removing from heat immediately, then toss with a little oil to cool.

    Prepping and storing your Cashew Crunch Salad

    • Prepare and chop all vegetables a day in advance. Keep refrigerated in airtight containers.
    • Toast cashews ahead of time; store in an airtight jar for up to a week.
    • Make the dressing up to 2 days ahead. Keep chilled, and whisk again before using.
    • Add cashews and dressing just before serving to keep the crunch and freshness.
    • Leftovers will soften slightly but still taste good—refrigerate up to 2 days.
    • Reheat gently if needed, but best enjoyed fresh for the best texture.

    10 Practical Q&As about Cashew Crunch Salad

    1. Can I use roasted cashews instead of raw?

    Use fresh, raw cashews for the best crunch and flavor. Toast them lightly if you want a smoky note.

    2. Should I toast the cashews beforehand?

    Yes, but toasted cashews add a nuttier, deeper flavor and extra crunch.

    3. How do I know when the cashews are toasted enough?

    Yes, a quick toast in a dry skillet over medium heat until golden and fragrant, about 3-5 minutes.

    4. Can I make the salad ahead of time?

    Chop the vegetables finely for a better bite and easier mixing. Think small, even dice.

    5. Will the salad get soggy if made in advance?

    Absolutely, prepare the dressing and chop vegetables a day ahead. Keep refrigerated in airtight containers.

    6. How long can I store leftovers?

    To keep it fresh, add the cashews and dressing just before serving.

    7. Can I freeze this salad?

    Best within 2 days, kept in the fridge. The texture may soften slightly after that.

    8. Is this salad suitable for vegans?

    Not recommended, as the vegetables may become mushy upon thawing.

    9. Can I substitute other nuts?

    Yes, as long as the dressing is made without honey or dairy, using plant-based alternatives.

    10. What if I don’t have fresh herbs?

    Yes, almonds or walnuts work well, but they won’t give the same sweet, buttery crunch as cashews.

    This salad is a reminder that simple can be stunning, especially when you focus on the textures and fresh flavors. It shines at picnics, lunch boxes, or just a quick dinner when you want something light but satisfying.

    Every time I make it, I’m reminded of how a few good ingredients can turn into something memorable. It’s a dish I keep coming back to because it’s honest, straightforward, and just plain good—no fuss, no pretenses.

  • Cranberry Mimosa Recipe

    The idea for this Cranberry Mimosa came from a moment of needing something bright and festive to lift a quiet brunch. I wanted a drink that felt special but didn’t require complicated ingredients or fuss. Cranberries, with their deep red hue and tart flavor, seemed like the perfect way to add a splash of color and a burst of freshness.

    It’s one of those recipes that’s simple enough for a weekday but feels like a celebration. The cranberries provide a natural tartness that balances the bubbly sweetness of the sparkling wine, making each sip a lively contrast. Plus, the vibrant red makes it look as cheerful as it tastes.

    This drink is a little reminder that sometimes, the best ideas come from just looking at what’s in the fridge and thinking, ‘What if?’

    A festive twist on the classic mimosa, inspired by the vibrant, tart allure of cranberries and the holiday cheer they bring.

    Why I Keep Coming Back to This Recipe

    • I love how the tart cranberries brighten up the drink.
    • This recipe reminds me of holiday mornings with family.
    • It’s my go-to for easy, festive celebrations without too much fuss.

    Inspiration Behind the Cranberry Mimosa

    • I first made this for a brunch with friends, and everyone loved the unexpected tartness.
    • It’s a simple way to dress up sparkling wine with just a few ingredients.
    • Now, I keep a jar of cranberry syrup in the fridge during the holidays.

    Cranberries and Mimosas: A Brief History

    • Cranberries are native to North America, historically used by indigenous peoples for food and medicine.
    • The mimosa, traditionally a brunch staple, originated in France and was named for its mimosa flower.
    • Cranberry syrup adds a tart contrast to sweet drinks, historically used to preserve cranberries before refrigeration.
    • This cocktail blends seasonal ingredients, making it a perfect holiday or winter brunch drink.

    Ingredient Insights and Tweak Tips

    • Fresh cranberries: I love their bright, tart punch, but frozen works in a pinch. Just thaw and mash slightly for more juice.
    • Sparkling wine: Use a good-quality bubbly for real sparkle; cheap options tend to lose fizz fast.
    • Sugar: I prefer cane sugar, but honey or agave can add a different sweetness dimension.
    • Orange zest: Adds a fragrant, citrusy aroma—use a microplane for fine zest, or skip if out.
    • Mint sprigs: Fresh mint brightens the drink visually and aromatically, especially when muddled gently.

    Key Ingredients Spotlight

    Cranberries:

    • They’re tart and juicy, with a slight bitterness that balances sweetness. Watch for their color deepening as they cook.
    • Sparkling wine: The lively bubbles are delicate—pour slowly to preserve the effervescence. Use chilled wine for best results.

    Sparkling Wine:

    • Its crispness defines the drink; avoid flat or overly sweet options. The bubbles crackle pleasantly when poured.
    • Ensure it’s well chilled—warm bubbles lose their fizz quickly and dull the experience.

    Ingredient Swap Tips

    • Dairy-Free: Swap syrup with a dash of orange juice and a touch of honey for a lighter, brighter flavor.
    • Sugar-Free: Use a sugar substitute like erythritol syrup—less sweet, but still tart and festive.
    • Alcohol-Free: Replace sparkling wine with sparkling water or tonic, and add a splash of orange juice.
    • Gluten-Free: Cranberries and sparkling wine are naturally gluten-free, so no change needed.
    • Extra Citrus: Add a squeeze of lemon or lime for an additional zing.
    • Sweetener Variations: Maple syrup can replace sugar for a richer, caramel note.
    • Boozy Boost: Add a splash of Grand Marnier or Cointreau for more citrus complexity.

    Equipment & Tools

    • Saucepan: To simmer and make the cranberry syrup.
    • Fine sieve: To strain out solids from the syrup.
    • Flute glasses: For serving and showcasing the drink.
    • Spoon or stirrer: To gently mix the syrup and wine.

    How to Make a Cranberry Mimosa

    1. Prepare the cranberry syrup: Combine 1 cup fresh cranberries, 1 cup sugar, and 1 cup water in a small saucepan.
    2. Bring to a gentle simmer over medium heat, about 10 minutes, until cranberries burst and syrup thickens.
    3. Strain through a fine sieve, pressing to extract all the juice. Let cool completely.
    4. Chill the syrup in the fridge for at least 30 minutes before mixing.
    5. In a flute glass, add 1-2 tablespoons of cranberry syrup, depending on your sweetness preference.
    6. Top with 3-4 ounces of chilled sparkling wine or champagne.
    7. Gently stir to combine, avoiding losing too much fizz.
    8. Garnish with a few fresh cranberries and a sprig of mint.
    9. Serve immediately to enjoy the bubbles and fresh flavors.

    Serve immediately after mixing, garnished and chilled. No need for resting; the freshness is best enjoyed right away.

    How to Know It’s Done

    • Color of the syrup should be deep red.
    • Smell should be bright and fruity, with a hint of tartness.
    • Bubbles should be lively and persistent when pouring the sparkling wine.

    Cranberry Mimosa

    This festive drink combines the tartness of fresh cranberries with the bubbly sweetness of sparkling wine, creating a vibrant, refreshing cocktail perfect for brunch or holiday celebrations. The process involves making a simple cranberry syrup, which is then combined with chilled sparkling wine for a lively and colorful presentation. The final drink boasts a bright red hue with a sparkling, effervescent texture and a balanced tart-sweet flavor.
    Prep Time 20 minutes
    Cook Time 10 minutes
    Total Time 30 minutes
    Servings: 4
    Course: Main Course
    Cuisine: Holiday
    Calories: 120

    Ingredients
      

    • 1 cup fresh cranberries or frozen cranberries, thawed
    • 1 cup sugar preferably cane sugar
    • 1 cup water
    • 4 oz sparkling wine chilled, good quality
    • optional fresh cranberries for garnish
    • 1 sprig fresh mint for garnish

    Equipment

    • Saucepan
    • Fine sieve
    • Flute glasses
    • Spoon or stirrer

    Method
     

    1. Combine the cranberries, sugar, and water in a small saucepan over medium heat.
    2. Bring the mixture to a gentle simmer, listening for the cranberries to start popping and releasing their color, about 10 minutes.
    3. Use a fine sieve to strain the syrup into a bowl, pressing gently to extract all the vibrant red juice. Discard the solids.
    4. Allow the syrup to cool completely, then refrigerate for at least 30 minutes to chill and thicken slightly.
    5. Pour 1-2 tablespoons of the chilled cranberry syrup into each flute glass.
    6. Gently top each glass with 3-4 ounces of chilled sparkling wine, pouring slowly to preserve the bubbles.
    7. Gently stir the mixture with a spoon or stirrer to combine the flavors without losing too much fizz.
    8. Garnish each glass with a few fresh cranberries and a sprig of mint for a festive touch.
    9. Serve immediately to enjoy the lively bubbles and bright, tart flavor.

    Tips & Tricks for a Perfect Cranberry Mimosa

    • Use fresh cranberries for the best flavor and color.
    • Chill your glasses in the freezer to keep the drink cold longer.
    • Add a splash of orange liqueur for extra depth.
    • Gently pour the sparkling wine to preserve bubbles.
    • Garnish with fresh cranberries for a festive look.

    Common Mistakes and How to Fix Them

    • FORGOT to strain the syrup? Reheat and press through a fine sieve again.
    • DUMPED too much syrup? Dilute with a splash of sparkling water.
    • OVER-TORCHED the syrup? Start over with fresh cranberries.
    • SPILLED bubbly? Gently pour more to top up and avoid losing fizz.

    Quick Fixes for Common Issues

    • When the syrup is too thick, warm slightly and stir with hot water.
    • Splash a bit of lemon juice if the syrup is too tart.
    • Patch bubbles by gently swirling the glass if fizz diminishes.
    • Shield the syrup from direct heat to avoid caramelization.
    • If out of fresh cranberries, use frozen ones—just thaw first.

    Preparing in Advance and Storage Tips

    • Make the cranberry syrup up to 2 weeks ahead, store in a sealed jar in the fridge.
    • Keep the syrup chilled; it thickens slightly but retains bright flavor.
    • The drink is best assembled fresh, but the syrup can be used for other cocktails too.
    • Refrigerated, the syrup maintains its tartness for about a week.

    10 Practical Q&As about Cranberry Mimosa

    1. Can I use frozen cranberries?

    Use fresh cranberries for a tart, juicy burst, but frozen berries work just fine if fresh isn’t available.

    2. What can I add to boost the flavor?

    Add a splash of orange liqueur or a dash of orange bitters to deepen the citrus flavor and add complexity.

    3. Should I chill the glasses?

    Chill your glasses in the freezer before serving to keep the drink cold longer without watering down.

    4. What kind of bubbly should I use?

    Use a good-quality sparkling wine or champagne, as it’s the base of the drink and needs to shine.

    5. Can I make it less sweet?

    For a less sweet version, choose a dry sparkling wine and reduce the cranberry syrup slightly.

    6. What garnishes work best?

    Garnish with fresh cranberries and a sprig of mint for visual appeal and a fresh aroma.

    7. Can I make the syrup ahead?

    Prepare the cranberry syrup a day ahead; keep refrigerated to let flavors meld.

    8. How do I balance the sweetness?

    Adjust sweetness by adding more or less cranberry syrup based on your taste.

    9. When should I serve it?

    Serve immediately after mixing to keep the bubbles lively and the flavors fresh.

    10. What do I do if it’s too foamy?

    If the drink becomes too foamy, gently stir to recombine the ingredients before serving.

    That’s the thing about this Cranberry Mimosa. It’s not just a drink; it’s a little moment of brightness, a toast to the season or just to making ordinary mornings feel a bit more special. It’s easy to throw together, yet it feels like a small celebration every time you take a sip.

    So, whenever you’re craving something lively and fresh, remember this one. It’s perfect for brunches, holidays, or whenever you want a splash of festivity in a glass. Cheers to simple joys and bright flavors.

  • Sheet Pan Ratatouille Recipe

    When I first started making ratatouille, I was all about the stovetop. But then I discovered roasting the vegetables in the oven, and everything changed. The caramelization, the smoky edges, it’s like each veggie gets a little charred hug from the heat.

    This method feels more forgiving, more hands-off, and honestly, it frees up stove space for everything else. Plus, the sweet, roasted aroma filling the kitchen makes everyone gather around, even if they’re just passing by.

    The Unseen Art of Roasting Vegetables for a Rustic, Flavor-Deep Ratatouille

    Why Roasting Vegetables Changed My Approach to Ratatouille

    • I love how roasting turns simple vegetables into something deeply flavorful.
    • There’s a satisfaction in the smell of caramelized peppers and smoky eggplant.
    • I feel proud serving this dish; it’s like a celebration of seasonal produce.
    • Even my kids eat this without fuss—it’s colorful and tasty.
    • Sometimes I toss in a handful of olives or capers for a salty punch.

    The Inspiration Behind My Roasted Ratatouille

    • I was tired of soggy, watery ratatouille, so I tried roasting instead. The results blew me away—more flavor, less fuss.
    • One evening, I had a bunch of leftover veggies and a craving for something cozy. Roasting turned those odds and ends into a star.
    • It’s become a go-to method for me—more reliable, more delicious, and it makes the house smell incredible.

    The Surprising History and Fun Facts About Ratatoille

    • Ratatouille originated in Provence, France, as a humble vegetable stew.
    • The name means ‘stirred together,’ reflecting its rustic roots.
    • Roasting vegetables for ratatouille is a modern twist that intensifies flavors.
    • Traditionally, the dish used eggplant, zucchini, peppers, tomatoes, and herbs.
    • This method helps reduce moisture, giving a richer, more concentrated taste.

    Deep Dive into the Key Ingredients of Roasted Ratatouille

    • Eggplant: I love how it becomes tender and slightly smoky; soak slices in salt water to reduce bitterness.
    • Zucchini: It cooks fast and stays juicy, but overcooking makes it mushy—watch carefully.
    • Red peppers: They develop a deep sweetness and smoky flavor, especially if charred slightly.
    • Tomatoes: Use ripe, juicy ones for a burst of bright, fresh flavor that balances the richness.
    • Herbs: Fresh basil and thyme add a fragrant, lively note that elevates the dish.

    Spotlight on Eggplant and Peppers

    Eggplant:

    • Sinks into a tender, creamy texture with a slightly smoky taste after roasting.
    • It releases moisture during roasting, so slicing evenly helps it cook uniformly.

    Red Peppers:

    • Develop a sweet, smoky flavor with charred spots that add complexity.
    • For extra smoky flavor, broil them until blistered before roasting.

    Easy Substitutions to Suit Your Pantry and Preferences

    • Dairy-Free: Use olive oil instead of butter for roasting—keeps the dish light and vibrant.
    • Vegan: Skip cheese or add a sprinkle of nutritional yeast for umami.
    • Gluten-Free: This dish is naturally gluten-free, no swaps needed.
    • Less Salt: Use a salt substitute or reduce salt to taste.
    • Herb Variations: Swap thyme for oregano or rosemary for different flavor profiles.

    Equipment & Tools

    • Large rimmed baking sheet: To hold all vegetables in a single, even layer for roasting.
    • Parchment paper: Prevents sticking and makes cleanup easier.
    • Spatula or tongs: To toss vegetables halfway through cooking.

    How to Roast Vegetables for Perfect Sheet Pan Ratatouille

    1. Preheat oven to 200°C (400°F). Line a large sheet pan with parchment.
    2. Slice eggplant, zucchini, peppers, and tomatoes about 1/4 inch thick. Toss with olive oil, salt, and herbs.
    3. Spread the vegetables in a single layer on the pan. Roast for 25-30 minutes until edges are golden and veggies are tender.
    4. Halfway through, toss the vegetables gently with a spatula to promote even caramelization.
    5. Check for charred edges and fragrant aroma. The peppers should be soft and slightly smoky.
    6. Remove from oven and let sit for 5 minutes. Garnish with fresh herbs before serving.

    Let it rest for 5 minutes before garnishing and serving. This helps the flavors settle and makes it easier to plate.

    How to Know It’s Done

    • Edges are caramelized and slightly charred.
    • Vegetables are tender when pierced with a fork.
    • A fragrant, roasted aroma fills the kitchen.

    Roasted Ratatouille

    This roasted ratatouille showcases vibrant vegetables caramelized to perfection in the oven, creating a smoky, flavorful dish with a rustic appearance. The process involves roasting sliced eggplant, zucchini, peppers, and tomatoes until tender and slightly charred, resulting in a colorful, aromatic medley with deep, concentrated flavors and a tender yet slightly crispy texture.
    Prep Time 15 minutes
    Cook Time 30 minutes
    Total Time 45 minutes
    Servings: 4
    Course: Main Course
    Cuisine: French
    Calories: 180

    Ingredients
      

    • 1 medium eggplant sliced into 1/4 inch rounds
    • 2 zucchini sliced into 1/4 inch rounds
    • 2 red bell peppers sliced into strips about 1/4 inch thick
    • 3 large ripe tomatoes sliced into 1/4 inch rounds
    • 2 tablespoons olive oil for tossing vegetables
    • 1 teaspoon dried thyme or fresh thyme leaves
    • to taste salt for seasoning
    • to taste black pepper freshly ground for flavor
    • a few fresh basil leaves for garnish

    Equipment

    • Large rimmed baking sheet
    • Parchment paper
    • Spatula or tongs

    Method
     

    1. Preheat your oven to 200°C (400°F) and line a large rimmed baking sheet with parchment paper. Arrange all the sliced vegetables on a cutting board or tray for easy assembly.
    2. In a small bowl, mix the olive oil with thyme, salt, and pepper. Brush or toss the sliced eggplant, zucchini, peppers, and tomatoes with this mixture until evenly coated.
    3. Spread the vegetables in a single, even layer on the prepared baking sheet. Make sure not to overcrowd them to promote caramelization.
    4. Place the sheet in the oven and roast for about 25-30 minutes, until the edges are golden and slightly charred, and the vegetables are tender when pierced with a fork. Toss the vegetables gently with a spatula halfway through to promote even browning.
    5. Once roasted, remove the sheet from the oven and let the vegetables rest for 5 minutes to settle the flavors and cool slightly.
    6. Transfer the roasted vegetables to a serving dish or bowl. Garnish with fresh basil leaves for a bright, fragrant finish.
    7. Serve your roasted ratatouille warm or at room temperature, enjoying the smoky aroma and tender, caramelized textures.

    Top Tips and Tricks for Perfect Sheet Pan Ratatouille

    • Uniform slices → Ensures even cooking and caramelization.
    • Don’t overcrowd → Keep vegetables in a single layer for crispy edges.
    • Use good olive oil → Boosts flavor and helps with caramelization.
    • Season generously → Salt and herbs are key to flavor.
    • Toss halfway through → Promotes even browning.

    Common Roasting Mistakes and How to Fix Them

    • FORGOT TO PREHEAT THE OVEN? → Preheat fully for even roasting and caramelization.
    • DUMPED TOO MUCH OIL? → Use just enough to lightly coat veggies; excess drips off and burns.
    • OVER-TORCHED EDGES? → Reduce oven temp slightly or shorten roasting time.
    • VEGGIES ARE SOGGY? → Slice thinner and toss with a little more oil before roasting.

    Quick Fixes for Common Roasting Hiccups

    • When veggies stick, splash a little water or broth to loosen.
    • If burnt edges appear, cover with foil and lower oven temp.
    • Patch soggy veggies with a quick blast under the broiler.
    • Shield delicate herbs by adding at the end, not during roasting.
    • If the dish lacks brightness, squeeze lemon over before serving.

    Make-Ahead and Storage Tips for Better Flavor

    • Vegetables can be sliced and seasoned a day ahead. Keep covered in the fridge.
    • Roasted ratatouille keeps well for 2-3 days in an airtight container.
    • The flavors deepen overnight, making it even tastier the next day.
    • Reheat in the oven at 180°C (350°F) until sizzling—about 10 minutes. Look for steam and fragrant aroma.

    10 Practical Q&As About Sheet Pan Ratatouille

    1. What kind of pan should I use?

    Use a large, rimmed baking sheet to give everything enough room to spread out, ensuring even roasting.

    2. How thick should the vegetables be sliced?

    Slice the vegetables uniformly, about 1/4 inch thick, so they cook evenly and look pretty.

    3. Should I marinate the vegetables beforehand?

    Toss the vegetables with olive oil, herbs, and salt before roasting—this helps them caramelize and develop flavor.

    4. How long does it take to cook?

    Roast at 200°C (400°F) for about 25-30 minutes until the edges are golden and veggies are tender.

    5. How do I know when it’s done?

    Check for charred edges and a fragrant aroma—these indicate it’s ready. The peppers should be soft.

    6. Can I toss the vegetables during roasting?

    Use a spatula to gently toss halfway through to encourage even roasting.

    7. How should I serve it?

    Serve hot with crusty bread or over rice; the flavors deepen as it cools, so leftovers are great.

    8. Can I customize the flavors?

    Feel free to add a splash of balsamic vinegar or a sprinkle of fresh basil before serving for extra brightness.

    9. How do I store and reheat leftovers?

    Leftovers keep well in the fridge for 2-3 days. Reheat in the oven until sizzling and fragrant.

    10. Why is this recipe seasonally relevant?

    This dish is a great way to use up garden produce and makes a colorful, healthy meal.

    This sheet pan approach makes it easy to get a big, flavorful batch without fussing over each ingredient. It’s perfect for weeknights when time is tight but you want something wholesome and satisfying.

    And honestly, I keep coming back to it because it tastes better—the roasted vegetables are just so much richer, and the whole dish feels like a little celebration of the season’s best produce.

  • Chocolate Peanut Butter Tart Recipe

    When I first made this tart, I was craving something indulgent but easy to pull together after a long day. The combo of silky peanut butter and deep chocolate feels both nostalgic and decadent—no fuss, just good stuff. It’s like a little secret stash of comfort I can whip up in under an hour.

    This recipe is a reminder that sometimes, less is more. No complicated techniques, no fancy ingredients—just honest, straightforward flavors that hit all the right spots. I love how the crunch of the crust contrasts with the creamy filling, making each bite a little celebration.

    A no-bake approach for the busy cook, focusing on effortless assembly and rich flavors without turning on the oven.

    Why this tart matters to me—simple, satisfying, and always a hit.

    • I love how this tart balances richness with crunch.
    • Every time I make it, I feel a little bit like a confident baker, even if I didn’t turn on the oven.
    • Sharing this with friends always sparks smiles and nostalgic stories.
    • It’s my go-to when I want something sweet but don’t want to spend all day baking.

    A personal story of inspiration and evolution.

    • This recipe was born out of a lazy weekend craving for something indulgent but easy. I had a jar of peanut butter and a bar of dark chocolate sitting around, and suddenly, the idea of a tart just clicked. It’s a no-bake, fuss-free way to get that perfect balance of salty, sweet, and chocolatey.
    • Over time, I’ve tweaked the ingredient ratios and added a sprinkle of sea salt on top, which totally elevates the flavor. It’s become a little tradition for me—an instant fix for cravings that’s ready in under two hours, from start to finish.
    • I love how this tart feels like a treat, but it’s so straightforward that I often make it last minute. It’s the kind of dessert that makes you wonder why you ever bothered with complicated recipes.

    A little history and trivia about the ingredients and inspiration

    • This tart is inspired by classic no-bake cheesecake flavors but with a richer, chocolatey twist.
    • Chocolate and peanut butter combo became iconic in the 1960s, popularized by various candy bars.
    • Using crushed biscuits as a crust is a quick, no-fuss alternative to traditional pastry.
    • Peanut butter was first made in the late 19th century, originally marketed as a health food.

    Ingredient insights and tweaks

    • Chocolate: I prefer a 70% dark chocolate for depth; use milk chocolate for sweeter, softer flavor.
    • Peanut Butter: Creamy or crunchy, your choice—crunch adds texture, creaminess melts smoothly.
    • Biscuits: Digestives or graham crackers work well. For a richer crust, swap with crushed cookies.
    • Butter: Unsalted is best for control of saltiness; salted butter adds a touch of seasoning.
    • Sea Salt: Flaky sea salt on top elevates the sweetness with a burst of saltiness, like a little surprise.

    Spotlight on Chocolate and Peanut Butter

    Dark chocolate:

    • Chocolate: Melts into a glossy, smooth ganache that coats the palate with deep cocoa flavor.
    • It can seize if overheated, so melt gently and stir well.
    • Chilled, it firms up quickly, giving the tart its structure.

    Creamy peanut butter:

    • Peanut Butter: Adds a salty, nutty richness that balances the sweetness.
    • Oil separation is natural—stir before using to ensure even creaminess.
    • Aromatic and oozy when warmed, it blends seamlessly into the filling.

    Ingredient substitution ideas

    • Dairy-Free: Swap regular butter for coconut oil, but expect a slightly coconutty flavor.
    • Sugar-Free: Use sugar substitutes like erythritol in the crust or filling, but beware of lingering aftertaste.
    • Gluten-Free: Substitute biscuits with gluten-free cookies or crushed almonds.
    • Vegan: Use plant-based butter and ensure chocolate is dairy-free.
    • Salted Caramel: Drizzle on top for a salty-sweet twist, replacing sea salt.

    Equipment & Tools

    • Food processor: Crush biscuits evenly.
    • Double boiler or microwave: Melt chocolate gently.
    • Spatula: Smooth the filling and top.
    • Tart pan, 23cm/9in: Shape the crust and hold the tart.
    • Sharp knife dipped in warm water: Slice cleanly.

    Step-by-step guide to a no-bake Chocolate Peanut Butter Tart

    1. Crush the biscuits finely, then mix with melted butter. Press into a tart pan, about 23cm/9in, and chill for 15 minutes.
    2. Melt the chocolate gently over a double boiler or in short bursts in the microwave. Let it cool slightly.
    3. Mix peanut butter, vanilla, and a pinch of sea salt until smooth. Fold in melted chocolate until combined.
    4. Pour filling into the chilled crust, smoothing the top with a spatula. Chill for at least 2 hours.
    5. Before serving, sprinkle flaky sea salt or chopped peanuts on top for crunch and contrast.
    6. Slice with a hot, sharp knife dipped in warm water for clean cuts.
    7. Let the tart sit at room temp for 30 minutes before slicing to enhance flavors.

    Let the tart rest at room temperature for 30 minutes before slicing. Serve directly from the fridge or at room temp, depending on your texture preference.

    How to Know It’s Done

    • Chocolate filling looks glossy and smooth.
    • Crust is firm and holds shape when pressed.
    • Tart feels set and slightly firm to the touch after chilling.

    No-Bake Chocolate Peanut Butter Tart

    This indulgent tart combines a crunchy biscuit crust with a silky, rich peanut butter and chocolate filling. Made without an oven, it features a smooth, glossy chocolate ganache topped with a sprinkle of sea salt, creating a decadent yet effortless dessert. The contrast between the crunchy base and creamy filling makes each bite a satisfying treat.
    Prep Time 20 minutes
    Total Time 2 minutes
    Servings: 8
    Course: Main Course
    Cuisine: American
    Calories: 470

    Ingredients
      

    • 1 1/2 cups crushed biscuits (digestives or graham crackers)
    • 1/4 cup unsalted butter, melted
    • 200 g dark chocolate (70%)
    • 1/2 cup creamy peanut butter
    • 1 teaspoon vanilla extract
    • 1/4 teaspoon sea salt or flaky sea salt for sprinkling on top

    Equipment

    • Food processor
    • Microwave or double boiler
    • Spatula
    • 23cm/9in tart pan
    • Sharp knife dipped in warm water

    Method
     

    1. Crush the biscuits into fine crumbs using a food processor, then transfer to a bowl.
    2. Pour the melted butter over the biscuit crumbs and stir until well combined, creating a moist, sandy mixture.
    3. Press the biscuit mixture evenly into the base and up the sides of a 23cm tart pan, then refrigerate for 15 minutes to set the crust.
    4. Gently melt the dark chocolate in a microwave in short bursts or over a double boiler, stirring until smooth and glossy. Let it cool slightly.
    5. In a bowl, blend the peanut butter, vanilla extract, and a pinch of sea salt until creamy and smooth.
    6. Fold the cooled, melted chocolate into the peanut butter mixture until fully combined and smooth.
    7. Pour the chocolate peanut butter filling into the chilled crust, spreading it evenly with a spatula.
    8. Refrigerate the tart for at least 2 hours, or until the filling is firm and glossy.
    9. Just before serving, sprinkle flaky sea salt on top for a flavor contrast.
    10. Use a sharp, warm knife to slice the tart cleanly, dipping it in warm water between cuts.
    11. Serve the tart at room temperature or chilled, and enjoy the rich, creamy, and crunchy textures in every bite.

    Cooking tips and tricks for perfect tart

    • Use room temperature ingredients to blend smoothly.
    • Chill the crust before filling to prevent sogginess.
    • Melt chocolate gently—double boiler or microwave in short bursts.
    • Use a hot, sharp knife for clean slices.
    • Sprinkle sea salt just before serving to enhance flavor.

    Common pitfalls and how to fix them

    • FORGOT TO CHILL THE CRUST? Press it firmly and chill for 30 mins before filling.
    • DUMPED TOO MUCH CHOCOLATE? Use a lighter hand next time or add more peanut butter to balance.
    • OVER-TORCHED THE CHOCOLATE? Melt it gently over low heat or in short bursts in the microwave.
    • FILLING IS TOO RUNNY? Chill it longer or add a tiny bit of cornstarch to thicken.

    Quick fixes for common tart troubles

    • When filling is too thick, stir in a splash of cream or milk.
    • Splash warm water on knife for cleaner slices.
    • Patch cracks in crust with extra crumbs and press down.
    • Shield chocolate from heat to prevent blooming or streaking.
    • When in doubt, chill the tart longer or serve slightly softer for easier slicing.

    Make-ahead tips and storage advice

    • Crust can be made a day ahead; keep wrapped in the fridge.
    • Filling can be prepared a few hours before and stored in the fridge.
    • The tart tastes best after at least 2 hours of chilling, but can be made a day early.
    • Cover tightly and store in the fridge for up to 3 days; flavors deepen and meld.

    10 Practical Q&As about the Chocolate Peanut Butter Tart

    1. What kind of chocolate should I use?

    Use a good quality dark chocolate, around 70%, for a rich, not overly sweet flavor.

    2. Should I chill the crust before adding the filling?

    Chill the crust before filling to prevent sogginess and ensure a crisp bite.

    3. Can I warm the peanut butter?

    Warm the peanut butter slightly for easier mixing and a silkier texture.

    4. How long should I rest the tart before slicing?

    Let the tart sit at room temperature for about 30 minutes before serving for optimal flavor.

    5. How do I get clean slices?

    Use a sharp knife dipped in hot water for clean slices without cracking.

    6. Should I add salt on top?

    Add a sprinkle of flaky sea salt on top for a contrast that enhances both flavors.

    7. Which type of peanut butter works best?

    Opt for crunchy peanut butter if you like texture, or smooth for creaminess.

    8. How do I know when the crust is done?

    Bake the crust just until golden, about 10 minutes at 180°C/350°F.

    9. How long will the tart keep?

    Store leftovers in an airtight container in the fridge for up to 3 days.

    10. Should I bring it to room temperature before serving?

    Bring the tart to room temp before serving if refrigerated to soften the filling.

    This tart isn’t just a dessert; it’s a tiny rebellion against overly complicated baking. It’s perfect for when you want something satisfying but don’t want to spend hours in the kitchen. Plus, it’s a hit with kids and adults alike, especially when that salty-sweet topping gets sprinkled on.

    Every time I make this, I think about how a few pantry staples can turn into a moment of pure, simple pleasure. It’s a reminder that good food doesn’t always need to be fancy—just honest, flavorful, and made with a little love.