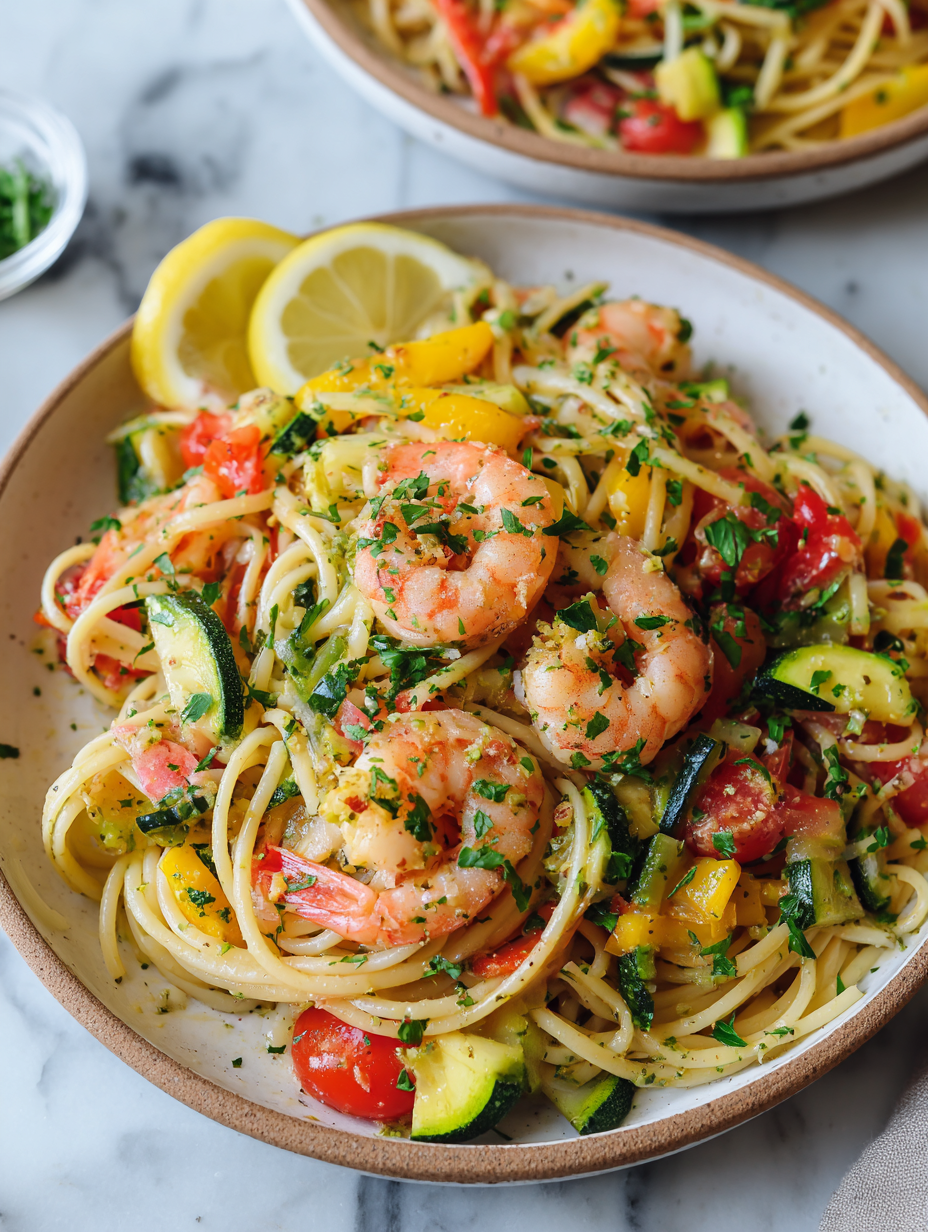
Category: Main Course

  • Creepy Stuffed Shells: An Unusual Comfort Food with a Twist

    Creepy Stuffed Shells: An Unusual Comfort Food with a Twist

    These creepy stuffed shells are a little bit spooky, a little bit nostalgic, and totally comforting. I love how the shape of the pasta invites you to fill it with whatever strange, cheesy concoction you fancy. It’s the kind of dish that’s perfect for a casual dinner, a party, or just a lazy weekend craving.

    Why I Keep Coming Back to Creepy Stuffed Shells

    They’re endlessly adaptable, forgiving, and surprisingly satisfying. Each time I make them, I can tweak the fillings or toppings, making it feel new. Plus, the smell of baked cheese and garlic filling the house is pure comfort, especially when the world feels chaotic.

    What’s Inside? An Ingredient Breakdown

    • Ricotta cheese: Creamy, mild, and acts as the base. Swap with mascarpone for extra richness.
    • Mozzarella cheese: Oozy, smoky, melts beautifully. Use a good block, not pre-shredded for better flavor.
    • Fresh spinach: Adds a leafy freshness. Frozen works in a pinch—just drain excess moisture.
    • Garlic: Infuses the filling with pungent warmth. Roasted garlic adds a sweet, mellow note.
    • Pasta shells: The perfect vessel—large, sturdy, and fun to stuff. Whole wheat adds a nutty flavor.
    • Salt and pepper: Basic seasonings—don’t skimp, they bring everything alive.
    • Olive oil: For sautéing spinach and garlic—smoky and bright.

    Tools of the Trade for Creepy Shells

    • Large pot: Boiling pasta shells evenly.
    • Mixing bowl: Combining cheese and filling ingredients.
    • Baking dish: Crisping and melting the cheese topping.
    • Spoon or piping bag: Stuffing shells smoothly.
    • Oven thermometer: Ensuring precise baking temperature.

    Mastering the Art of Stuffed Shells: A Step-by-Step Guide

    Step 1: Preheat your oven to 180°C (350°F).

    Step 2: Cook the pasta shells in boiling salted water until just al dente, about 8 minutes.

    Step 3: Drain shells and set aside to cool slightly.

    Step 4: Mix ricotta, shredded mozzarella, chopped spinach, and a dash of garlic in a bowl.

    Step 5: Stuff each shell with the cheese mixture, then arrange in a baking dish.

    Creepy Shells: Key Cooking Checkpoints

    • Shells should be al dente, not mushy or undercooked.
    • Cheese filling must be creamy and not dry—adjust with a splash of milk if needed.
    • Top should be bubbling and golden when baked—don’t forget to peek.

    Common Mistakes and How to Fix Them

    • Under-cooking shells, they’re hard to stuff.? Use a timer for boiling shells; overcooked shells fall apart.
    • Stuffing hot shells, melts cheese prematurely.? Drain shells thoroughly and let cool slightly before stuffing.
    • Covering dish, causing cheese to steam and turn pale.? Bake uncovered until bubbling and golden.
    • Filling is dry or crumbly.? Add a splash of milk to cheese filling if it’s too thick.

    Creepy Stuffed Shells

    These spooky stuffed shells feature large pasta shells filled with a creamy cheese and spinach mixture, baked until bubbling and golden. The dish combines comforting textures with cheesy richness, perfect for a casual dinner or party centerpiece. The shape of the shells makes for a fun and inviting presentation.
    Prep Time 15 minutes
    Cook Time 20 minutes
    Total Time 35 minutes
    Servings: 4
    Course: Main Course
    Cuisine: American
    Calories: 350

    Ingredients
      

    • 12 pieces large pasta shells whole wheat adds a nutty flavor
    • 1 cup ricotta cheese creamy and mild
    • 1 cup shredded mozzarella cheese preferably fresh for better flavor
    • 1 cup fresh spinach chopped, drained if frozen
    • 2 cloves garlic minced or roasted
    • 2 tablespoons olive oil for sautéing
    • to taste salt and pepper season generously

    Equipment

    • Large pot
    • Mixing bowl
    • Baking dish
    • Spoon or piping bag
    • Oven thermometer

    Method
     

    1. Bring a large pot of salted water to a boil and cook the pasta shells until just al dente, about 8 minutes. Drain and set aside to cool slightly.
    2. In a mixing bowl, combine ricotta cheese, shredded mozzarella, chopped spinach, and minced garlic. Mix until well blended and creamy, adding salt and pepper to taste.
    3. Using a spoon or piping bag, carefully stuff each shell with the cheese mixture, pressing gently to fill completely.
    4. Arrange the stuffed shells snugly in a baking dish, facing up and side by side.
    5. Drizzle olive oil over the shells and cover the dish loosely with foil. Bake in a preheated oven at 180°C (350°F) for 15 minutes.
    6. Remove the foil and bake uncovered for an additional 5 minutes, until the cheese is bubbling and golden brown on top.
    7. Once baked, let the shells rest for a few minutes, then serve hot, enjoying the cheesy, creamy filling with a crispy top.

    Notes

    Feel free to add a sprinkle of red pepper flakes or chopped fresh herbs for extra flavor. You can also make the filling ahead of time for quicker assembly.
    These stuffed shells aren’t just a meal—they’re a conversation starter, a little bit creepy, a little bit cozy. Let your imagination run wild with fillings, maybe add some smoky chipotle or a splash of lemon for brightness. Whatever you do, enjoy the process and the warm, cheesy chaos that follows.

  • Monster Meatloaf: A Hearty, Unexpected Twist for Comfort Food Lovers

    Monster Meatloaf: A Hearty, Unexpected Twist for Comfort Food Lovers

    Monster meatloaf started as a way to tame a fridge full of odds and ends. It’s a dish that’s evolved from simple family dinners into a messy, joyful spectacle of flavors. I love the thrill of throwing in whatever’s at hand and seeing how it turns out. It’s a perfect storm of chaos and comfort, especially during busy weekends.

    Why this monster keeps calling me back

    It’s the unpredictability — no two monsters are the same. Plus, the smell of baking meatloaf at 175°C, with hints of caramelized onions, always pulls me home. It’s a dish that’s forgiving, rustic, and honestly, just plain satisfying to make and eat.

    Breaking down the beast: ingredients and their quirks

    • Ground beef: The backbone, juicy and tender, but lean works better—avoid dry turkey or chicken.
    • Breadcrumbs: Hold everything together. Use fresh or slightly stale for best texture.
    • Onions & garlic: Builds flavor from the inside out. Sauté until golden and fragrant.
    • Ketchup & spices: Adds sweetness and smoky depth. Feel free to swap for barbecue sauce or hot sauce.
    • Eggs: Bind everything together, keeping the loaf from falling apart.
    • Optional extras: Chopped bacon, cheese, or hot sauce—go wild, it’s your monster.

    Tools of the trade for monster meatloaf

    • Large mixing bowl: Combine all ingredients evenly.
    • Skillet: Sauté onions and garlic to deepen flavors.
    • Loaf pan: Shape and bake the meatloaf evenly.
    • Thermometer: Check internal temperature for safety and doneness.
    • Cooling rack: Rest the loaf so juices redistribute.

    Step-by-step guide to crafting your monstrous masterpiece

    Step 1: Preheat your oven to 175°C (350°F).

    Step 2: Gather a 9×5 inch (23×13 cm) loaf pan and a large mixing bowl.

    Step 3: In a skillet over medium, sauté diced onions and garlic until translucent, about 5 minutes.

    Step 4: Mix all ingredients in the bowl: ground beef, cooked veggies, breadcrumbs, eggs, ketchup, and spices.

    Step 5: Shape the mixture into a loaf and place in the pan.

    Step 6: Bake for about 1 hour, until the top is caramelized and a thermometer reads 70°C (160°F).

    Step 7: Let rest for 10 minutes before slicing to ensure clean cuts.

    Step 8: Serve with a drizzle of gravy or extra ketchup for a nostalgic touch.

    Cooking checkpoints to keep your monster on track

    • Meatloaf should be golden-brown and slightly crispy on top.
    • Internal temperature must reach 70°C (160°F) for safety.
    • The loaf should feel firm but not hard, with a slight jiggle in the center.
    • Smell should be rich with caramelized onions and seasoned beef.

    Common pitfalls and how to dodge them

    • Using dry breadcrumbs without enough moisture.? Add a splash of beef broth if the mixture feels too dry.
    • Overbaking, causing the loaf to dry out.? Cover loosely with foil if the top browns too fast.
    • Slicing immediately, which causes crumbling.? Let the meatloaf rest for 10 minutes before slicing.
    • Using a dull knife leading to squished slices.? Use a sharp knife to cut clean slices.

    Monster Meatloaf

    Monster meatloaf is a rustic, hearty dish that combines ground beef with breadcrumbs, sautéed onions, garlic, and flavorful condiments. Baked until caramelized on top with a juicy, tender interior, it offers a comforting, chaotic mix of flavors and textures. Perfect for using up odds and ends in the fridge, it’s a messy but satisfying centerpiece.
    Prep Time 15 minutes
    Cook Time 1 hour
    Total Time 1 hour 15 minutes
    Servings: 4
    Course: Main Course
    Cuisine: American
    Calories: 450

    Ingredients
      

    • 1 lb ground beef lean preferred
    • 1 cup breadcrumbs fresh or slightly stale
    • 1 large onion diced
    • 3 cloves garlic minced
    • 1/2 cup ketchup or barbecue sauce
    • 2 eggs beaten
    • 1 tsp spice mix spices of choice

    Equipment

    • Large mixing bowl
    • Skillet
    • Loaf pan
    • Thermometer
    • Cooling rack

    Method
     

    1. Preheat your oven to 175°C (350°F) and gather your loaf pan and mixing bowl.
    2. In a skillet over medium heat, sauté diced onions and minced garlic until they turn golden and fragrant, about 5 minutes. This deepens their flavor and softens their texture.
    3. In your large mixing bowl, combine the ground beef, cooked onions and garlic, breadcrumbs, beaten eggs, ketchup, and spice mix. Mix everything together thoroughly until well combined; the mixture should be slightly sticky but manageable.
    4. Shape the mixture into a loaf shape and place it into the loaf pan, pressing gently to ensure it holds together evenly.
    5. Bake in the preheated oven for about 60 minutes, until the top becomes caramelized and a thermometer inserted into the center reads at least 70°C (160°F). The aroma should be rich and savory as it bakes.
    6. Once baked, remove the meatloaf from the oven and transfer it to a cooling rack. Let it rest for about 10 minutes; this helps the juices redistribute and makes slicing easier.
    7. Slice the meatloaf with a sharp knife into thick pieces, revealing a juicy, tender interior with a nicely browned crust.
    8. Serve your monster meatloaf warm, optionally drizzled with extra ketchup or gravy for a nostalgic, comforting meal.

    Notes

    Feel free to add extras like bacon, cheese, or hot sauce into the mixture for an even more monster-like flavor explosion.
    This monster meatloaf isn’t just about feeding a crowd; it’s about embracing the chaos of comfort food with a hearty, satisfying twist. It’s messy, it’s flavorful, and it’s a reminder that in the kitchen, imperfections often make the best dishes. Feel free to tweak the ingredients, maybe throw in some smoked cheese or hot sauce—make it your own. Now, go ahead, slice into that beast and enjoy every bite.

  • Spooky Stuffed Peppers: A Halloween-Inspired Twist on a Classic

    Spooky Stuffed Peppers: A Halloween-Inspired Twist on a Classic

    I’ve always loved stuffed peppers, but Halloween gives me an excuse to push the spooky factor. This version is a little more playful, turning a humble dish into a festive centerpiece. It’s a good way to balance fun and comfort, especially when the nights get longer and colder.

    Why You’ll Keep Making These

    They’re easy, forgiving, and endlessly customizable. I love how they turn a simple dinner into a visual treat. Plus, they make me feel like a kitchen wizard, creating something festive with just a handful of ingredients.

    Inside the Ingredient Palette

    • Bell peppers: Large, sturdy, and colorful; they serve as edible bowls that hold all the goodness.
    • Ground meat or veggie protein: Provides the hearty base; opt for plant-based if you want a meatless version.
    • Rice: Adds bulk and texture; use day-old rice for best results.
    • Olives and feta: Salty, briny, and tangy; they add a punch of flavor and contrast.
    • Hot sauce: A splash brings a smoky, spicy kick that wakes up the filling.
    • Cheese: Melty, golden, and slightly crispy on top, tying everything together.
    • Spooky toppings: Black olives, cherry tomatoes, or even sliced jalapeños for a haunted look.

    Tools You’ll Need for Spooky Stuffed Peppers

    • Oven: To bake the peppers to perfection.
    • Large skillet: For sautéing and cooking the filling.
    • Spoon or scoop: To hollow out the peppers.
    • Baking dish: To hold the stuffed peppers while baking.
    • Knife: To chop ingredients and cut tops.

    Step-by-Step for Your Haunted Feast

    Step 1: Preheat your oven to 180°C (350°F).

    Step 2: Slice the tops off 4 large bell peppers and scoop out seeds and membranes.

    Step 3: In a skillet over medium heat, sauté 1 chopped onion and 2 cloves minced garlic in olive oil until fragrant, about 5 minutes.

    Step 4: Add 1 pound ground beef or plant-based alternative to the skillet. Cook until browned, about 8 minutes.

    Step 5: Stir in 1 cup cooked rice, ½ cup chopped black olives, ½ cup crumbled feta, and a splash of hot sauce. Mix well.

    Step 6: Stuff the peppers with the filling, pressing down lightly.

    Step 7: Place stuffed peppers in a baking dish, top with shredded cheese and spooky toppings like black olives or cherry tomatoes.

    Step 8: Bake for 25-30 minutes until peppers are tender and cheese is bubbly and golden.

    Step 9: Let sit for 5 minutes before serving to settle flavors.

    Cooking Tips & Tricks for Perfect Peppers

    • Peppers should be firm but pliable, not soft or shriveled.
    • Ensure filling is seasoned well, tasting before stuffing.
    • Bake until cheese is golden and bubbling, not just warm.
    • Check peppers with a fork—should be tender but not falling apart.

    Common Pitfalls and How to Fix Them

    • Peppers tear when cutting.? Use a sharp knife to cut peppers; dull blades crush and tear.
    • Overly charred aromatics.? Sauté onions and garlic until fragrant, not burnt.
    • Overbaking leading to collapse.? Bake peppers until just tender, not mushy.
    • Bland stuffing.? Season filling generously, taste before stuffing.

    Spooky Stuffed Peppers

    These festive stuffed peppers are baked until tender and topped with melty cheese, featuring colorful bell peppers filled with a savory mixture of ground meat or plant-based protein, rice, olives, and feta. The final dish boasts vibrant, slightly crispy tops with juicy, flavorful insides perfect for a Halloween-inspired centerpiece.
    Prep Time 15 minutes
    Cook Time 30 minutes
    Total Time 45 minutes
    Servings: 4
    Course: Main Course
    Cuisine: International
    Calories: 350

    Ingredients
      

    • 4 large bell peppers large and sturdy, with colorful skins
    • 1 medium onion chopped
    • 2 cloves garlic minced
    • 1 pound ground beef or plant-based protein cooked until browned
    • 1 cup cooked rice preferably day-old
    • 0.5 cup black olives chopped
    • 0.5 cup feta cheese crumbled
    • 1 dash hot sauce adds a smoky, spicy kick
    • 1 cup shredded cheese melty and golden, for topping

    Equipment

    • Oven
    • Large Skillet
    • Spoon or scoop
    • Baking dish
    • Knife

    Method
     

    1. Preheat your oven to 180°C (350°F). Slice the tops off the bell peppers and carefully scoop out the seeds and membranes using a spoon or scoop, leaving a hollow shell.
    2. In a large skillet, sauté the chopped onion and minced garlic in a splash of oil over medium heat until fragrant and translucent, about 5 minutes. The kitchen will smell warm and savory.
    3. Add the ground beef or plant-based protein to the skillet and cook until browned, breaking it apart with a spoon, about 8 minutes. It should turn a rich brown color with a pleasant aroma.
    4. Stir in the cooked rice, chopped olives, crumbled feta, and a dash of hot sauce into the skillet. Mix everything thoroughly until combined and heated through, creating a flavorful filling with a slightly chunky texture.
    5. Stuff each hollowed-out pepper with the filling, pressing down gently to pack it in. Place the filled peppers into a baking dish, standing upright.
    6. Top each stuffed pepper with shredded cheese, then add spooky toppings like sliced black olives or cherry tomatoes to create a haunted look. The vibrant toppings will make the dish festive and fun.
    7. Bake the peppers in the preheated oven for 25-30 minutes until the peppers are tender and the cheese is bubbly and golden brown on top. You’ll hear a gentle bubbling sound when they’re ready.
    8. Remove the dish from the oven and let it rest for 5 minutes, allowing the flavors to settle and the cheese to set slightly. The peppers should be tender but still hold their shape, with a crispy, cheesy top.
    9. Serve the stuffed peppers hot, letting each guest enjoy the colorful, cheesy, and flavorful feast. The mixture inside is juicy and satisfying, and the toppings add a playful, spooky touch.

    Notes

    Feel free to customize the toppings with other spooky ingredients like sliced jalapeños or pepperoni for extra flair. Using day-old rice helps the filling hold together better, but freshly cooked rice works too once cooled slightly.
    These spooky stuffed peppers are more than just a Halloween party snack. They combine comforting, hearty flavors with a playful presentation that sparks conversation. Feel free to swap fillings or toppings to make them your own—this is about having fun in the kitchen as much as it’s about the taste. Enjoy busting out these creepy, cozy bites whenever you want a little festive flair.

  • Halloween Tacos: A Spooky Twist on a Crowd Favorite

    Halloween Tacos: A Spooky Twist on a Crowd Favorite

    I’ve always loved the chaos of Halloween, and these tacos capture that spirit in a meal. The idea of turning classic tacos into something spooky and fun just clicks with my love for playful cooking. Plus, making them is a bit of a messy joy—cracking open cans, chopping colorful veggies, and assembling with a grin.

    Why I Keep Coming Back to These Halloween Tacos

    They remind me of childhood Halloweens, filled with chaos and candy. Plus, they’re endlessly customizable, making each batch a new adventure. The bright colors and bold flavors turn a simple taco into a mini celebration.

    Spooky, Savory, and Colorful: Ingredient Breakdown

    • Ground beef or turkey: Main protein, seasoned with chili powder, cumin, and garlic for depth.
    • Black beans: Adds earthiness and texture, really pops against the meat’s smoky notes.
    • Tortillas: Soft and pliable, serve as the perfect spooky ‘tombs’ for fillings.
    • Cheese: Shredded cheddar or Monterey Jack; melts into gooey, inviting layers.
    • Toppings like sour cream, jalapeños, and shredded lettuce: Bright, cooling, and spicy elements to balance flavors and add visual punch.

    Tools of the Trade for Spooky Tacos

    • Skillet: To cook and brown the meat evenly.
    • Spatula: To break apart and stir the meat as it cooks.
    • Microwave or dry skillet: To warm tortillas without drying them out.
    • Knife and chopping board: For prepping toppings and fillings.

    Step-by-step to Craft Creepy, Delicious Halloween Tacos

    Step 1: Start by preheating your skillet over medium heat, around 180°C (350°F).

    Step 2: While it heats, prepare your fillings: seasoned ground meat, black beans, and vibrant toppings.

    Step 3: Cook the meat until browned and fragrant, about 8 minutes, breaking it apart with a spatula.

    Step 4: Warm your tortillas either in a dry skillet or microwave wrapped in a damp towel, for about 20 seconds.

    Tacos in the Making: Tips for a Perfect Spooky Bite

    • Meat should be well browned, not greasy, and smell smoky with a hint of cumin.
    • Tortillas should be warm and pliable, not cracked or dry.
    • Toppings need to be fresh and brightly colored for that eye-catching effect.

    Oops Moments and How to Fix ‘Em

    • Meat sticking and burning.? Add a splash of water if the meat sticks or seems dry.
    • Tortillas drying out or cracking.? Cover tortillas with a damp towel to keep them soft.
    • Overcooking toppings.? Turn down heat if fillings burn or smell charred.
    • Crowding the pan, leading to uneven browning.? Use a wider pan for more space to cook evenly.

    Halloween Tacos

    These spooky Halloween tacos combine seasoned ground meat with black beans, colorful toppings, and warm tortillas to create a playful and flavorful meal. The dish features a mix of textures—from crispy and smoky meat to soft tortillas—and vibrant colors, making it perfect for a festive celebration. Assembly is simple, with each bite offering a fun, messy joy reminiscent of childhood Halloweens.
    Prep Time 10 minutes
    Cook Time 15 minutes
    Total Time 25 minutes
    Servings: 4
    Course: Main Course
    Cuisine: Mexican
    Calories: 350

    Ingredients
      

    • 1 lb ground beef or turkey seasoned with chili powder, cumin, and garlic
    • 1 cup black beans drained and rinsed
    • 8 small tortillas warm and pliable
    • 1 cup shredded cheddar or Monterey Jack cheese for melting and topping
    • 1/2 cup sour cream for cooling and decoration
    • 1 jalapeño jalapeño slices for spice and color
    • 1 cup shredded lettuce for freshness and crunch

    Equipment

    • Skillet
    • Spatula
    • Microwave or dry skillet
    • Knife
    • Chopping board

    Method
     

    1. Preheat your skillet over medium heat until it’s hot and slightly shimmering.
    2. Add the ground meat to the skillet and cook, breaking it apart with a spatula, until browned and fragrant, about 8 minutes. The meat should develop a deep, smoky aroma and a nicely browned exterior.
    3. While the meat cooks, warm the tortillas either in a dry skillet for about 20 seconds each or in a microwave wrapped in a damp towel until soft and pliable.
    4. Add the drained black beans to the cooked meat, stirring to combine and heat through for about 2 minutes. The mixture should look moist and flavorful, with beans evenly distributed.
    5. Remove the skillet from heat. Spread a generous spoonful of the meat and bean mixture into the center of each warm tortilla.
    6. Sprinkle shredded cheese over the fillings, allowing it to melt slightly from the residual heat, creating a gooey, inviting layer.
    7. Top each taco with colorful toppings: a dollop of sour cream, jalapeño slices for spice, and shredded lettuce for crunch and freshness.
    8. Serve the tacos immediately, allowing everyone to enjoy the warm, cheesy, and vibrant bites that are both playful and satisfying.

    Notes

    Feel free to customize toppings with olives, tomatoes, or other colorful ingredients to enhance the spooky theme.
    These Halloween tacos are more than just a fun dinner—they’re a chance to get a little creative in the kitchen. Feel free to swap fillings like spicy chorizo or roasted veggies for a different vibe. The key is to keep it playful and flavorful, making it a memorable meal for all ages. Enjoy customizing each taco with your favorite toppings and let the kids (and grown-ups) dig in with big smiles.

  • Spooky Good Halloween Lasagna: A Layered Trick-or-Treat Surprise

    Spooky Good Halloween Lasagna: A Layered Trick-or-Treat Surprise

    Lasagna is the last dish you’d associate with Halloween, but that’s what makes this version fun. I love turning a classic into a spooky centerpiece, with layers that peek through like secret tunnels. It’s comfort food with a twist, perfect for a season that loves both nostalgia and a little mischief. Plus, it’s surprisingly simple to throw together, even on a busy October night.

    Why this lasagna keeps haunting my kitchen

    It’s endlessly customizable, forgiving, and always a crowd-pleaser. The layers hide surprises, and the cheesy aroma makes the house feel festive. Plus, it’s a dish that makes me feel like a kid again, sneaking extra cheese and playing with spooky shapes.

    Spooky ingredients and their secrets

    • Lasagna noodles: Al dente noodles hold the layers; skip overcooking for a firm bite.
    • Ricotta cheese: Creamy and mild, it balances savory flavors; swap with cottage cheese if needed.
    • Marinara sauce: Rich tomato base, vibrant and bright; use homemade or a good quality store-bought.
    • Mozzarella cheese: Melty, gooey, with a slight stretch; fresh mozzarella is more flavorful.
    • Ground beef or plant-based protein: Adds hearty depth, but you can skip for veggie version.
    • Spinach: Vivid green, slightly earthy; substitute with kale or omit for a lighter dish.
    • Parmesan: Sharp, salty topping; Pecorino works too if you want a different bite.

    Tools of the trade for a layered fright

    • Large pot: Boiling noodles
    • Skillet: Sautéing and browning meat
    • Mixing bowls: Combining cheeses and herbs
    • Baking dish (9×13 inch): Layering and baking the lasagna
    • Aluminum foil: Covering during baking for even heat

    Step-by-step to spooky layers and cheesy thrills

    Step 1: Preheat your oven to 180°C (350°F).

    Step 2: Cook the lasagna noodles in boiling salted water until al dente, about 8-10 minutes. Drain and set aside.

    Step 3: In a skillet, sauté finely chopped onions and garlic until fragrant, about 3 minutes.

    Step 4: Add ground beef or plant-based alternative, cook until browned, about 5 minutes.

    Step 5: Stir in marinara sauce, let simmer for 10 minutes to deepen the flavors.

    Step 6: In a mixing bowl, combine ricotta cheese with chopped spinach and a pinch of nutmeg.

    Step 7: Layer the ingredients in a baking dish: start with sauce, then noodles, then cheese mixture, repeating.

    Step 8: Top with shredded mozzarella and a sprinkle of Parmesan.

    Step 9: Cover with foil and bake for 25 minutes.

    Step 10: Remove foil, bake for an additional 10 minutes until bubbly and golden.

    Step 11: Let rest for 10 minutes before slicing.

    Cooking checkpoints and tips for that perfect spooky lasagna

    • Noodles should be firm but not chalky, al dente is key.
    • Sauce should be thick enough to hold the layers, not runny.
    • Cheese should be bubbly and lightly browned on top.
    • Let the lasagna rest; it helps set the layers for cleaner slices.

    Common mistakes and how to avoid them

    • Not enough sauce, resulting in dry, crumbly slices.? Use enough sauce to prevent dry layers.
    • Cutting too early, causing gooey mess.? Let the lasagna rest before slicing.
    • Burnt cheese on top.? Cover with foil to prevent over-browning.
    • Overcooked noodles turning mushy.? Ensure noodles are cooked al dente.

    Spooky Halloween Lasagna

    This Halloween-inspired lasagna features layered pasta, rich marinara sauce, creamy ricotta, and melted mozzarella, creating a cozy yet playful dish. The layers peek through like secret tunnels, with bubbling cheese on top offering a golden, bubbly finish. Perfect as a festive centerpiece, it combines comfort food with a fun, spooky twist.
    Prep Time 20 minutes
    Cook Time 40 minutes
    Total Time 1 hour
    Servings: 8
    Course: Main Course
    Cuisine: Italian
    Calories: 520

    Ingredients
      

    • 12 oz lasagna noodles al dente
    • 15 oz marinara sauce rich tomato flavor
    • 15 oz ricotta cheese creamy and mild
    • 2 cups shredded mozzarella cheese for melting and gooeyness
    • 1 lb ground beef or plant-based protein
    • 2 cups fresh spinach chopped
    • 0.5 cup Parmesan cheese grated
    • 1 small onion finely chopped
    • 3 cloves garlic minced
    • to taste salt and pepper

    Equipment

    • Large pot
    • Skillet
    • Mixing bowls
    • 9×13-inch baking dish
    • Aluminum foil

    Method
     

    1. Bring a large pot of salted water to a boil and cook the lasagna noodles until just al dente, about 8-10 minutes. Drain and set aside.
    2. Heat a skillet over medium heat, add chopped onion and minced garlic, and sauté until fragrant and translucent, about 3 minutes.
    3. Add ground beef to the skillet and cook until browned, about 5 minutes, breaking it apart with a spatula.
    4. Stir in marinara sauce and let simmer for 10 minutes to deepen the flavors, then season with salt and pepper to taste.
    5. In a mixing bowl, combine ricotta cheese with chopped spinach and a pinch of salt and pepper, mixing until well blended.
    6. Spread a thin layer of meat sauce at the bottom of the baking dish, then add a layer of cooked noodles over the sauce.
    7. Spread half of the ricotta-spinach mixture evenly over the noodles.
    8. Repeat layering with sauce, noodles, remaining ricotta mixture, and finishing with a final layer of noodles.
    9. Top the final layer of noodles with shredded mozzarella cheese and a sprinkle of grated Parmesan cheese.
    10. Cover the dish tightly with aluminum foil and bake at 180°C (350°F) for 25 minutes until bubbly.
    11. Remove the foil and bake for an additional 10 minutes, until the cheese on top is golden and bubbling.
    12. Let the lasagna rest for 10 minutes to set the layers, then slice and serve hot, enjoying the cheesy, hearty layers that peek through like secret tunnels.

    Notes

    For a vegetarian version, omit the ground beef and add extra vegetables like mushrooms or zucchini. For extra spooky effect, use a cookie cutter to create fun Halloween shapes from cheese slices to decorate the top before baking.
    This Halloween lasagna is a riot of flavors and textures, with a fun, spooky twist. It’s a perfect dish to share with friends or family, especially when everyone’s craving comfort with a dash of seasonal fun. Feel free to add extra veggie layers or a drizzle of spicy sauce for more personality. Enjoy the chaos of assembling and the satisfaction of slicing into that gooey, cheesy masterpiece.

  • Eyeball Meatballs: An Unlikely Feast from the Deep

    Eyeball Meatballs: An Unlikely Feast from the Deep

    Eyeball meatballs aren’t your everyday dinner. They tap into a primal, almost ritualistic part of cooking—pushing boundaries and embracing the strange. I first tried these during a late-night, curious binge on exotic ingredients, and they’ve haunted my kitchen ever since. It’s a dish that’s equal parts challenge and celebration.

    Why I Keep Coming Back to This

    The thrill of working with such an unusual ingredient keeps me hooked. Each batch offers a new challenge—perfectly sealing the eyeballs or balancing flavors. Plus, the reaction from friends when they taste these is priceless—shock, curiosity, delight. It’s a dish that sparks conversations and pushes culinary boundaries.

    Breaking Down the Ingredients

    • Eyeballs: Fresh, firm, and slightly oozy; the star of the show, bringing an unusual texture.
    • Ground meat: Pork or beef, for richness and structure—use what you have, but don’t skimp.
    • Garlic and herbs: Adds pungent aroma and bright flavor—think parsley or thyme for freshness.
    • Salt and pepper: Simple seasoning that highlights the meat’s natural richness.
    • Oil for frying: A neutral oil with a high smoke point, like canola or sunflower—hot enough to crisp.
    • Lemon or chili sauce: For serving—something bright and punchy to cut through the richness.
    • Optional spices: Paprika, cumin, or smoked paprika can add a smoky or earthy note.

    Tools & Equipment You’ll Need

    • Mixing bowl: For combining the meat mixture.
    • Sharp knife: To handle and prepare the eyeballs carefully.
    • Skillet or frying pan: To brown and cook the meatballs evenly.
    • Tongs: For turning the meatballs without piercing them.
    • Paper towels: To drain excess oil and rest the cooked meatballs.

    Crafting the Perfect Eyeball Meatballs

    Step 1: Start with fresh, firm eyeballs—if you can find them. Rinse gently in cold water, then set aside.

    Step 2: In a mixing bowl, combine ground meat—pork or beef, your call—with minced garlic, chopped herbs, salt, and pepper.

    Step 3: Carefully stuff each eyeball into a small ball of seasoned meat, making sure it’s fully enclosed.

    Step 4: Heat a generous splash of oil in a skillet over medium-high heat (around 180°C/356°F).

    Step 5: Place the meatballs carefully in the pan, brown on all sides for about 8-10 minutes until golden and slightly crispy.

    Step 6: Check for doneness by slicing one open; the eyeball should be opaque, and the meat should be cooked through.

    Step 7: Rest the meatballs on a paper towel for 2 minutes, then serve with a zingy lemon sauce or a spicy chili dip.

    Cooking Checkpoints & Tips

    • Eyeballs should be firm but not rubbery when pressed.
    • Meatballs should be golden on the outside, cooked through in the center.
    • The sauce or dip should complement the rich, gamey flavor of the eyeballs.

    Common Mistakes & How to Fix Them

    • Overly high heat causing bursting.? If the eyeballs burst during cooking, lower the heat and handle gently.
    • Dryness or tough texture.? Dried-out meatballs? Add a splash of broth during frying.
    • Poor sealing or falling apart.? If the meat isn’t sealing around the eyeball, add a tiny bit of egg to the mixture.
    • Uneven doneness.? For uneven cooking, cover the pan and simmer on low for 3 minutes.

    Eyeball Meatballs

    Eyeball meatballs combine tender ground meat with the surprise of fresh eyeballs, enveloped into small, round bites that are browned to crispy perfection. The dish features a unique texture contrast—the firm, slightly oozy eyeballs encased in savory meat—culminating in a visually striking and conversation-starting appetizer or main course.
    Prep Time 20 minutes
    Cook Time 15 minutes
    Total Time 35 minutes
    Servings: 4
    Course: Main Course
    Cuisine: Exotic
    Calories: 250

    Ingredients
      

    • 8 pieces fresh eyeballs cleaned gently in cold water
    • 1/2 pound ground pork or beef for richness and structure
    • 2 cloves garlic minced
    • 2 tablespoons fresh herbs chopped parsley or thyme
    • 1 teaspoon salt
    • 1/2 teaspoon black pepper
    • 2 tablespoons oil for frying, like canola or sunflower
    • as needed lemon or chili sauce for serving

    Equipment

    • Mixing bowl
    • Sharp knife
    • Skillet or frying pan
    • Tongs
    • Paper towels

    Method
     

    1. Gently rinse the fresh eyeballs in cold water and set aside—make sure they’re firm and slightly oozy for the best texture.
    2. In a mixing bowl, combine the ground meat with minced garlic, chopped herbs, salt, and black pepper. Mix thoroughly until everything is well incorporated and fragrant.
    3. Take a small handful of the seasoned meat mixture and mold it into a thin, flat disc. Place an eyeball in the center and gently enclose it, shaping the meat around it into a smooth ball, ensuring the eyeball is fully sealed inside.
    4. Heat a generous splash of oil in a skillet over medium-high heat until shimmering and bubbling slightly, giving off a warm, nutty aroma.
    5. Carefully place the meatballs into the hot skillet, making sure not to overcrowd the pan. Sear each side for about 2-3 minutes until golden brown and slightly crispy, turning gently with tongs.
    6. Reduce the heat to medium and continue cooking for another 8-10 minutes, turning occasionally, until the meat is cooked through and the exterior is deeply browned.
    7. Check one meatball by slicing it open—look for opaque eyeballs and fully cooked meat with no pink in the center.
    8. Transfer the cooked meatballs to a paper towel-lined plate to drain excess oil for about 2 minutes.
    9. Arrange the eyeball meatballs on a serving platter and drizzle with lemon or chili sauce for a bright, spicy contrast.
    10. Serve immediately while hot and crispy, and enjoy the surprising textures and flavors of this daring dish.

    Notes

    Handling fresh eyeballs requires care to ensure they stay firm and don’t burst during cooking. Adjust cooking time if needed to prevent overcooking or bursting.
    This dish is a weird delight that pushes boundaries. The surprise of the eyeball’s texture paired with savory meat makes each bite memorable. Don’t shy away from experimenting with different herbs or spicy dips—each variation adds a new layer of chaos and charm. Enjoy this as a daring appetizer or a main that sparks conversation around the table.

  • Black Pasta with Squid Ink: A Deep Dive into the Ocean’s Hidden Flavor

    Black Pasta with Squid Ink: A Deep Dive into the Ocean’s Hidden Flavor

    Black pasta with squid ink isn’t just a visual stunt; it’s a celebration of the ocean’s mysterious allure. The ink adds a subtle umami depth that transforms simple pasta into something almost theatrical. I love making this when I want a dinner that feels special but requires little fuss, just a handful of ingredients and patience.

    Why I keep returning to this dish

    It’s a reminder that the ocean’s complexity can be captured in a simple plate. The smoky, briny flavors evoke memories of seaside markets and quiet mornings at the coast. Each time I make it, I feel reconnected to those quiet, salt-scented moments. It’s a dish that demands attention but rewards with every bite.

    What makes this ink-tinted pasta tick?

    • Squid ink: The star, adding smoky, savory depth. Use fresh or canned—skip if you dislike seafood flavors.
    • Pasta (preferably spaghetti or linguine): The vessel for briny, smoky sauce. Anything long and thin works well.
    • Garlic: Fragrant and pungent, essential for building flavor.
    • Chili flakes: Adds a gentle heat, balancing the umami.
    • Lemon: Brightens everything, cutting through the richness of the ink.
    • Parsley: Fresh, herbal, and a splash of color.
    • Olive oil: Rich and fruity, the base for sautéing.

    Tools of the trade for inky perfection

    • Large pot: To boil the pasta and infuse it with ink and salt.
    • Slotted spoon: To drain pasta without losing too much water.
    • Pan (preferably non-stick): To sauté garlic and chili flakes for flavor.
    • Measuring spoons: For precise seasoning, especially salt and chili flakes.
    • Lemon squeezer: To extract bright juice at the end.

    Step-by-step guide: mastering black pasta with squid ink

    Step 1: Fill a large pot with water, salt generously, and bring it to a rolling boil—think sea water. It should taste salty like the ocean, because this is the only chance to season the pasta itself.

    Step 2: Add the squid ink to the boiling water, stirring gently to distribute evenly. Watch as the water turns a deep, inky black—almost like midnight, mysterious and inviting.

    Step 3: Drop in the pasta, making sure it’s submerged. Cook according to package instructions, usually about 8-10 minutes, until al dente. Stir occasionally to prevent sticking.

    Step 4: While pasta cooks, heat a good splash of olive oil in a pan over medium heat (about 150°C/300°F). Add minced garlic and chili flakes, cooking just until fragrant, about 30 seconds.

    Step 5: Drain the pasta, reserving a cup of cooking water. Toss the pasta in the garlic oil, adding a splash of reserved water to loosen the sauce and coat every strand evenly.

    Step 6: Finish with a squeeze of lemon, chopped parsley, and a sprinkle of sea salt. Serve immediately, the inky blackness contrasting with bright, fresh flavors.

    Cooking checkpoints to keep in mind

    • Pasta should be al dente—firm to the bite but not hard. Test a strand at 8 minutes.
    • The ink water should be uniformly dark—if it’s streaky, stir more and check the heat.
    • Garlic and chili flakes should be fragrant but not browned—watch carefully to prevent bitterness.
    • The final dish should look glossy and dark, with a fresh pop from lemon and herbs.

    Common pitfalls and how to dodge them

    • Adding ink too quickly or unevenly.? Stir the ink water gently to prevent splashes and uneven color.
    • Cooking pasta until mushy.? Use a timer for the pasta to avoid overcooking.
    • Burning garlic.? Keep heat moderate when sautéing garlic to avoid bitterness.
    • Adding citrus too early, which dulls the flavor.? Add lemon juice at the end to preserve brightness.

    Black Pasta with Squid Ink

    Black pasta with squid ink is a visually striking dish that combines the smoky, umami depth of squid ink with perfectly cooked al dente pasta. The dish features a simple sauté of garlic and chili flakes, finished with bright lemon and fresh parsley for a vibrant contrast. Its glossy, dark appearance and rich flavors evoke the ocean’s mysterious allure, making it a special yet fuss-free meal.
    Prep Time 10 minutes
    Cook Time 15 minutes
    Total Time 25 minutes
    Servings: 2
    Course: Main Course
    Cuisine: Seafood
    Calories: 550

    Ingredients
      

    • 200 g spaghetti or linguine preferably long, thin pasta
    • 1 tsp sea salt for boiling water and seasoning
    • 1 tsp squid ink fresh or canned
    • 2 cloves garlic minced
    • 1/4 tsp chili flakes adjust to taste
    • 2 tbsp olive oil fruity, rich
    • 1 each lemon for juice and zest
    • 2 tbsp fresh parsley chopped

    Equipment

    • Large pot
    • Slotted spoon
    • Pan
    • Measuring spoons
    • Lemon squeezer

    Method
     

    1. Fill a large pot with water, add a generous teaspoon of sea salt, and bring to a rolling boil, tasting the water to ensure it’s salty like the ocean.
    2. Add the squid ink to the boiling water, stirring gently to distribute evenly. Watch as the water turns a deep, inky black, creating a dramatic and mysterious hue.
    3. Drop in the pasta, making sure it’s submerged. Cook according to package instructions, usually 8-10 minutes, until al dente, stirring occasionally to prevent sticking.
    4. While the pasta cooks, heat olive oil in a pan over medium heat. Add minced garlic and chili flakes, sautéing until fragrant and just starting to bubble, about 30 seconds.
    5. Reserve a cup of the starchy pasta water, then drain the pasta using a slotted spoon and add it to the pan with the garlic oil mixture.
    6. Toss the pasta in the garlic oil, adding a splash of the reserved pasta water to loosen the sauce and coat every strand evenly. The pasta should look glossy and dark.
    7. Squeeze fresh lemon juice over the pasta, then sprinkle with chopped parsley. Toss gently to combine, brightening the dish with fresh citrus and herbs.
    8. Serve immediately, enjoying the glossy, inky pasta with its smoky, briny aroma and vibrant finishing touches.
    This dish is about embracing the ocean’s depth—its smoky, briny essence wrapped in silky pasta. It’s a reminder that simple ingredients, when treated right, reveal complex, unforgettable flavors. No matter how often you make it, each plate feels like a mini voyage, a splash of the sea on your plate. Enjoy the process, tweak the seasonings to your taste, and savor each bite.

  • Spooky Good: The Halloween Pasta That Turns Ordinary Noodles into a Ghoulish Feast

    Spooky Good: The Halloween Pasta That Turns Ordinary Noodles into a Ghoulish Feast

    This Halloween pasta isn’t just about the look; it’s about embracing the chaos of the season with a dish that’s quick, flexible, and a little bit silly. I love that it lets me play with ingredients I already have—no fancy tricks, just good, honest cooking. It’s perfect for last-minute costume parties or a cozy night in, feeling a bit mischievous.

    Why This Halloween Pasta Will Never Leave Your Rotation

    It’s quick, playful, and endlessly adaptable. A few ingredients and a little imagination turn it into a new spooky masterpiece every time. Plus, it’s the kind of dish that sparks laughs and memories, even in the busiest moments.

    Haunting Ingredients and Their Spooky Roles

    • Spaghetti or any long pasta:: The blank canvas for your haunting shapes, neutral but essential.
    • Tomato sauce:: Rich and smoky, it gives the dish its spooky, deep hue. Swap with roasted pepper sauce for a sweeter twist.
    • Olives or cheese:: Perfect for creepy eyes—smoky olives or creamy cheese, cut into small rounds.
    • Garlic and onion:: Base flavors that fill your kitchen with a warm, inviting aroma—don’t skip them.
    • Fresh herbs:: Adds freshness and color. Basil or parsley works, or even cilantro for a bright note.

    Tools of the Trade for Haunted Pasta

    • Large pot:: For boiling pasta efficiently.
    • Skillet or frying pan:: To sauté ingredients and combine flavors.
    • Small cookie cutters or a knife:: To shape cheese or vegetables into spooky shapes.
    • Slotted spoon:: For draining pasta without losing too much water.

    Crafting the Creepy-Cute Pasta Process

    Step 1: Cook the pasta in boiling salted water until al dente, about 8 minutes.

    Step 2: Drain and set aside, saving a cup of pasta water for later.

    Step 3: In a pan, sauté garlic and onion in olive oil until fragrant and translucent, about 3 minutes.

    Step 4: Add in your chosen vegetables or protein, cook until just tender, about 5 minutes.

    Step 5: Mix in tomato sauce, a splash of pasta water, and season with salt and pepper. Let simmer for 10 minutes.

    Step 6: Use a spoon to create eye shapes with olives or cheese, placing them on top of the pasta.

    Step 7: Finish with a sprinkle of chopped herbs or green onions for a pop of color.

    Spook-tacular Cooking Cues and Tips

    • Al dente pasta should have a slight firmness when bitten.

    Beware the Boo-Boos: Common Pasta Pitfalls and How to Fix Them

    • Too firm or mushy pasta.? Undercooked pasta? Boil a minute longer and test for bite.
    • Thin, watery sauce.? Sauce too thin? Simmer a few more minutes or add a touch of tomato paste.
    • Burned garlic or onions.? Over-browned garlic? Remove from heat immediately, add a splash of water to stop cooking.
    • Eyes or decorations falling apart.? Olive eyes falling off? Use toothpicks or attach with a tiny dab of sauce.

    Halloween Spooky Pasta

    This playful Halloween pasta features long spaghetti coated in rich tomato sauce, topped with creepy eye decorations made from olives or cheese. The dish is quick to prepare, with sautéed aromatics and simple toppings creating a fun, festive meal that’s perfect for last-minute parties or cozy nights in. Its vibrant colors and whimsical presentation make it a hit with kids and adults alike.
    Prep Time 10 minutes
    Cook Time 15 minutes
    Total Time 25 minutes
    Servings: 4
    Course: Main Course
    Cuisine: American
    Calories: 450

    Ingredients
      

    • 12 oz spaghetti or long pasta uncooked
    • 1 cup tomato sauce rich and smoky
    • 1 cup mixed vegetables or protein (optional) e.g., bell peppers, mushrooms, cooked chicken
    • 2 cloves garlic minced
    • 1 small onion diced
    • 2 tbsp olive oil
    • to taste salt and pepper
    • 12 small black olives or cheese rounds for creepy eyes
    • fresh herbs basil or parsley chopped, for garnish

    Equipment

    • Large pot
    • Skillet or frying pan
    • Small cookie cutters or knife
    • Slotted spoon

    Method
     

    1. Bring a large pot of salted water to a boil, then add the spaghetti. Cook until al dente, about 8 minutes, until it’s just firm to the bite and fragrant.
    2. Drain the pasta using a slotted spoon, reserving a cup of pasta water to loosen the sauce later. Set the pasta aside.
    3. Heat olive oil in a skillet over medium heat. Sauté minced garlic and diced onion until they turn fragrant and translucent, about 3 minutes, filling your kitchen with a warm aroma.
    4. Add your choice of chopped vegetables or cooked protein to the skillet. Cook until tender, about 5 minutes, stirring occasionally.
    5. Pour in the tomato sauce and a splash of the reserved pasta water. Stir to combine, then let it simmer gently for about 10 minutes, allowing flavors to meld and the sauce to thicken slightly.
    6. While the sauce simmers, cut small rounds from cheese or olives to create spooky eyes. Use a small cookie cutter or a knife to shape them neatly.
    7. Once the sauce is ready, toss the cooked pasta into the skillet, ensuring it’s well coated. Mix gently to combine all flavors.
    8. Arrange the eye shapes on top of the pasta, pressing gently to attach if necessary. Place a few on each serving to create the spooky effect.
    9. Finish with a sprinkle of chopped fresh herbs for a pop of color and freshness. Serve immediately while hot and bubbling.

    Notes

    For extra fun, add other spooky decorations like tiny cheese bats or spiderwebs using shredded cheese or sauce. Adjust seasoning to taste and feel free to swap ingredients to suit your spooky theme.
    This Halloween pasta is a simple, fun way to make mealtime memorable. It’s not about perfection but about the joy of turning everyday ingredients into something a little spooky. Feel free to swap out ingredients or add your own creepy touches—this dish invites playfulness. Enjoy every bite, and don’t forget to snap a photo of your ghoulish creation before digging in.

  • Halloween Pizza: A Spooky Spin on Comfort Food

    Halloween Pizza: A Spooky Spin on Comfort Food

    Halloween is all about playful scares, but I like to bring a bit of culinary mischief into the mix. This Halloween pizza turns a simple pie into a spooky, edible canvas that’s fun for kids and adults alike. It’s a reminder that food can be both a costume and a comfort.

    Why I Keep Coming Back to This Halloween Pizza

    It’s the messy joy of decorating, the smell of baking bread and melting cheese, that rush of creating something both spooky and delicious. Plus, it’s a hit every single time, no matter the age of my guests. It’s imperfect, fun, and makes the holiday’s chaos taste like a kind of edible art.

    Spooky Ingredients Breakdown

    • Pre-made pizza dough: Convenient and reliable base; look for ‘fresh’ or freeze for later use.
    • Tomato sauce: Bright and tangy; use a good quality jar or make your own with ripe tomatoes.
    • Mozzarella cheese: Oozy and melty, with that perfect stretch. Opt for whole milk for richness.
    • Black olives: For creepy eyes or decorations, their salty punch adds flavor.
    • Pepperoni slices: Spooky little monsters or teeth, crispy or chewy—your call.
    • Bell peppers: Colorful, crunchy, and fresh—slice into ghostly shapes or jack-o’-lantern faces.
    • Egg wash: Gives the crust a shiny, golden finish, making your pizza look extra spooky.

    Tools of the Trade for a Spooky Good Pizza

    • Pizza stone or baking sheet: Provides even heat and a crispy crust.
    • Rolling pin: Helps achieve a perfect, uniform base.
    • Sharp knife or pizza cutter: For clean, precise slices that reveal your creepy toppings.
    • Pastry brush: For a shiny, golden crust when brushing with egg wash.

    Crafting Your Halloween Pizza with a Personal Touch

    Cooking Tips and Tricks for That Perfect Slice

    • Watch the crust color; it should be golden-brown and slightly crisp.
    • Ensure the cheese is bubbling and slightly browned for that gooey, crispy finish.
    • Check the pizza’s center for a firm, but not hard texture—avoid sogginess.

    Halloween Pizza Pitfalls and How to Avoid Them

    • Overloading with cheese? Use too much cheese? Spread it evenly or it’ll melt into a greasy mess. Keep it light for better topping visibility.
    • Overbaking or too hot oven? Crust burnt? Reduce oven temp or shorten baking time. Keep an eye on that golden glow.
    • Toppings falling off? Toppings sliding off? Use less sauce and press toppings slightly into the dough. Think firm but not squished.
    • Dough sticking to the surface? Dough sticking? Dust your surface and rolling pin with flour. No tears, no fuss.

    Halloween Spooky Pizza

    This Halloween pizza transforms a classic pie into a spooky, edible canvas with playful toppings like black olives, bell peppers, and pepperoni arranged into ghostly faces and jack-o’-lanterns. The recipe involves shaping, decorating, and baking the pizza to achieve a crispy crust, gooey cheese, and fun, creepy designs that make it as much a visual treat as a tasty meal.
    Prep Time 20 minutes
    Cook Time 15 minutes
    Total Time 35 minutes
    Servings: 4
    Course: Main Course
    Cuisine: Halloween
    Calories: 320

    Ingredients
      

    • 1 pound pre-made pizza dough look for fresh or frozen
    • 1/2 cup tomato sauce preferably bright and tangy
    • 1 1/2 cups mozzarella cheese shredded, for gooeyness
    • 1/4 cup black olives sliced, for creepy eyes
    • 4 slices pepperoni for spooky monsters or teeth
    • 1 bell pepper assorted colors sliced into ghostly or face shapes
    • 1 egg egg wash for shiny, golden crust

    Equipment

    • Pizza stone or baking sheet
    • Rolling pin
    • Sharp knife or pizza cutter
    • Pastry brush

    Method
     

    1. Preheat your oven to 450°F (230°C). Roll out the pizza dough on a floured surface with a rolling pin until it’s about 12 inches in diameter, then transfer to your baking sheet or pizza stone.
    2. Spread the tomato sauce evenly over the dough, leaving about a 1-inch border around the edges for the crust.
    3. Sprinkle the shredded mozzarella cheese generously over the sauce, covering it completely for a gooey, cheesy base.
    4. Cut the bell peppers into ghostly shapes or faces, and arrange them on the pizza for colorful, spooky decorations.
    5. Place slices of pepperoni onto the pizza to create spooky monsters or teeth, pressing them slightly into the cheese so they stay in place.
    6. Use sliced black olives to make creepy eyes by placing them on the pepperoni or cheese, creating a spooky face effect.
    7. Whisk the egg and brush it over the crust with a pastry brush to give your Halloween pizza a shiny, golden finish.
    8. Bake the pizza in the preheated oven for about 12-15 minutes, until the crust is golden brown and crispy, and the cheese is bubbling and slightly browned.
    9. Remove the pizza from the oven and let it cool for a few minutes. Slice into pieces with a pizza cutter or sharp knife, revealing your spooky decorations.
    10. Enjoy your creepy, delicious Halloween pizza with friends or family, marveling at your edible spooky art!
    This Halloween pizza is not just about the look but the messy, cheesy joy it brings. Feel free to tinker with toppings—maybe add some spicy pepperoni or a handful of fresh herbs. It’s a simple, fun way to make the holiday a little more edible and a lot more memorable.

  • Bloody Beet Gnocchi: An Unorthodox Spin on a Classic

    Bloody Beet Gnocchi: An Unorthodox Spin on a Classic

    Beets are not just a root vegetable; they’re a canvas for color and flavor. I stumbled upon the idea of beet gnocchi during a winter pantry raid, craving something different from the usual. The vivid red hue brings a dash of joy to the table, especially when paired with simple butter sauce or tangy cheese. It’s a reminder that even humble ingredients can surprise you.

    Why I Keep Coming Back to This Recipe

    Because it’s a visual feast that surprises my senses and brightens my plate. The process is earthy and tactile, grounding me even on chaotic days. Plus, it’s endlessly adaptable—sweet, savory, or spicy—and never gets old.

    The Ingredients that Make It Work

    • Beets: I roast and mash them for a deep, earthy sweetness.: A vivid, oozy red that turns the gnocchi bright and lively.
    • Ricotta: I use full-fat for richness, but cottage cheese works in a pinch.: Adds creaminess and helps bind the dough.
    • Egg: It’s the glue that keeps everything together.: May be swapped for a flaxseed egg in vegan versions.
    • Flour: I start with 1 cup, but be ready to add more.: Provides structure without making the gnocchi dense.
    • Salt: Just a pinch to enhance the natural sweetness.: A simple seasoning to balance the earthy beets.
    • Optional cheese or herbs: For extra flavor, I toss in crumbled feta or thyme.: Gives a fresh, savory edge.

    Tools of the Trade for Beet Gnocchi

    • Baking sheet: For roasting beets evenly without fuss.
    • Stand mixer or mixing bowl: To combine ingredients effortlessly.
    • Fork or gnocchi paddle: To shape and add ridges to the gnocchi.
    • Large pot: For boiling the gnocchi.
    • Slotted spoon: To lift gnocchi out of boiling water gently.

    The Gnocchi Making Process

    Step 1: First, roast your beets until they’re tender, about 45 minutes at 200°C (390°F). Let them cool slightly, then peel and mash until smooth.

    Step 2: In a large bowl, combine the mashed beets with ricotta, egg, and a pinch of salt. Mix until just combined.

    Step 3: Gradually add flour, starting with 1 cup, until the dough is soft but not sticky. You might need a bit more or less.

    Step 4: Divide the dough into four parts. Roll each into a long rope, about 2 cm thick.

    Step 5: Cut the ropes into 2 cm pieces, then gently press with a fork to create the classic gnocchi ridges.

    Cooking and Serving Tips for Perfect Gnocchi

    • Ensure the dough is not too sticky; dust with a little extra flour if needed.
    • When boiling, add a pinch of salt to the water and gently stir to prevent sticking.
    • Gnocchi are ready when they float to the surface, usually within 2-3 minutes.
    • Handle gently while boiling and draining to keep their shape intact.

    Common Mishaps and How to Fix Them

    • Dough is too wet and sticky.? Use a little less flour if the dough is too sticky.
    • Gnocchi disintegrate in the water.? Add a bit more flour if gnocchi fall apart while boiling.
    • Gnocchi stick or burn at the base of the pot.? Reduce heat slightly if gnocchi stick to the bottom.
    • Gnocchi lose shape during cooking.? Handle gently when boiling to prevent squashing.

    Beet Gnocchi

    Beet gnocchi are tender, pillowy dumplings made by combining roasted beets with ricotta, egg, and flour, then shaping and boiling them until they float. Their vibrant red color and earthy flavor make for a visually striking and satisfying dish with a soft, delicate texture. Perfect served with butter or cheese, they bring a joyful splash of color to any plate.
    Prep Time 20 minutes
    Cook Time 10 minutes
    Total Time 30 minutes
    Servings: 4
    Course: Main Course
    Cuisine: Contemporary
    Calories: 200

    Ingredients
      

    • 4 beets medium-sized, roasted and peeled
    • 1 cup ricotta cheese full-fat preferred
    • 1 egg beaten
    • 1 cup all-purpose flour plus extra for dusting
    • pinch salt
    • optional feta cheese or herbs for serving or flavoring

    Equipment

    • Baking sheet
    • Mixing bowl
    • Fork or gnocchi paddle
    • Large pot
    • Slotted spoon

    Method
     

    1. Preheat your oven to 200°C (390°F). Wrap the beets in foil and roast on a baking sheet until tender, about 45 minutes. Let cool slightly, then peel and mash until smooth.
    2. Transfer the mashed beets to a large mixing bowl and add the ricotta cheese. Mix gently until combined, creating a vibrant, earthy-colored mixture.
    3. Pour in the beaten egg and sprinkle a pinch of salt. Fold everything together until the mixture is smooth and cohesive.
    4. Gradually add the flour, a little at a time, folding it into the mixture until it forms a soft dough that is slightly tacky but manageable. Adjust with more flour if needed.
    5. Divide the dough into four equal parts. Roll each part into a long rope about 2 cm thick on a floured surface.
    6. Cut each rope into 2 cm pieces, then gently press each piece with a fork to create ridges, which help hold onto sauces.
    7. Bring a large pot of salted water to a boil. Carefully drop the gnocchi into the boiling water, working in batches if necessary.
    8. Cook the gnocchi until they float to the surface, about 2-3 minutes. Use a slotted spoon to lift them out gently.
    9. Drain the gnocchi well and serve immediately, topped with crumbled feta or fresh herbs if desired.

    Notes

    Handle the gnocchi gently during boiling to maintain their shape. Adjust flour as needed to achieve a manageable dough consistency. For vegan versions, use a flaxseed egg substitute.
    This gnocchi isn’t just a visual shock; it’s a celebration of earthy sweetness with a punch of vibrant color. The process is straightforward, but the results feel like a little rebellion against tradition. Enjoy the tactile joy of rolling and shaping, and don’t rush—these little beet beauties deserve your attention. Toss them in browned butter, a sprinkle of feta, or a drizzle of balsamic, and savor each vibrant bite.