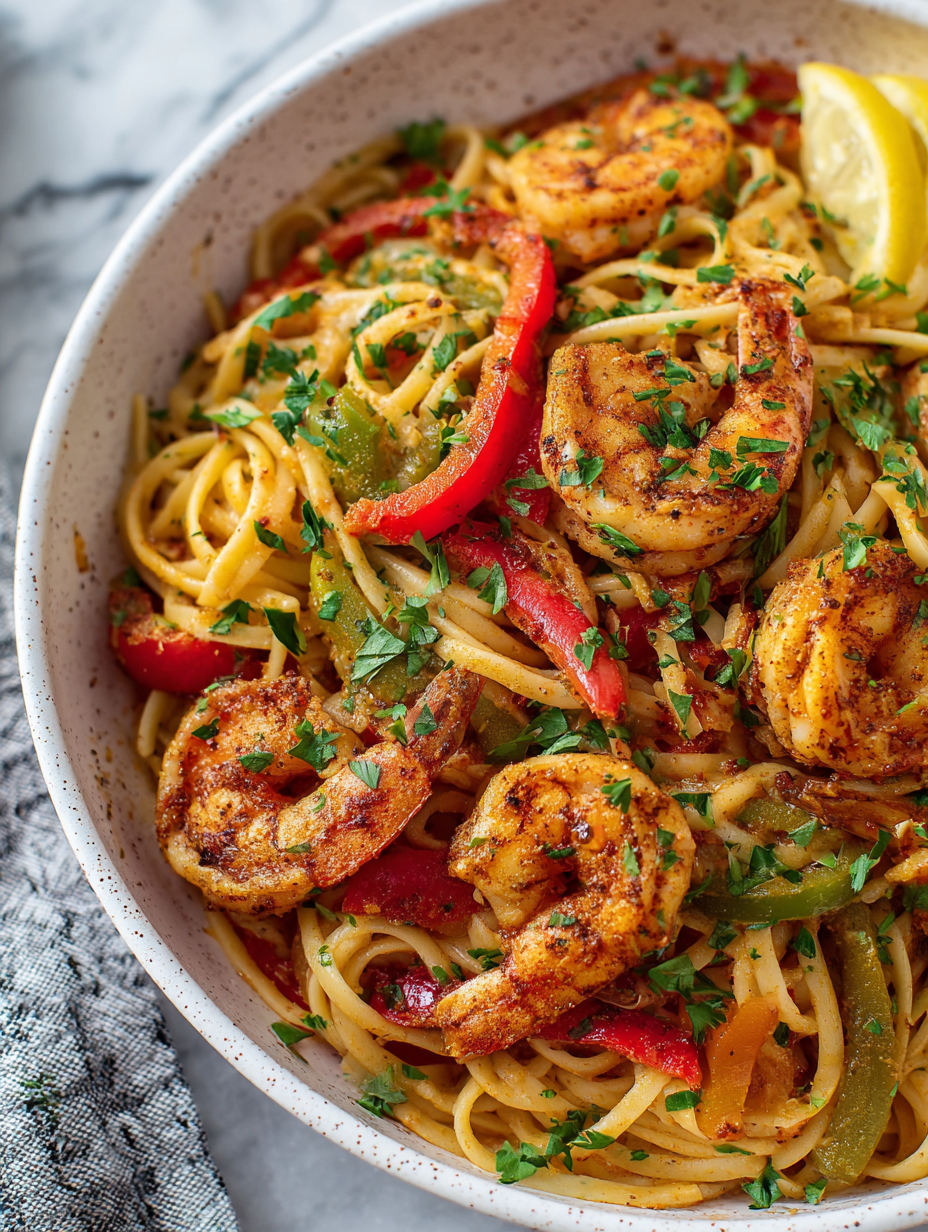
Category: Main Course

  • Unconventional Warmth: The Secret Ingredient in My Best Chili

    Unconventional Warmth: The Secret Ingredient in My Best Chili

    Cooking chili often feels like a quest for comfort, but I love sneaking a splash of unexpected ingredients into my pot. This makes it stand out in a sea of beef and beans, giving it a personal touch. It’s not just a meal, it’s a memory in the making.

    Recently, I discovered that adding a dash of cinnamon before simmering brings a subtle warmth and a hint of something mysterious. It’s a flavor twist that surprises both my family and me every time. This chili feels like a cozy blanket with a spicy twist that awakens all your senses.

    WHY I LOVE THIS RECIPE?

    • I love the cozy chaos of browning meat while spices crackle sweetly in the pan.
    • The way the aroma slowly fills the kitchen, promising comfort and adventure alike.
    • This recipe connects me to the fall season, when flavors feel warmer and more nostalgic.
    • It’s a forgiving, adaptable process—perfect for improvising with whatever’s in the pantry.
    • Every spoonful tastes like a secret I’m dying to share with friends.

    Spiced Beef Chili with Cinnamon

    This chili is prepared by browning ground beef with aromatic spices and a dash of cinnamon, then simmering with beans, tomatoes, and vegetables until flavors meld. The dish develops a thick, hearty consistency with a rich, inviting aroma and a slightly spicy, warm flavor profile.
    Prep Time 15 minutes
    Cook Time 45 minutes
    Total Time 1 hour
    Servings: 4
    Course: Main Course
    Cuisine: American
    Calories: 350

    Ingredients
      

    • 1 lb ground beef preferably lean
    • 1 medium onion finely chopped
    • 2 cloves garlic minced
    • 1 can (14 oz) diced tomatoes
    • 1 can (15 oz) kidney beans drained and rinsed
    • 2 tbsp chili powder
    • 1/2 tsp cinnamon ground
    • 1 bell pepper red bell pepper deseeded and chopped
    • 1 cup vegetable broth
    • 2 tbsp oil vegetable oil

    Equipment

    • Large skillet or Dutch oven
    • Wooden spoon or spatula
    • Chopping knife
    • Cutting board
    • Measuring spoons

    Method
     

    1. Heat the vegetable oil in a large skillet or Dutch oven over medium heat until shimmering.
    2. Add the chopped onion and sauté, stirring occasionally, until it becomes translucent and fragrant—about 3-4 minutes.
    3. Stir in the minced garlic and cook for another minute until the garlic is fragrant, just starting to turn golden.
    4. Add the ground beef, breaking it apart with a spatula, and cook until browned all over, about 5-7 minutes. Drain excess fat if necessary.
    5. Mix in the chopped red bell pepper, stirring for a couple of minutes until slightly softened.
    6. Sprinkle in the chili powder and ground cinnamon, stirring well to evenly coat the meat and vegetables, releasing fragrant spices.
    7. Pour in the diced tomatoes and vegetable broth, stirring to combine all ingredients smoothly.
    8. Bring the mixture to a gentle simmer, then reduce the heat to low and cover the pan loosely.
    9. Let the chili simmer uncovered for about 30 minutes, stirring occasionally until it thickens and the flavors deepen.
    10. Stir in the drained kidney beans and cook for another 5 minutes to heat through.
    11. Taste the chili and adjust seasonings as desired, adding more salt or spice if necessary.
    12. Serve hot, garnished with your favorite toppings, and enjoy the cozy, spicy warmth of this cinnamon-infused chili.

    Notes

    You can customize this chili by adding other vegetables or adjusting the spice levels to your preference. Let the chili rest for a few minutes after cooking for the flavors to meld fully.

    This chili recipe isn’t just food; it’s a small rebellion against the ordinary. It’s perfect for chilly evenings or when you just need a bit of soul food on tap. The combination of smoky, spicy, and unexpected hints makes it ideal for sharing—or savoring alone as a quiet victory.

    Cooking this dish reminds me that a little creativity can turn everyday ingredients into something memorable. It’s a reminder that even simple meals can carry a story, a twist, and a little bit of magic. I hope you rediscover the joy of improvising in the kitchen with every spoonful.

  • Eggplant Parmesan: The Chefs’ Hidden Secret to Crispy Layers and Rich Flavors

    Eggplant Parmesan: The Chefs’ Hidden Secret to Crispy Layers and Rich Flavors

    As a food blogger always hunting for the most satisfying textures, I stumbled upon a technique that elevates eggplant Parmesan beyond the usual fare. I love how the eggplant slices get a golden, crispy edge while staying tender inside. It’s like a blissful crunch that pairs perfectly with all the cheesy, saucy layer that follows.

    Today, I’ll share a version that might challenge your comfort zone. We’re talking about a double-breading process that creates layers of crispiness and a secret ingredient that adds depth. This isn’t your average bake-it-once dish; it’s a symphony of textures and flavors waiting to be explored.

    Double-Crushed Eggplant Parmesan

    This dish features sliced eggplant that is double-breaded to achieve a crispy exterior while remaining tender inside. The eggplant is layered with marinara and cheese, then baked to golden perfection. The final result is a hearty, crunchy-on-the-outside, cheesy-on-the-inside casserole with a layered, saucy appearance.
    Prep Time 20 minutes
    Cook Time 35 minutes
    Total Time 55 minutes
    Servings: 4
    Course: Main Course
    Cuisine: Italian-American
    Calories: 420

    Ingredients
      

    • 2 eggplants preferably medium-sized
    • 1 cup all-purpose flour for initial coating
    • 3 eggs large eggs beaten
    • 2 cups bread crumbs preferably seasoned
    • 1 cup grated Parmesan cheese for breading mix
    • 2 cups marinara sauce your favorite brand or homemade
    • 1 cup shredded mozzarella cheese for layering
    • 2 tablespoons olive oil for greasing
    • salt and pepper to taste seasoning

    Equipment

    • Baking sheet
    • Shallow bowls
    • Whisk
    • Tongs
    • Cheese grater
    • Kitchen paper towels

    Method
     

    1. Slice the eggplants into 1/4-inch thick rounds and pat them dry with paper towels to remove excess moisture.
    2. Set up a breading station with three shallow bowls: one with flour, one with beaten eggs, and one with a mixture of bread crumbs and grated Parmesan.
    3. Dredge each eggplant slice in the flour, shaking off excess, then dip it into the beaten eggs, allowing any excess to drip off.
    4. Next, coat the slices in the breadcrumb mixture, pressing lightly to ensure the coating sticks evenly.
    5. Lay the breaded slices onto a baking sheet lined with parchment or lightly greased with olive oil.
    6. Repeat the dredging process with the remaining slices, then bake in a preheated oven at 400°F (200°C) for about 20-25 minutes, until golden and crispy.
    7. Remove the crispy eggplant slices from the oven and reduce oven temperature to 375°F (190°C).
    8. Layer half of the baked eggplant slices in a baking dish, drizzle with marinara sauce, then sprinkle with mozzarella cheese.
    9. Add a second layer of eggplant slices on top, then cover with the remaining marinara and cheese.
    10. Bake the assembled dish for another 15-20 minutes until bubbling, golden on top, and cheese is melted.
    11. Remove from oven, let it rest for a few minutes, then serve hot, garnished with fresh basil if desired.
    This recipe arrives just in time for cozy nights and tantalizing family gatherings. The aroma of bubbling cheese and fragrant tomato sauce makes every oven run worth it. It’s a comforting dish that whispers nostalgia and invites shared bites around the table.

    Keep this one in your back pocket for a rainy afternoon or when you need a hearty, satisfying meal with zero fuss. Eggplant Parmesan might seem simple, but when made with a little extra care, it transforms into something quite memorable. Enjoy every crispy, cheesy bite—your taste buds will thank you.

  • Hidden Sweetness in Every Bite: The Unexpected Charm of Stuffed Peppers

    Hidden Sweetness in Every Bite: The Unexpected Charm of Stuffed Peppers

    Imagine a dish that balances the comforting warmth of baked vegetables with a burst of unexpected sweetness. Stuffed peppers, usually seen as hearty or bland, can be transformed into a delightful adventure for your taste buds when you add a splash of balsamic glaze and a sprinkle of toasted pine nuts. Today, I want to share a version that celebrates this unlikely pairing, turning ordinary ingredients into extraordinary bites.

    This recipe encourages you to look beyond the standard filling and embrace a touch of chaos in your kitchen. Using colorful bell peppers and a surprising sweet-savory filling, it’s perfect for those seeking something fresh yet familiar. It’s a reminder that even the simplest ingredients have the potential for delightful surprises when combined thoughtfully.

    Sweet Balsamic Stuffed Peppers with Toasted Pine Nuts

    These baked stuffed peppers feature a colorful mix of sweet and savory ingredients, including a vibrant vegetable filling topped with balsamic glaze and toasted pine nuts. The dish is finished with a caramelized, slightly sticky exterior and a tender, flavorful interior. The presentation is bright and inviting, highlighting the contrasting textures and flavors.
    Prep Time 20 minutes
    Cook Time 35 minutes
    Total Time 55 minutes
    Servings: 4
    Course: Main Course
    Cuisine: Fusion
    Calories: 250

    Ingredients
      

    • 4 large bell peppers various colors for visual appeal
    • 1 cup quinoa or cooked rice for filling texture
    • 1/2 cup dried cranberries or raisins adds sweetness
    • 1 cup chopped fresh spinach for color and flavor
    • 2 cloves garlic minced
    • 2 tablespoons olive oil
    • 1/4 cup balsamic glaze for drizzling and glazing
    • 1/4 cup pine nuts toasted
    • Salt and pepper to taste

    Equipment

    • Baking dish or sheet
    • Chef’s knife
    • Cutting board
    • Mixing bowls
    • Sauté pan
    • Toaster or oven
    • Measuring spoons
    • Spatula

    Method
     

    1. Preheat your oven to 375°F (190°C). Slice the tops off the bell peppers and remove the seeds and membranes. Arrange them cut-side up in a baking dish. Lightly brush the outside of the peppers with a little olive oil.
    2. Cook the quinoa or rice according to package instructions, then let it cool slightly. In a large mixing bowl, combine the cooked grain with dried cranberries, chopped spinach, and minced garlic. Drizzle in a tablespoon of olive oil and season with salt and pepper, mixing well.
    3. Stuff each prepared bell pepper generously with the mixture, pressing down slightly to pack it in. Place the stuffed peppers in the baking dish, open side up.
    4. Bake the peppers in the preheated oven for about 25-30 minutes, until they are tender and slightly caramelized on the edges.
    5. While the peppers bake, toast the pine nuts in a dry skillet over medium heat until golden and fragrant, about 3-4 minutes. Watch carefully to prevent burning.
    6. Remove the peppers from the oven and drizzle each with balsamic glaze. Sprinkle the toasted pine nuts over the top for a crunchy finish.
    7. Return the peppers to the oven for an additional 5 minutes if you desire a slight caramelization and warmth for the glaze.
    8. Gently transfer the peppers to serving plates. Garnish with additional balsamic glaze or fresh herbs if desired. Serve warm and enjoy the burst of sweet, savory, and crunchy textures.

    As the peppers come out of the oven, their edges slightly caramelized and fragrant of garlic, they invite you to dig in. The contrast of crunchy tops with tender interiors makes each bite a celebration of textures. Sometimes, it’s these little twists that rekindle your love for everyday cooking, reminding you how fun and creative it can be.

    This dish is especially relevant now, with a focus on seasonal produce and flavor exploration. It’s a simple yet impactful way to bring a burst of color and flavor to your table without much fuss. Enjoy the process of balancing sweet, savory, and smoky notes—each pepper a little vessel of happiness.

  • Layered Comfort: The Surprising Charm of Lasagna Soup

    Layered Comfort: The Surprising Charm of Lasagna Soup

    Many think of lasagna as a hefty, layered casserole best served in slices. But what if you could capture that rich, cheesy flavor in a bowl that’s faster to make and easier to enjoy? Enter lasagna soup—an unexpected twist that transforms your favorite Italian flavors into a cozy, spoonable delight.

    This dish came into my life during a hectic week when time was tight but craving comfort was high. It’s a perfect mashup of rustic, hearty broth with all the indulgent goodness of lasagna—minus the fuss. Every spoonful is like a warm hug with a burst of marinara, melting cheese, and tender noodles.

    Lasagna Soup

    Lasagna soup combines the hearty, cheesy flavors of traditional lasagna into a comforting, brothy soup. It features savory tomato broth, tender pasta, and melted cheese, creating a rich and satisfying final dish with a smooth, layered appearance. The dish is cooked through simmering and combined in a single pot for easy preparation.
    Prep Time 10 minutes
    Cook Time 25 minutes
    Total Time 35 minutes
    Servings: 4
    Course: Main Course
    Cuisine: Italian
    Calories: 350

    Ingredients
      

    • 1 tablespoon olive oil for sautéing
    • 1 medium yellow onion finely chopped
    • 3 cloves garlic minced
    • 1 can (28 oz) crushed tomatoes unsalted or low-sodium preferred
    • 4 cups chicken or vegetable broth
    • 1 cup small pasta shells uncooked
    • 1 cup mozzarella cheese shredded
    • ½ cup Parmesan cheese grated
    • 1 tablespoon basil fresh, chopped (optional)
    • to taste salt and pepper for seasoning

    Equipment

    • Large pot or Dutch oven
    • Wooden spoon or spatula

    Method
     

    1. Heat the olive oil in a large pot over medium heat, and once shimmering, add the chopped onion. Sauté, stirring frequently, until the onion becomes translucent and fragrant, about 5 minutes.
      1 tablespoon olive oil
    2. Add the minced garlic to the pot and cook for about 30 seconds until it becomes aromatic, taking care not to burn it.
      1 tablespoon olive oil
    3. Pour in the crushed tomatoes along with their juices, stirring to combine the ingredients and scrape up any bits stuck to the bottom for extra flavor.
      1 tablespoon olive oil
    4. Slowly pour in the chicken or vegetable broth, stirring well to blend everything smoothly. Bring the mixture to a gentle boil.
      1 tablespoon olive oil
    5. Add the uncooked small pasta shells to the boiling broth, stirring occasionally to prevent sticking. Reduce the heat to medium and simmer until the pasta is tender, about 10 minutes.
      1 tablespoon olive oil
    6. Stir in the shredded mozzarella and grated Parmesan cheeses, allowing them to melt into the soup for a creamy, cheesy texture.
      1 tablespoon olive oil
    7. Season the soup with salt and pepper to taste, then sprinkle with freshly chopped basil if using, and stir to combine all flavors.
      1 tablespoon olive oil
    8. Simmer the soup for another 2-3 minutes until everything is heated through and the flavors meld together beautifully.
    9. Serve hot in bowls, making sure each serving has a good mix of broth, pasta, and melted cheese for a hearty, satisfying meal.

    Notes

    You can add cooked ground beef or Italian sausage for extra protein. Leftovers keep well refrigerated for up to 3 days; reheat gently to avoid breaking down the pasta.

    Lasagna soup isn’t just a meal; it’s a quick escape to Italy’s kitchen, even on the busiest days. Its layers of flavor and texture make dinner both satisfying and surprisingly simple.

    As the season turns cooler, this dish gains even more appeal. It’s a reminder that comfort food doesn’t have to be complicated—sometimes, it just needs to be cozy and nourishing. Enjoy every spoonful of this revival of a beloved classic.

  • Monster Mash Burgers: The Spookiest Halloween Feast

    Monster Mash Burgers: The Spookiest Halloween Feast

    Halloween is the perfect excuse to turn basic burgers into creepy, crawly monsters that wow guests and kids alike. This year, I decided to add a whimsical twist by crafting burgers that look straight out of a mad scientist’s lab. Bright green buns, googly eyes made of olives, and sinister fake teeth create a chaos of color and texture that scream fun.

    But these aren’t just for silly pictures; they pack all the hearty, satisfying flavors of classic burgers with a playful, spooky makeover. It’s all about embracing chaos in the kitchen and turning simple ingredients into a haunting experience. Plus, they’re perfect for quick prep—who doesn’t love a dish that’s a little wild but still easy to assemble?

    **WHY I LOVE THIS RECIPE?**

    • The joy of transforming familiar ingredients into visually shocking creations.
    • Rekindling childhood memories of dressing up for Halloween and sneaking bites of candy.
    • The chaos—the messy green buns, the googly eyes—feels just right for a festive night.
    • Sharing these with friends sparks laughter and amazement, making the evening extra memorable.
    • It turns a boring dinner into a playful, giggly event that everyone remembers.

    AVOID MY DISASTER (You’re Welcome)

    • FORGOT to cheese the eyes, leaving them falling apart—use a dab of cream cheese instead.
    • DUMPED too much ketchup on a monster face, blurring details—stick to small dots for eyes.
    • OVER-TORCHED the buns, turning them black—set a timer and keep a close eye.
    • SKIPPED toasting the buns, making them soggy—give them a quick toast for extra crunch.

    QUICK FIXES THAT SAVE YOUR DAY

    • When eyes collapse, splash a little mayo to stabilize them—crunchy texture revives the look.
    • Patch a kneaded green bun with fresh lettuce if it chars too dark.
    • Shield melted cheese from over-browning using a foil tent—smells fresh and inviting.
    • If ketchup spills, wipe immediately to keep the chaos neat—clean counters win.
    • When bread is stale, substitute with fresh slider buns for instant freshness—crackling crust guaranteed.

    Spooky Halloween Monster Burgers

    This dish features beef patties cooked until juicy, assembled into fun monster burgers. Bright green buns made from colored bread or buns, topped with playful decorations like olive eyes and cheese teeth, create a chaotic and colorful Halloween-themed presentation. The final look is whimsical and playful, with textured, gooey, and crispy elements.
    Prep Time 15 minutes
    Cook Time 20 minutes
    Total Time 35 minutes
    Servings: 4
    Course: Main Course
    Cuisine: Halloween
    Calories: 650

    Ingredients
      

    • 1 pound ground beef preferably 80% lean
    • 4 pieces buns preferably bright green-colored
    • 4 slices cheddar cheese for teeth and eyes
    • 1 can black olives pitted and sliced for eyes
    • 2 tablespoons mayonnaise optional, for stabilization
    • to taste ketchup for monster faces
    • 1 tablespoon olive oil for greasing
    • optional colored food coloring for dying buns green

    Equipment

    • Grill or stovetop skillet
    • Cooking spatula
    • Baking sheet
    • Small spoon or piping bag
    • Knife
    • Cutting board

    Method
     

    1. Preheat your grill or skillet over medium-high heat and lightly brush with olive oil. Form the ground beef into four equal patties, about ¾-inch thick, and season with salt and pepper if desired.
    2. Place the patties on the hot grill or skillet, cooking for about 4-5 minutes per side until nicely browned and cooked through. You should see juices bubbling and the edges crisping up.
    3. While the burgers cook, prepare the green buns by adding a few drops of food coloring to the bread or bun dough, or use pre-colored buns. Toast the buns lightly in the oven or on a skillet until just golden around the edges.
    4. Once cooked, place each beef patty on a bun bottom. Top with slices of cheese cut into small shapes for teeth, and chopped olives for eyes. Use small drops of mayonnaise to stabilize the olive eyes if needed.
    5. Add ketchup in small dots or squiggles to create spooky monster faces or injuries. Cover with the top buns, pressing gently to help everything hold together.
    6. Decorate the buns with additional olive slices or cheese if desired to enhance the monstrous appearance. Serve immediately for a fun, creepy presentation that’s perfect for Halloween.

    Notes

    Use bright green food coloring for buns. For extra fun, add other decorations like lettuce or extra cheese pieces. Keep an eye on the burgers while cooking to prevent over-charring the buns.
    These monstrous burgers are more than just a visual delight; they bring a nostalgic thrill that’s perfect for Halloween parties. They turn simple ingredients into a dynamic horror show on your plate, full of textures and playful quirks. Making them is a messy, joyous event—exactly what festive chaos should be about.

    Sharing these with friends creates moments of laughter and wonder that linger long after the night ends. They remind us that good food can be as fun as it is filling. So, embrace the chaos and revel in this Halloween-themed culinary adventure—your taste buds and guests will thank you.

  • Spooky Sweetness: The Art of Halloween Jack-o’-Lantern Stuffed Peppers

    Spooky Sweetness: The Art of Halloween Jack-o’-Lantern Stuffed Peppers

    Most Halloween treats lean toward the sweet side, but I love flipping the script with savory, colorful stuffed peppers shaped like mini jack-o’-lanterns. They transform your kitchen into a haunted house, with vibrant orange peppers hollowed out and carved into cheerful or spooky faces. This not only sparks kids’ delight but also makes a stunning table centerpiece that’s edible.

    Shaping peppers to resemble tiny jack-o’-lanterns is surprisingly easy, and the sensory thrill of cutting into their smiling or grinning faces is pure joy. Filling them with seasoned rice, spiced ground meats, or even a medley of roasted vegetables turns each bite into a playful harmony of textures and flavors. It’s a Halloween project that combines creativity with comforting, hearty eating.

    Mini Jack-o’-Lantern Stuffed Peppers

    This dish features vibrant orange bell peppers carved into Halloween-themed faces, hollowed out and filled with a savory mixture of seasoned rice and ground meats. The peppers are baked until tender, producing a colorful, festive appetizer or main course with a cheerful appearance and satisfying texture.
    Prep Time 20 minutes
    Cook Time 30 minutes
    Total Time 50 minutes
    Servings: 4
    Course: Main Course
    Cuisine: American
    Calories: 250

    Ingredients
      

    • 4 large orange bell peppers preferably firm and colorful
    • 1 cup cooked rice preferably cooled
    • 0.5 pound ground meat (beef or turkey) or vegetarian alternative
    • 1 small onion finely chopped
    • 2 cloves garlic minced
    • 1 teaspoon chili powder for spicing
    • 1 tablespoon olive oil for sautéing
    • to taste salt and pepper for seasoning

    Equipment

    • Chef’s knife
    • Baking sheet
    • Spoon
    • Small paring knife
    • Mixing bowl

    Method
     

    1. Preheat your oven to 375°F (190°C). Line a baking sheet with parchment paper for easy cleanup.
    2. Using a small paring knife, carefully carve faces into each orange pepper, creating cheerful or spooky jack-o’-lantern expressions. Set aside the tops to use as lids later.
    3. Slice off the tops of the peppers and gently hollow out their insides with a spoon, removing seeds and membranes to create hollow shells that will be filled.
    4. Heat olive oil in a skillet over medium heat; add chopped onion and minced garlic, sautéing until fragrant and slightly translucent, about 3-4 minutes.
    5. Add the ground meat to the skillet, breaking it apart with a spoon, and cook until browned and cooked through, about 5-7 minutes.
    6. Stir in cooked rice, chili powder, salt, and pepper. Mix well and cook for another 2-3 minutes until heated through and flavorful.
    7. Spoon the hearty filling into each hollowed pepper, filling them generously without overflowing.
    8. Place the filled peppers on the prepared baking sheet, positioning their tops back or leaving open based on preference. Bake in the preheated oven for 20-25 minutes, until peppers are tender and slightly blistered at edges.
    9. Remove from the oven and let cool slightly before serving. The peppers will be vibrant, with carved facial expressions framing a savory filling inside.

    Notes

    For extra fun, add cheese or herbs as toppings before baking. Ensure peppers are cooked until tender for the best texture.

    In the end, these Halloween Jack-o’-Lantern Stuffed Peppers bring a fun, inviting spirit to your seasonal table. They’re perfect for casual gatherings, costumed parties, or just a fun family dinner when everything feels a little more magical. Plus, their vibrant appearance makes every bite a celebration of autumn’s bold colors and flavors.

    As the season deepens and the nights grow longer, dishes like this remind us that food can be both a playful art and a way of bringing people together. Whether you carve them on the stovetop or the cutting board, these peppers make Halloween a little brighter—and a lot tastier.

    ,

  • Spooky Sweet & Savory: Halloween Bat Wings with Soy Sauce Glaze

    Spooky Sweet & Savory: Halloween Bat Wings with Soy Sauce Glaze

    As October nights grow darker, I find myself craving more than just the usual pumpkin-flavored treats. I love turning the familiar chicken wing into something whimsical and eerie—like these Halloween Bat Wings. The glossy soy sauce glaze mimics the midnight sheen of bat wings fluttering through a moonlit sky.

    This recipe is my autumn ritual, a way to bring a bit of spooky fun to the dinner table while satisfying that salty-sweet craving that only soy sauce can fulfill. The aroma alone, a smoky, salty scent with hints of caramelized sugar, transports me right into a cozy, haunted harvest festival.

    Halloween Bat Wings

    These chicken wings are glazed with a glossy soy sauce marinade that creates a shiny, dark coating reminiscent of bat wings in flight. The wings are baked until crispy, resulting in a savory, slightly caramelized exterior with tender meat inside. Their spooky, glossy appearance makes them perfect for festive Halloween gatherings.
    Prep Time 15 minutes
    Cook Time 40 minutes
    Total Time 55 minutes
    Servings: 4
    Course: Main Course
    Cuisine: American
    Calories: 290

    Ingredients
      

    • 2 lbs chicken wings tip: drumettes and flats
    • 1/4 cup soy sauce preferably dark for color
    • 2 tablespoons honey for caramelization
    • 1 teaspoon garlic powder
    • 1 teaspoon ground ginger
    • 1/4 teaspoon black pepper
    • 1 tablespoon cooking oil for mixing glaze

    Equipment

    • Baking sheet
    • Wire rack
    • Kitchen brush

    Method
     

    1. Preheat your oven to 400°F (200°C) and line a baking sheet with foil. Place a wire rack on top to allow air circulation around the wings for even crisping.
    2. Pat the chicken wings dry with paper towels and place them in a large bowl. This helps the glaze adhere better and promotes crispiness during baking.
    3. In a small bowl, whisk together soy sauce, honey, garlic powder, ground ginger, black pepper, and cooking oil to create a smooth, dark marinade that will give the wings their signature glossy finish.
    4. Pour the glaze over the chicken wings, tossing well to coat each piece evenly. Let them marinate for at least 10 minutes to absorb the flavors.
    5. Arrange the coated wings on the wire rack, spacing them out to avoid overcrowding. This allows hot air to circulate, making the wings crispy all around.
    6. Bake the wings in the preheated oven for 35-40 minutes, turning once halfway through. You’ll notice the glaze bubbling and the wings turning a deep, caramelized brown.
    7. Once baked, remove the wings from the oven and brush them with a little extra glaze if desired for a shiny, spooky finish. Let them rest for a few minutes to set the glaze and crisp up further.
    8. Serve the Halloween Bat Wings hot, with their glossy, dark exterior resembling fluttering bat wings illuminated under moonlight.

    Notes

    You can add black sesame seeds or edible glitter for extra spooky effect before serving.
    These Halloween Bat Wings are more than just a festive appetizer—they’re a reminder of how playful cooking can be. The combination of crispy skin and tender meat coated in a savory soy glaze makes them irresistibly addictive.

    As the season deepens, I love sharing these quirky wings with friends, watching their eyes light up with surprise. It’s a small gesture, but in the chaos of fall, these bat-shaped delights bring a little magic and a lot of flavor to the plate.

  • Unconventional Cozy Twist: Taco Soup That’s Surprisingly Heartwarming

    Unconventional Cozy Twist: Taco Soup That’s Surprisingly Heartwarming

    Imagine a bowl of taco soup that combines a nostalgic roadside stand aroma with an unexpected depth of flavor. This recipe transforms common ingredients into a comforting meal that warms you from the inside out, perfect for those chilly evenings. The secret lies in a unique spice blend that elevates the usual taco fare into something truly memorable.

    Baking hours of busy weekdays into a single-pot masterpiece is a relief. This taco soup recipe is about embracing chaos in the kitchen with a smile, knowing that every spoonful is packed with personality. It’s not just a meal but a cozy throwback to simpler times, reimagined with a surprising flair.

    Taco Soup

    Taco soup is a hearty, flavorful dish made by simmering ground meat, beans, corn, and tomatoes with a blend of spices. It results in a thick, comforting soup with a slightly spicy and savory profile, topped with cheese, sour cream, or fresh herbs for added flavor.
    Prep Time 15 minutes
    Cook Time 30 minutes
    Total Time 45 minutes
    Servings: 6
    Course: Main Course
    Cuisine: Mexican
    Calories: 300

    Ingredients
      

    • 1 pound ground beef or ground turkey
    • 1 can diced tomatoes 14.5 oz can
    • 1 can black beans drained and rinsed, 15 oz can
    • 1 can corn kernels 14 oz can, drained
    • 1 cup chicken broth
    • 1 package taco seasoning 1 oz packet
    • 1 small onion finely chopped
    • 2 cloves garlic minced
    • to taste salt and pepper

    Equipment

    • Large pot or Dutch oven
    • Wooden spoon or spatula

    Method
     

    1. Heat a large pot over medium heat and add the ground meat, breaking it apart as it cooks until browned and cooked through, about 5-7 minutes.
    2. Add the chopped onion and minced garlic to the pot with the meat and cook until the onion becomes translucent and fragrant, about 3 minutes.
    3. Stir in the taco seasoning until the meat and onions are evenly coated, allowing the spices to toast slightly and release their aroma.
    4. Pour in the diced tomatoes, black beans, corn, and chicken broth, stirring everything together to combine well.
    5. Bring the mixture to a boil, then reduce the heat to low and let it simmer uncovered for about 20 minutes, allowing the flavors to meld and the soup to thicken slightly.
    6. Taste the soup and season with salt and pepper as needed, adjusting the seasoning to your preference.
    7. Serve the hot taco soup in bowls, garnished with your favorite toppings such as shredded cheese, sour cream, chopped cilantro, or sliced jalapeños.
    This taco soup has become a favorite among friends for its ability to bring comfort with a little unexpected twist. It’s perfect for casual family nights or when you want a taste of home that’s both easy and a bit daring.

    As winter’s chill settles in, a hot bowl of this soup feels like a warm embrace. Its complex aroma and hearty texture make it a brilliant choice for turning a busy day into a moment of pure satisfaction. Sometimes, the simplest dishes make the deepest memories.