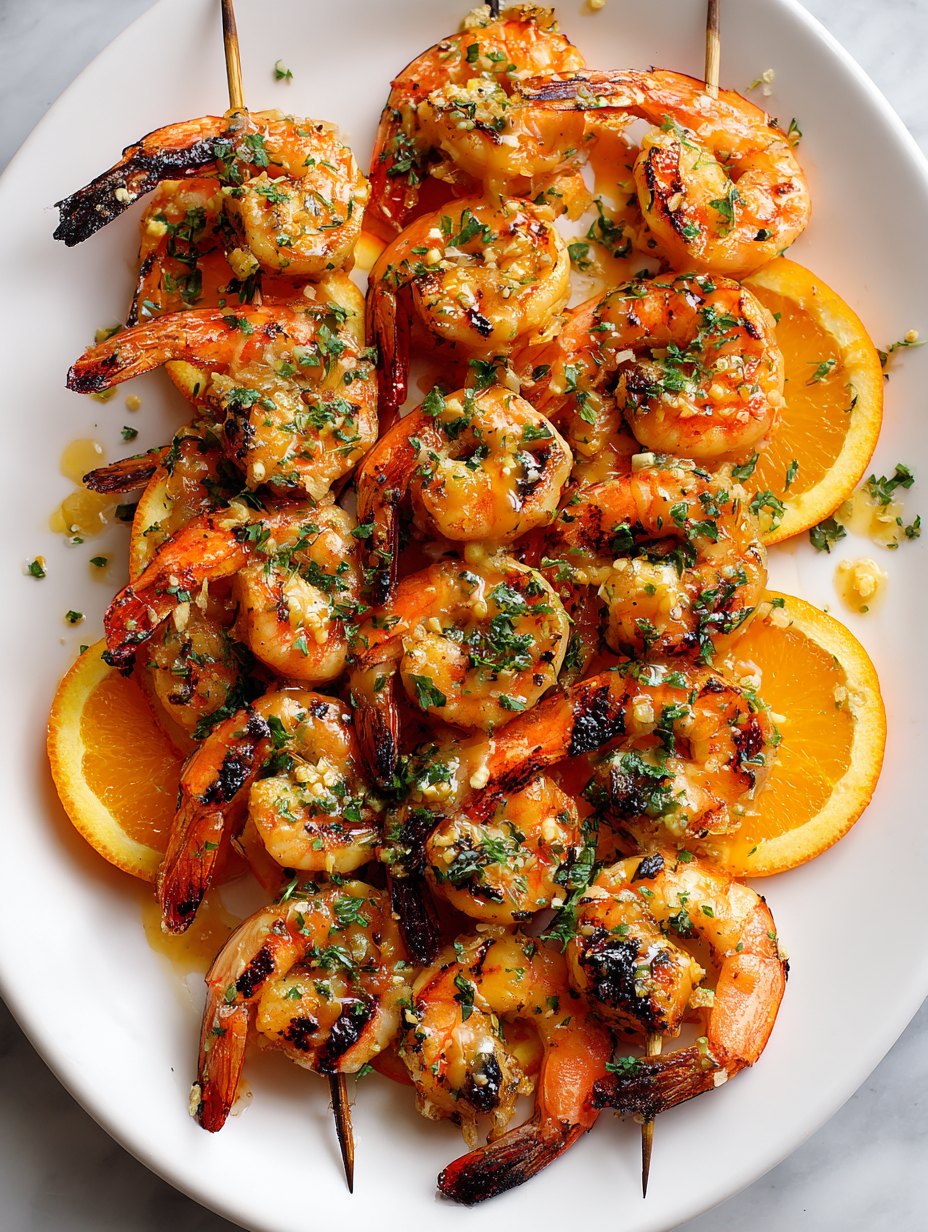
Blog

  • Sparkling Summer: The Surprising Joy of Sprite Slushies

    Sparkling Summer: The Surprising Joy of Sprite Slushies

    In the heat of summer, I stumbled upon a secret weapon against the sun’s relentless blaze: Sprite slushies. There’s something oddly satisfying about the way the cold, citrusy fizz dances on your tongue, reminding me of childhood picnics and lazy afternoons. It’s a simple treat, yet it feels like a small rebellion against the ordinary.

    This recipe lets me indulge in a bit of chaos — blending fizzy soda with ice creates a magical, frosty chaos I didn’t see coming. It’s not just a drink; it’s a moment of joy in a glass, perfect for those sweltering days when you crave something fun and refreshingly different. And the best part? It’s so simple, I almost feel guilty enjoying it.

    Sprite Slushies

    Sprite slushies are frosty beverages made by blending citrusy soda with ice until slushy and refreshing. The mixture results in a bubbly, icy texture with a bright, tangy flavor, perfect for hot summer days. The final drink is vibrant, cold, and slightly fizzy, with a granular, snow-like appearance.
    Prep Time 5 minutes
    Total Time 5 minutes
    Servings: 2
    Course: Main Course
    Cuisine: Casual
    Calories: 150

    Ingredients
      

    • 1 bottle Sprite soda chilled
    • 2 cups ice cubes

    Equipment

    • Blender
    • Measuring cups or glasses

    Method
     

    1. Pour the chilled Sprite into the blender, filling it about halfway.
    2. Add the ice cubes on top of the soda in the blender.
    3. Secure the lid and blend on high speed for about 30-45 seconds until the mixture is slushy, with tiny ice particles suspended in the bubbly liquid.
    4. Pause briefly to check the texture; it should look icy and frothy, with the soda still slightly bubbly.
    5. Pour the slushy mixture into glasses, ensuring a generous amount of ice crystals and fizz with each serve.
    6. Enjoy immediately with a straw or a spoon to savor the icy, citrusy fizz.

    Notes

    For extra flavor, add a splash of lemon or lime juice before blending.

    As summer continues to heat up, the Sprite slushie remains a favorite escape. Its vibrant bubbles and icy texture bring a nostalgic spark that’s hard to beat. Plus, it’s a quick fix for any day when you need a little extra sparkle.

    Next time the sun’s blazing and your energy is flagging, just grab a glass and stir up this cheerful, fizzy delight. It’s proof that sometimes, the simplest ingredients can turn an ordinary moment into a bright, refreshing celebration. Cheers to hot days and cool treats.

  • Beware the Sweet Poison: Halloween Toffee Apples with a Twist

    Beware the Sweet Poison: Halloween Toffee Apples with a Twist

    Halloween is the perfect backdrop for a little culinary mischief, especially when you turn classic toffee apples into a wicked treat. This year, I took a nostalgic favorite and added a sinister splash of colors and flavors that look as spooky as they taste. Its about embracing chaos in the kitchen with a dash of clever tricks.

    What makes these Poison Toffee Apples stand out is not just their vibrant, eerie appearance but how they challenge your palate with unexpected twists. The toffee coating is thick and crunchy, just the way I like it, but with a hint of chaos—a drop of green food coloring, a drizzle of dark chocolate, and a sprinkle of edible glitter. Its a visual feast as much as a flavor adventure.

    Poison Toffee Apples

    Poison Toffee Apples are a spooky Halloween treat featuring whole apples coated in thick, crunchy toffee. The apples are decorated with vibrant green food coloring, drizzled dark chocolate, and edible glitter, creating a colorful, eerie presentation with a chewy toffee exterior and glossy finish.
    Prep Time 20 minutes
    Cook Time 15 minutes
    Total Time 35 minutes
    Servings: 4
    Course: Main Course
    Cuisine: Halloween
    Calories: 250

    Ingredients
      

    • 4 large apples washed and dried
    • 200 g granulated sugar for the toffee
    • 50 g unsalted butter
    • 1 tbsp light corn syrup
    • 1 drop green food coloring to add spooky color
    • 100 g dark chocolate chips for drizzling
    • a pinch edible glitter for decoration

    Equipment

    • Saucepan
    • Wooden Spoon
    • Baking sheet
    • Parchment paper
    • Wire rack

    Method
     

    1. Insert candy sticks into the washed apples, pushing about three-quarters of the way through to create handles.
    2. Line a baking sheet with parchment paper and set a wire rack on top to cool the coated apples.
    3. Combine sugar, butter, and corn syrup in a saucepan over medium heat, stirring constantly until the mixture melts and begins to bubble.
    4. Bring the mixture to a boil, then cook for about 8-10 minutes until the toffee reaches a golden amber color and thickens slightly.
    5. Remove the toffee from heat and immediately stir in a drop of green food coloring, mixing quickly to distribute the color evenly.
    6. Dip each apple into the hot toffee, tilting the pan if needed to coat evenly, then lift and let excess drip off.
    7. Place the coated apples on the prepared wire rack and allow the toffee to set at room temperature for about 15 minutes.
    8. Melt dark chocolate chips in a microwave in short bursts until smooth, then drizzle over the set toffee apples using a fork or piping bag.
    9. Sprinkle edible glitter over the chocolate drizzle before it hardens for a spooky sparkle.
    10. Allow the chocolate and glitter to set completely, about 10-15 minutes at room temperature.
    11. Serve the Poison Toffee Apples immediately or package them for a spooky party treat.

    Notes

    Use caution when handling hot toffee to prevent burns. Adjust food coloring for different spooky effects. Store in a cool, dry place to prevent sticking.

    These Poison Toffee Apples are a vivid reminder that Halloween treats dont always have to be all about perfection. Sometimes, a little mess and a lot of imagination create the most memorable moments. Plus, they spark conversations as everyone fis curious about those strange, glowing colors.

    Whether youre handing them out to trick-or-treaters or serving as a spooky centerpiece, they add a touch of chaos and fun. The best part? You get to enjoy the playful process as much as the jaw-dropping reaction. These apples will surely become the highlight of your haunting festivities.

  • Unusual Comfort: Roasted Butternut & Carrot Soup with a Ginger Twist

    Unusual Comfort: Roasted Butternut & Carrot Soup with a Ginger Twist

    As the leaves turn crisp and the air chills, I find myself craving more than just the usual pumpkin fare. This recipe for roasted butternut squash and carrot soup offers a surprising kick of fresh ginger that elevates the humble bowl into something unexpectedly bright and invigorating. It’s a perfect example of transforming simple ingredients into a comforting yet lively dish.

    Rather than a traditional pureed soup, I love leaving some roasted chunks for texture, making each spoonful a little adventure. The roasting process caramelizes the natural sugars, filling the kitchen with a sweet, nutty aroma that’s impossible to resist. Plus, this soup works beautifully for early fall dinners or midweek cozy suppers when spare ingredients meet creative spirit.

    Roasted Butternut Squash and Carrot Soup with Ginger

    This soup combines roasted butternut squash and carrots with fresh ginger to create a vibrant, textured dish. The roasting process caramelizes the vegetables, while the soup features some chunks remaining for added texture, resulting in a cozy yet lively presentation.
    Prep Time 15 minutes
    Cook Time 40 minutes
    Total Time 55 minutes
    Servings: 4
    Course: Main Course
    Cuisine: Comfort Food
    Calories: 150

    Ingredients
      

    • 1 pound butternut squash, peeled and cubed about 1-inch pieces
    • 2 large carrots, peeled and sliced
    • 2 thumb-sized fresh ginger, grated about 2 teaspoons
    • 2 tablespoons olive oil
    • 4 cups vegetable broth
    • to taste Salt and pepper for seasoning

    Equipment

    • Baking sheet
    • Blender or Immersion Blender
    • Cooking pot

    Method
     

    1. Preheat your oven to 400°F (200°C). Spread the cubed butternut squash and sliced carrots evenly on a baking sheet. Drizzle with olive oil and toss to coat.
    2. Roast the vegetables in the oven for about 25-30 minutes, or until they are golden brown and tender when pierced with a fork.
    3. Remove the roasted vegetables from the oven and allow them to cool slightly for a few minutes.
    4. Add the roasted vegetables, grated ginger, and vegetable broth to a large pot. Bring the mixture to a gentle simmer over medium heat.
    5. Ladle the hot mixture into a blender or use an immersion blender to blend until mostly smooth, leaving some chunks for texture if desired.
    6. Return the blended soup to the pot and heat gently. Season with salt and pepper to taste. Adjust the consistency with additional broth if needed.
    7. Ladle the hot soup into bowls, allowing some chunks of roasted vegetables to remain visible for texture and visual appeal.
    8. Enjoy your warm, vibrant bowl of roasted butternut squash and carrot soup topped with a sprinkle of fresh herbs or a drizzle of olive oil if desired.
    This soup isn’t just a meal; it’s a small celebration of seasonal produce combined with a touch of culinary surprises. Whether you serve it as a starter or a light main, the balance of sweetness, earthiness, and zing keeps everyone eager for more.

    the next time you need a comforting bowl with a twist, this roasted butternut and carrot soup won’t let you down. Its versatility makes it perfect for both casual lunches and holiday gatherings, where a little extra warmth and flavor are always welcomed.

  • Autumnal Pumpkin Chili: The Cozy Slow Cooker Innovation

    Autumnal Pumpkin Chili: The Cozy Slow Cooker Innovation

    As the leaves turn and there’s a chill in the air, I crave something that wraps me in warmth and nostalgia. This Slow Cooker Fall Chili with Pumpkin sparks a new love for seasonal ingredients, transforming a classic into a cozy masterpiece that simmers all day. It’s surprisingly simple to throw together and feels like a warm hug in every bite.

    The scent of spices blending with roasted pumpkin is enough to make anyone pause and start dreaming of sweater weather. I’ve discovered that adding pumpkin not only enhances flavor but also ensures each spoonful feels comforting and hearty without being heavy. It’s perfect for those busy autumn days when you want incredible flavor without the fuss.

    Slow Cooker Fall Chili with Pumpkin

    This hearty chili combines ground meat, beans, and roasted pumpkin with warming spices, simmered slowly to develop deep flavors. The final dish has a thick, comforting texture with a vibrant orange color and fragrant aroma of fall spices and pumpkin.
    Prep Time 15 minutes
    Cook Time 6 minutes
    Total Time 6 minutes
    Servings: 4
    Course: Main Course
    Cuisine: American
    Calories: 350

    Ingredients
      

    • 1 pound ground turkey or beef or your preferred ground meat
    • 1 medium onion diced
    • 3 cloves garlic minced
    • 1 cup roasted pumpkin pureed or finely chopped
    • 1 can kidney beans drained and rinsed
    • 1 can diced tomatoes with juice
    • 2 tablespoons chili powder
    • 1 teaspoon ground cumin
    • 0.5 teaspoon cayenne pepper optional, for heat
    • 1 cup vegetable or chicken broth
    • 2 tablespoons olive oil

    Equipment

    • Slow Cooker
    • Chef’s knife
    • Cutting board
    • Large Skillet
    • Wooden Spoon

    Method
     

    1. Heat olive oil in a large skillet over medium heat and add diced onion. Sauté until translucent and fragrant, about 5 minutes, stirring occasionally.
      1 pound ground turkey or beef
    2. Add minced garlic to the skillet and cook for about 30 seconds until fragrant, stirring constantly to prevent burning.
      1 pound ground turkey or beef
    3. Turn up the heat slightly and add ground meat to the skillet, breaking it apart with a wooden spoon. Cook until browned and cooked through, about 8 minutes.
      1 pound ground turkey or beef
    4. Transfer the cooked meat mixture to the slow cooker, then add the roasted pumpkin, diced tomatoes with juice, drained beans, chili powder, cumin, and cayenne pepper.
      1 pound ground turkey or beef
    5. Pour in the vegetable or chicken broth to help create a flavorful, simmering base, then stir everything together well.
      1 pound ground turkey or beef
    6. Set the slow cooker to low and cook uncovered for 6 hours, stirring occasionally. The chili will thicken and the flavors will meld beautifully.
    7. Once the cooking time completes, give the chili a good stir, check the seasoning, and adjust salt or spices if needed. It should be rich, thick, and fragrant, with a vibrant orange hue from the pumpkin.
    There’s something about the way this chili fills the kitchen with a sweet, smoky aroma that reminds me of steamy afternoons at fall fairs. It’s a rustic dish that brings a sense of celebration to any table, especially during cozy gatherings. Plus, it’s endlessly adaptable—change the beans, adjust the spice, or top with crunchy cornbread for new adventures in each batch.

    Making this recipe is a small ritual that honors the fleeting beauty of fall. It captures the essence of season—earthy, spicy, and sweet—while offering comfort that lasts through the coldest nights. This dish isn’t just food; it’s an invitation to slow down and savor the little moments of autumn.

  • Unconventional Rum Slushie: A Journey Through Flavor and Nostalgia

    Unconventional Rum Slushie: A Journey Through Flavor and Nostalgia

    Imagine a frozen delight that captures the spirit of summer with a twist of unexpected ingredients. Rum slushies are usually straightforward, but I love to add a dash of lime and a splash of coconut for a tropical punch that transports you to a beachside cabana. This recipe isn’t just about chilling; it’s about awakening your senses with every sip.

    What makes this slushie stand out is its ability to adapt. Want a deeper flavor? Toss in some pineapple chunks. Craving a bit of spice? A pinch of ginger makes the experience more complex. These variations turn a simple frozen drink into a personal adventure in a glass.

    Tropical Rum Slushie

    A frozen cocktail that combines rum, lime juice, and coconut milk blended into a smooth, icy slush. The final texture is creamy and punchy, perfect for hot days, with optional additions like pineapple or ginger for personalized flavor variations.
    Prep Time 10 minutes
    Total Time 10 minutes
    Servings: 4
    Course: Main Course
    Cuisine: Tropical
    Calories: 180

    Ingredients
      

    • 1 ½ cups rum light or coconut-flavored rum recommended
    • 1 cup lime juice freshly squeezed preferred
    • 1 cup coconut milk full fat for creaminess
    • 2 cups ice cubes roughly chopped
    • ½ cup pineapple chunks optional, for added sweetness
    • 1 teaspoon fresh ginger grated, optional for spice

    Equipment

    • Blender
    • Measuring cups and spoons

    Method
     

    1. Add the rum, lime juice, coconut milk, and ice cubes to the blender. If using pineapple or ginger, include them now.
    2. Pulse the blender on high speed until the mixture becomes smooth and slushy, with no large ice pieces remaining. This should take about 30-40 seconds and fill the blender with a frosty, creamy texture.
    3. Check the consistency; if it’s too thick, add a splash more lime juice or rum and blend again briefly. If too thin, add a few more ice cubes and blend until desired texture is achieved.
    4. Pour the slushie into chilled glasses, allowing the mixture to mound slightly over the rims for visual appeal.
    5. Garnish with a slice of lime or a sprig of mint if desired for a fresh, colorful touch.
    6. Serve immediately with a straw and enjoy the icy tropical refreshment.

    Notes

    For an alcohol-free version, substitute rum with pineapple juice.

    This rum slushie is perfect for hot afternoons when you need a quick escape without leaving your backyard. It’s simple to make and even more rewarding to sip while listening to the hum of summer life. As the ice crystals melt in your mouth, you’ll find a little piece of paradise.

    Mixing nostalgia with a dash of chaos, this drink brings friends together and sparks spontaneous laughter. It’s a reminder that the best moments often come from unexpected combinations, chilled to perfection and enjoyed in good company.

  • Chill Out with an Unexpected Cherry Slushie Twist

    Chill Out with an Unexpected Cherry Slushie Twist

    Imagine turning the vibrant burst of summer cherries into a refreshing, icy treat that tastes like childhood memories and backyard picnics. This cherry slushie isn’t just a simple drink; it’s a celebration of seasonal fruit, blended with a hint of ginger and a splash of citrus to keep things interesting. Perfect for sweltering afternoons or when you need a quick cool-down from life’s chaos.

    This recipe is all about embracing the unexpected. I combine fresh cherries with a touch of vanilla and a dash of soda for a fizzy surprise, transforming ordinary berry goodness into a sparkling spectacle. It’s like biting into a cherry flown straight from the hand of a fruit fairy, frozen in time, ready to refresh and energize.

    Cherry Ginger Slushie

    This cherry ginger slushie is a frozen, icy beverage made by blending fresh cherries with ginger, citrus, and a splash of vanilla soda. The mixture results in a vibrant, smooth-textured drink with a hint of spice and effervescence, perfect for hot weather. Its bright flavor and colorful appearance make it a refreshing treat for summer days.
    Prep Time 10 minutes
    Total Time 10 minutes
    Servings: 2
    Course: Main Course
    Cuisine: Fusion
    Calories: 120

    Ingredients
      

    • 2 cups fresh cherries, pitted preferably ripe and juicy
    • 1 inch fresh ginger, sliced peeled and sliced thin
    • 1 orange citrus juice freshly squeezed, about 1/4 cup
    • 1 tbsp honey or maple syrup optional, for sweetness
    • 1 cup vanilla soda chilled

    Equipment

    • Blender
    • Measuring cups and spoons
    • Knife
    • Cutting board

    Method
     

    1. Rinse and pit the cherries, then measure out about 2 cups and place them in the blender.
    2. Add sliced ginger to the cherries in the blender for a bright, spicy aroma.
    3. Squeeze fresh citrus juice over the mixture, about a quarter cup, to add tang and enhance flavor.
    4. If desired, drizzle honey or maple syrup into the blender for extra sweetness, then blend until the cherries and ginger are well chopped.
    5. Secure the lid and blend everything on high until the mixture is smooth and frosty, about 30-45 seconds; it should be vibrant red with a icy texture.
    6. Pour the cherry-ginger mixture into glasses until they are about three-quarters full.
    7. Slowly pour chilled vanilla soda into each glass, allowing the fizzy bubbles to rise and create a sparkling layer on top.
    8. Gently stir the slushie to combine the icy base with the fizzy soda, resulting in a cool and effervescent drink.
    9. Garnish with a fresh cherry or a thin slice of ginger if desired for an appealing presentation.
    10. Serve immediately with a straw and enjoy this refreshing, icy cherry ginger treat.

    Notes

    For an extra icy texture, blend the mixture with ice cubes or freeze some of the blend prior to serving.
    These cherry slushies are more than just a cooling dessert; they’re a versatile crowd-pleaser for summer parties or a solo retreat in the heat. The bright, punchy flavor brings a splash of nostalgia while fitting perfectly into current hot-weather trends.

    Making this slushie is a quick escape, a reminder that simple ingredients can deliver big joy. Every sip offers a crisp echo of summer’s best days, capturing that perfect balance of sweet, tart, and icy coldness.

  • Spooky Elegance: Crafting Ghostly Halloween Graveyard Pudding Cups

    Spooky Elegance: Crafting Ghostly Halloween Graveyard Pudding Cups

    As October leaves crunch underfoot, I find joy in transforming simple treats into haunted tales. Today, I invite you to step into a world of edible eeriness with my Halloween Graveyard Pudding Cups. These little cups of chaos blend creamy textures with creepy toppings for a dessert that’s genuinely eye-catching.

    Creating a spooky scene in a small cup is a playful challenge that awakens my inner artist. The rich chocolate pudding, stone-like cookies, and creepy garnishes turn an ordinary snack into a display of festive fun. Plus, it’s a perfect project for both kids and adults eager to add a dash of spooky imagination to their table.

    **WHY I LOVE THIS RECIPE?**

    Halloween Graveyard Pudding Cups

    Halloween Graveyard Pudding Cups are individual servings featuring creamy chocolate pudding layered with crushed cookies resembling dirt, topped with spooky decorations like gummy worms and cookie tombstones. The dish combines smooth textures with creepy, crunchy toppings to create a fun and festive dessert that evokes a haunted graveyard scene.
    Prep Time 20 minutes
    Total Time 20 minutes
    Servings: 6
    Course: Main Course
    Cuisine: Halloween
    Calories: 250

    Ingredients
      

    • 2 cups milk for pudding
    • 1 box chocolate pudding mix
    • 1 cup water
    • 1 cup crushed chocolate cookies for dirt layer, plus some extra for garnish
    • 6 gummy worms gummy worms for creepy crawlies
    • 6 small cookie tombstones small cookies shaped or decorated as tombstones

    Equipment

    • Mixing bowls
    • Whisk
    • Serving cups or small jars
    • Spoon
    • Food processor or plastic bag and rolling pin
    • Gummy worms and cookies for decorations

    Method
     

    1. Pour the milk into a mixing bowl and whisk in the chocolate pudding mix until well combined and smooth, about 2 minutes.
    2. Allow the pudding to set in the refrigerator for about 5 minutes while you prepare the toppings.
    3. Crush the chocolate cookies into coarse crumbs using a food processor or by placing them in a plastic bag and gently crushing with a rolling pin.
    4. Spoon a layer of the crushed cookies into the bottom of each serving cup to resemble dirt.
    5. Top each cookie layer with a generous layer of the prepared chocolate pudding, smoothing the surface with the back of a spoon.
    6. Sprinkle additional cookie crumbs on top of the pudding to enhance the dirt effect and add some crunch.
    7. Decorate each pudding cup with gummy worms, arranging them so they look like creepy crawlies burrowing into the dirt.
    8. Place small cookie tombstones into the pudding, standing upright to resemble grave markers.
    9. Optionally, sprinkle some extra crushed cookies on top for a more textured, dirt-like appearance.
    10. Serve immediately or chill briefly to allow flavors to meld. Enjoy these spooky, fun dessert cups that look like a haunted graveyard!
    This Halloween dessert isn’t just about looks; it’s a nostalgic nod to childhood fun with a gourmet twist. The smell of melting chocolate and crushed cookies fills my kitchen with cozy chaos, making it the perfect centerpiece for a spooky gathering.

    As the night falls, these graveyard cups become more than just a treat—they become part of the story. The mix of textures, the playful decor, and the sight of little hands reaching for seconds remind me why I love Halloween so much. It’s all about creating moments of joy and a little bit of spooky magic.

  • Chill Out with a Refreshing Iced Tea Slushie: The Joy of Frozen Tea Moments

    Chill Out with a Refreshing Iced Tea Slushie: The Joy of Frozen Tea Moments

    Imagine a scorching summer day when the heat is relentless and all you crave is something cool and revitalizing. An iced tea slushie is not just a drink; it’s an instant escape, swirling with layered flavors and icy textures that cool your senses. This recipe transforms a simple iced tea into a frosty delight, perfect for those moments when only something extraordinary will do.

    What makes this slushie stand out is the nostalgic connection to childhood summers, blended with a modern twist of bold tea flavors. The secret lies in its icy crunch that makes every sip a miniature adventure. It’s a surprisingly simple treat that elevates your usual iced tea into a vivid, frosty feast for your taste buds.

    Iced Tea Slushie

    This iced tea slushie combines brewed black tea with sweetener and ice, then blends until smooth and frosty. The final texture is a thick, icy consistency with vibrant layered flavors, making it a refreshing summer treat.
    Prep Time 10 minutes
    Cook Time 5 minutes
    Total Time 15 minutes
    Servings: 2
    Course: Main Course
    Cuisine: American
    Calories: 50

    Ingredients
      

    • 2 cups brewed black tea cooled to room temperature
    • 2 tablespoons sugar or honey adjust to taste
    • 2 cups ice cubes or crushed ice

    Equipment

    • Kettle or pot for boiling
    • Blender
    • Measuring cups and spoons
    • Glass or serving cups

    Method
     

    1. Brew a strong batch of black tea and let it cool completely to avoid melting the ice too quickly.
    2. Pour the cooled tea into a blender and add sweetener, like sugar or honey, adjusting to your desired level of sweetness.
    3. Add the ice cubes to the blender, filling it up to about three-quarters full to ensure a thick, icy texture.
    4. Blend the mixture on high speed until the ice is fully crushed and the texture is smooth and frosty, about 30-60 seconds.
    5. Pause briefly to check the consistency—if it’s too thick, add a splash more tea and blend again; if too thin, add extra ice and blend briefly.
    6. Pour the vibrant, icy slushie into glasses and garnish with a slice of lemon or fresh mint if desired for extra visual appeal.
    As the days grow warmer and the sun blazes higher, a chilled, flavorful slushie can be a lifesaver. It’s easy to customize with your favorite tea and sweetener, making each batch unique and perfectly tailored to your mood.

    This frozen beverage isn’t just delicious; it’s a little ritual that cools down both your body and mind. With just a few quick steps, you can create a sensory experience that refreshes and delights, turning ordinary afternoons into extraordinary moments of cool bliss.

  • Unconventional Warmth: The Secret Ingredient in My Best Chili

    Unconventional Warmth: The Secret Ingredient in My Best Chili

    Cooking chili often feels like a quest for comfort, but I love sneaking a splash of unexpected ingredients into my pot. This makes it stand out in a sea of beef and beans, giving it a personal touch. It’s not just a meal, it’s a memory in the making.

    Recently, I discovered that adding a dash of cinnamon before simmering brings a subtle warmth and a hint of something mysterious. It’s a flavor twist that surprises both my family and me every time. This chili feels like a cozy blanket with a spicy twist that awakens all your senses.

    WHY I LOVE THIS RECIPE?

    • I love the cozy chaos of browning meat while spices crackle sweetly in the pan.
    • The way the aroma slowly fills the kitchen, promising comfort and adventure alike.
    • This recipe connects me to the fall season, when flavors feel warmer and more nostalgic.
    • It’s a forgiving, adaptable process—perfect for improvising with whatever’s in the pantry.
    • Every spoonful tastes like a secret I’m dying to share with friends.

    Spiced Beef Chili with Cinnamon

    This chili is prepared by browning ground beef with aromatic spices and a dash of cinnamon, then simmering with beans, tomatoes, and vegetables until flavors meld. The dish develops a thick, hearty consistency with a rich, inviting aroma and a slightly spicy, warm flavor profile.
    Prep Time 15 minutes
    Cook Time 45 minutes
    Total Time 1 hour
    Servings: 4
    Course: Main Course
    Cuisine: American
    Calories: 350

    Ingredients
      

    • 1 lb ground beef preferably lean
    • 1 medium onion finely chopped
    • 2 cloves garlic minced
    • 1 can (14 oz) diced tomatoes
    • 1 can (15 oz) kidney beans drained and rinsed
    • 2 tbsp chili powder
    • 1/2 tsp cinnamon ground
    • 1 bell pepper red bell pepper deseeded and chopped
    • 1 cup vegetable broth
    • 2 tbsp oil vegetable oil

    Equipment

    • Large skillet or Dutch oven
    • Wooden spoon or spatula
    • Chopping knife
    • Cutting board
    • Measuring spoons

    Method
     

    1. Heat the vegetable oil in a large skillet or Dutch oven over medium heat until shimmering.
    2. Add the chopped onion and sauté, stirring occasionally, until it becomes translucent and fragrant—about 3-4 minutes.
    3. Stir in the minced garlic and cook for another minute until the garlic is fragrant, just starting to turn golden.
    4. Add the ground beef, breaking it apart with a spatula, and cook until browned all over, about 5-7 minutes. Drain excess fat if necessary.
    5. Mix in the chopped red bell pepper, stirring for a couple of minutes until slightly softened.
    6. Sprinkle in the chili powder and ground cinnamon, stirring well to evenly coat the meat and vegetables, releasing fragrant spices.
    7. Pour in the diced tomatoes and vegetable broth, stirring to combine all ingredients smoothly.
    8. Bring the mixture to a gentle simmer, then reduce the heat to low and cover the pan loosely.
    9. Let the chili simmer uncovered for about 30 minutes, stirring occasionally until it thickens and the flavors deepen.
    10. Stir in the drained kidney beans and cook for another 5 minutes to heat through.
    11. Taste the chili and adjust seasonings as desired, adding more salt or spice if necessary.
    12. Serve hot, garnished with your favorite toppings, and enjoy the cozy, spicy warmth of this cinnamon-infused chili.

    Notes

    You can customize this chili by adding other vegetables or adjusting the spice levels to your preference. Let the chili rest for a few minutes after cooking for the flavors to meld fully.

    This chili recipe isn’t just food; it’s a small rebellion against the ordinary. It’s perfect for chilly evenings or when you just need a bit of soul food on tap. The combination of smoky, spicy, and unexpected hints makes it ideal for sharing—or savoring alone as a quiet victory.

    Cooking this dish reminds me that a little creativity can turn everyday ingredients into something memorable. It’s a reminder that even simple meals can carry a story, a twist, and a little bit of magic. I hope you rediscover the joy of improvising in the kitchen with every spoonful.

  • Spooky Sophistication: The Haunted Spider Web Cake

    Spooky Sophistication: The Haunted Spider Web Cake

    Every October, I find myself craving a dessert that’s as visually arresting as it is delicious. The Halloween Spider Web Cake hits that sweet spot, with its intricate web design that makes it look like a spooky masterpiece. But beneath the cobwebs lies a moist, rich cake that surprises you with its depth of flavor.

    What excites me most about this recipe is how easily it transforms a simple chocolate or vanilla cake into a Halloween spectacle. It’s a chance to unleash your inner artist while filling your home with the warm aroma of baked goodness. Plus, it’s a fun project, perfect for both chaos and celebration in equal measure.

    WHY I LOVE THIS RECIPE?

    • The web pattern is so much fun to create—like making edible art
    • The contrasts of dark chocolate and sweet frosting make every bite a delight
    • It’s nostalgic—reminds me of childhood costumes and candy hunts
    • The endless decorating options keep it playful and unique each time

    AVOID MY DISASTER (You’re Welcome)

    • FORGOT to let the frosting set before dragging the spider web—ended up smudging everything. Chill and reapply.
    • DUMPED hot frosting on the cake—burned some frosting flavor and made the web soggy. Cool it first.
    • OVER-TORCHED the chocolate web—smelled burnt, but a quick scrape saved the design. Lower the heat next time.
    • MISSED a spot on the web pattern—looked weird but was easily fixed with an extra piping detail and a smile.

    QUICK FIXES THAT SAVE YOUR DAY

    • When frosting cracks, gently warm it and remix for a smooth finish.
    • Patch web tears with a dab of melted chocolate for seamless details.
    • Shield the cake from drafts—they can cause uneven frosting crusts.
    • When web sugar melts, cool quickly with a fan for crisp lines.
    • Splash on sprinkles or edible glitter to hide any flaws—shimmer always distracts.

    Halloween Spider Web Cake

    This cake features a moist, rich chocolate or vanilla base decorated with an intricate spider web pattern made from melted chocolate or icing. The final appearance is a striking, spooky design with a smooth, tender crumb and a glossy web topping that creates a festive Halloween centerpiece.
    Prep Time 30 minutes
    Cook Time 35 minutes
    Total Time 1 hour 5 minutes
    Servings: 8
    Course: Main Course
    Cuisine: American
    Calories: 420

    Ingredients
      

    • 2 cups all-purpose flour for cake batter
    • 1 1/2 cups granulated sugar sweetness and structure
    • 1/2 cup unsweetened cocoa powder for chocolate flavor
    • 1 cup buttermilk moisture and tang
    • 1/2 cup vegetable oil moisture and richness
    • 3 large eggs for structure and binding
    • 2 teaspoons vanilla extract flavor enhancer
    • 1 1/2 cups powdered sugar for frosting
    • 1/2 cup unsalted butter for frosting
    • 2 cups confectioners’ icing to create web design
    • 1/2 cup dark chocolate or black icing for web pattern

    Equipment

    • Mixing bowls
    • Cake pans
    • Offset spatula
    • Piping bag
    • Baking sheet
    • Cooling rack
    • Chocolate melting pot or microwave
    • Small piping tips

    Method
     

    1. Preheat your oven to 350°F (175°C). Grease two 8-inch cake pans and line the bottoms with parchment paper for easy removal.
    2. In a large mixing bowl, whisk together the flour, cocoa powder, and sugar until well combined and slightly aerated.
    3. Add the eggs, buttermilk, vegetable oil, and vanilla extract to the dry mixture. Mix on medium speed until the batter is smooth, thick, and evenly combined, about 2-3 minutes. The batter should be pourable but not runny.
    4. Divide the batter evenly between the prepared cake pans. Smooth the tops with an offset spatula to ensure even layers.
    5. Bake in the preheated oven for 30-35 minutes, or until a toothpick inserted into the center comes out clean. The cake should spring back when lightly pressed.
    6. Remove the cakes from the oven and let them cool in the pans for 10 minutes. Then, transfer them to a cooling rack and let them cool completely before frosting.
    7. In a mixing bowl, beat the softened butter until creamy. Gradually add the powdered sugar and confectioners’ icing, beating until smooth and fluffy. This creates a stable frosting suitable for decorating.
    8. Once the cakes are completely cooled, spread a layer of frosting on top of one cake layer. Place the second cake on top and apply a thin crumb coat around the entire cake. Chill for 20 minutes to set.
    9. Spread a smooth, even layer of frosting over the chilled cake, creating a clean surface for decorating. Chill again for 10 minutes to firm up the frosting.
    10. In a melting pot or microwave, melt the dark chocolate or black icing until smooth and glossy. Let it cool slightly so it thickens to piping consistency.
    11. Fill a piping bag fitted with a small tip with the melted chocolate and carefully pipe concentric circles and radial lines across the top of the cake to form the web pattern. Use a small spatula or toothpick to straighten and perfect the web.
    12. Refrigerate the decorated cake for at least 30 minutes to allow the web design to set and firm up.
    13. Slice and serve this spooky, web-embellished cake to enjoy the moist crumb contrasted with the glossy web pattern. Perfect for Halloween festivities!

    Notes

    For a more dramatic web, use a fine piping tip and take your time to trace the web pattern carefully. Chill the decorated cake to help set the web. Feel free to dust the web with edible glitter for extra sparkle.

    This Spider Web Cake captures the spirit of Halloween with its spooky design and festive flavors. It’s more than a dessert; it’s a conversation starter, a visual delight, and a chance to get creative in the kitchen during this haunting season.

    As the days grow shorter and the nights colder, this cake brings a sense of fun and nostalgia to my table. Sharing it with friends or family turns a simple gathering into a memorable celebration of all things spooky and sweet. Baking it becomes a ritual that makes October feel even more magical.